close
The Stripe payment gateway provides an easy and powerful way to accept credit cards directly on the web application. Stripe makes integrating the checkout system and collecting payment on the website easy. The Stripe API is a powerful solution to integrate the checkout system into the web application to provide a smooth payment experience.
If you want to accept credit card payments on your website, Stripe will be the best option for that. You can easily integrate the checkout system into your PHP-based website, which allows the user to make payments through credit or debit cards without leaving your website. This tutorial will show you how to integrate the Stripe payment gateway in PHP for collecting payments online using credit or debit cards.
This Stripe Payment Gateway Integration in PHP tutorial will guide you through the process of integrating the Stripe payment gateway in PHP to accept credit card payments on your website. The example code uses the Stripe PHP library to create a charge and make payment with a credit/debit card and other payment methods. The 3D Secure authentication is integrated to make this Stripe integration script ready for SCA (Strong Customer Authentication).
In the example script, we will implement the following functionality to demonstrate the Stripe payment gateway integration process.
To integrate the Stripe payment gateway in PHP, you need to create a Stripe account and get the API keys (Publishable key and Secret key) from your Stripe account. You can create a Stripe account for free and get the API keys from the Developers » API keys section of your Stripe dashboard.
LIVE API Keys
TEST API Keys
Before going live, you can use the test API keys to test the payment process. The test API keys are used to simulate the payment process without charging any real money. You can use the test card numbers provided by Stripe to test the payment process.
Do the following to get the test API keys:
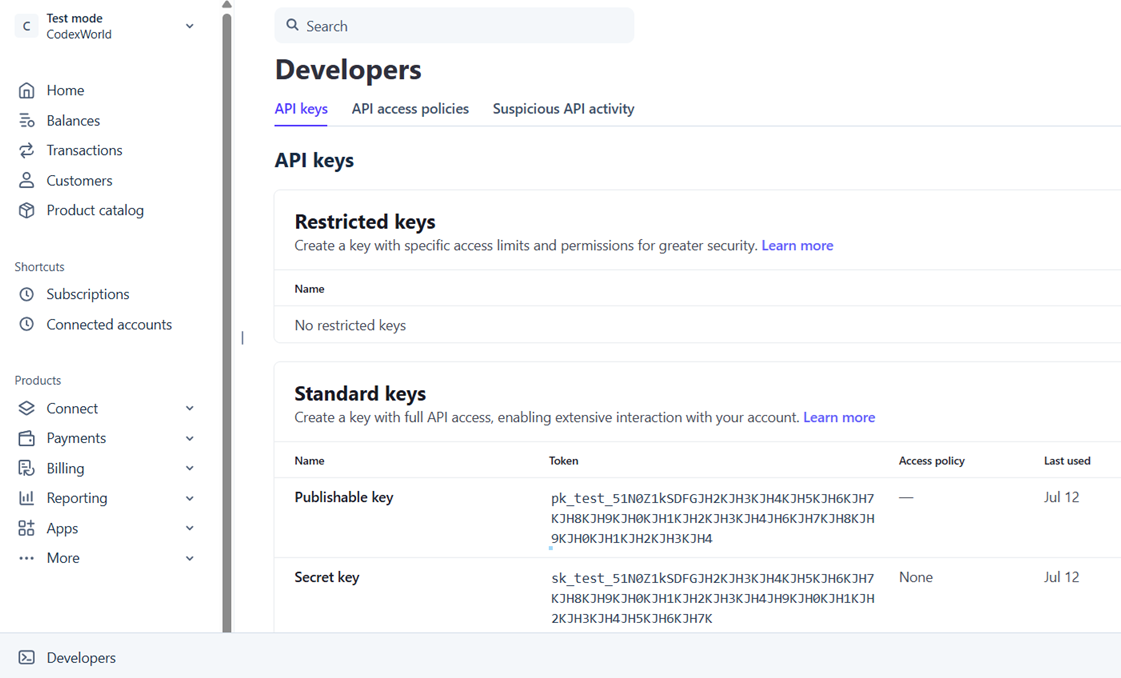
Note: The Publishable key is used in the client-side code (JavaScript) to create payment elements and the Secret key is used in the server-side code (PHP) to create a PaymentIntent and charge the card. Make sure to keep your Secret key secure and do not expose it in the client-side code.
Before getting started to integrate Stripe payment gateway in PHP, take a look at the file structure for this tutorial:
stripe_integration_in_php/
├── config.php
├── index.php
├── payment_init.php
├── payment-status.php
├── stripe-php/
├── js/
|    └── checkout.js
└── css/
    └── style.css
Let’s take a look at the purpose of each file in the folder structure:
checkout.js) to handle the Stripe checkout process.style.css) to style the HTML form and payment status page.Lets’s get started with the Stripe Payment Gateway Integration in PHP (Payment Intents API) and accept credit card payments on your website.
To integrate the Stripe payment gateway in PHP, you need to download the Stripe PHP library. You can download the latest version of the Stripe PHP library from the GitHub repository or install it via Composer:
composer require stripe/stripe-php
Note: All the required library files are already included in our ready-to-download source code ZIP package. You don’t need to download or install it separately.
To store the payment transaction details, you need to create a database and a table in your MySQL database. First, create a database (e.g., checkout_db) and run the following SQL query (in phpMyAdmin or any MySQL client) to create a table (e.g., payments) to store the payment transaction details.
CREATE TABLE `payments` (
  `id` int(11) NOT NULL AUTO_INCREMENT,
  `product` varchar(255) DEFAULT NULL,
  `customer_name` varchar(50) DEFAULT NULL,
  `customer_email` varchar(50) DEFAULT NULL,
  `amount` float(10,2) NOT NULL,
  `currency` varchar(10) NOT NULL,
  `payment_intent_id` varchar(100) DEFAULT NULL,
  `status` varchar(50) NOT NULL,
  `created_at` datetime DEFAULT current_timestamp(),
  PRIMARY KEY (`id`)
) ENGINE=InnoDB DEFAULT CHARSET=utf8mb4;
Create a config.php file to store the configuration settings for the Stripe API keys and database connection. The following code includes the necessary configuration settings for the Stripe payment gateway integration in PHP.
PRODUCT_NAME, PRODUCT_PRICE, and CURRENCY constants to store the product details.STRIPE_PUBLISHABLE_KEY and STRIPE_SECRET_KEY constants to store the Stripe API keys.getDbConnection() to establish a connection to the MySQL database using the defined settings.<?php
/*
* Product details
* Amount in USD (Minimum amount is $0.50 US)
*/
define('PRODUCT_NAME', 'Premium Course Access');
define('PRODUCT_DESCRIPTION', 'Unlock a full month of premium learning content.');
define('PRODUCT_AMOUNT', 49);
define('PRODUCT_CURRENCY', 'usd');
/*
* Stripe API keys
* Remember to switch to your live publishable and secret key in production!
* See your keys here: https://dashboard.stripe.com/account/apikeys
*/
define('STRIPE_PUBLISHABLE_KEY', 'pk_test_your_stripe_publishable_key');
define('STRIPE_SECRET_KEY', 'sk_test_your_stripe_secret_key');
// Database credentials
define('DB_HOST', 'localhost');
define('DB_USERNAME', 'root');
define('DB_PASSWORD', '');
define('DB_NAME', 'checkout_db');
// Helper function to create database connection
function getDbConnection(): mysqli
{
static $connection = null;
if ($connection instanceof mysqli) {
return $connection;
}
mysqli_report(MYSQLI_REPORT_ERROR | MYSQLI_REPORT_STRICT);
$connection = new mysqli(DB_HOST, DB_USERNAME, DB_PASSWORD);
$connection->set_charset('utf8mb4');
$connection->query('CREATE DATABASE IF NOT EXISTS `' . DB_NAME . '`');
$connection->select_db(DB_NAME);
return $connection;
}
?>
Note: Make sure to replace the placeholder values of STRIPE_PUBLISHABLE_KEY and STRIPE_SECRET_KEY with your actual Stripe API keys, which you obtained from your Stripe account earlier (Developers > API keys).
Create an index.php file to display the product details and payment form to the user. The following code includes the necessary HTML structure and JavaScript to handle the Stripe checkout process.
Configuration File: Include the config.php file to access the configuration settings.
<?php require_once __DIR__ . '/config.php'; ?>
Stripe JS Library: Include the Stripe.js library to handle the Stripe checkout process using JavaScript. The Stripe.js library is loaded from the Stripe CDN and is required to create payment elements and handle the payment process securely (sending the sensitive information to Stripe directly from the browser).
<script src="https://js.stripe.com/dahlia/stripe.js"></script>
Checkout JS Script: Include the checkout.js script to handle the checkout process with Stripe API using JavaScript. The checkout.js script is loaded from the js/ folder and contains the JavaScript code to handle the Stripe checkout process, including creating a PaymentIntent, attaching card input elements, and confirming the payment.
STRIPE_PUBLISHABLE_KEY from the config.php file to the JavaScript file using a custom attribute.<script src="js/checkout.js" STRIPE_PUBLISHABLE_KEY="<?php echo STRIPE_PUBLISHABLE_KEY; ?>" defer></script>
Product Details: Display the product name and price using the defined constants in the config.php file.
<div class="product-copy">
    <p class="eyebrow">Secure Stripe Checkout</p>
    <h1><?= htmlspecialchars(PRODUCT_NAME) ?></h1>
    <p><?= htmlspecialchars(PRODUCT_DESCRIPTION) ?></p>
    <div class="product-meta">
        <div>
            <span>Price</span>
            <strong>$<?= number_format(PRODUCT_AMOUNT, 2) ?></strong>
        </div>
        <div>
            <span>Currency</span>
            <strong><?= htmlspecialchars(strtoupper(PRODUCT_CURRENCY)) ?></strong>
        </div>
    </div>
</div>
Payment Form: Create a payment form with input fields for the customer’s full name and email address. The form also includes a #payment-element div where the Stripe card input elements will be mounted. The form has a submit button (#submit-button) to initiate the payment process.
<!-- Payment form -->
<form id="payment-form" class="payment-form">
    <div class="field-group">
        <label for="name">Full name</label>
        <input id="name" name="name" type="text" placeholder="John Doe" required>
    </div>

    <div class="field-group">
        <label for="email">Email address</label>
        <input id="email" name="email" type="email" placeholder="john@example.com" required>
    </div>

    <div id="payment-element">
        <!--Stripe.js injects the Payment Element-->
    </div>

    <button id="submit-button">
        <div class="spinner hidden" id="spinner"></div>
        <span id="button-text">Pay $<?= number_format(PRODUCT_AMOUNT, 2) ?></span>
    </button>

    <div id="payment-message" class="payment-message" role="status"></div>
</form>

<!-- Display processing notification -->
<div id="frmProcess" class="hidden">
    <span class="ring"></span> Processing...
</div>

<!-- Display re-initiate button -->
<div id="payReinit" class="hidden">
    <button onClick="window.location.href=window.location.href.split('?')[0]"><i class="rload"></i>Re-initiate Payment</button>
</div>
The checkout.js file contains the JavaScript code to handle the Stripe checkout process.
STRIPE_PUBLISHABLE_KEY from the custom attribute defined in the script tag of index.php.payment_intent_client_secret parameter from the URL.payment_intent_client_secret is already present in the URL. If not, initialize the payment form by creating an instance of the Elements UI library and attaching the client secret.initialize() function is used to,
payment_init.php) and capture the client secret.#payment-element) defined in the payment form.handleSubmit() function is used to,
payment_init.php).stripe.confirmPayment of Stripe Payment Intents JS API.checkStatus() function is used to,
stripe.retrievePaymentIntent method of Stripe Payment Intents JS API.payment_init.php) and redirect to the payment status page (payment-status.php).showMessage() function helps to display status messages.setLoading() function disable submit button and show a spinner on payment submission.setProcessing() function disable the payment form and show the notification about payment processing.setReinit() function help to disable the payment form and display the payment re-initiate button..// Retrieve the Stripe publishable key from the script tag attribute
let STRIPE_PUBLISHABLE_KEY = document.currentScript.getAttribute('STRIPE_PUBLISHABLE_KEY');
// Create an instance of the Stripe object using the publishable key
const stripe = Stripe(STRIPE_PUBLISHABLE_KEY);
let elements; // Define card elements
const paymentFrm = document.querySelector("#payment-form"); // Select payment form element
// Get payment_intent_client_secret param from URL
const clientSecretParam = new URLSearchParams(window.location.search).get(
"payment_intent_client_secret"
);
// Check whether the payment_intent_client_secret is already exist in the URL
setProcessing(true);
if(!clientSecretParam){
setProcessing(false);
// Create an instance of the Elements UI library and attach the client secret
initialize();
}
// Check the PaymentIntent creation status
checkStatus();
// Attach an event handler to payment form
paymentFrm.addEventListener("submit", handleSubmit);
// Define a variable to store the PaymentIntent ID
let payment_intent_id;
// Initialize the payment form by fetching the PaymentIntent ID and client secret from the server
async function initialize() {
// Fetch the PaymentIntent ID and client secret from the server-side script
const { id, clientSecret } = await fetch("payment_init.php", {
method: "POST",
headers: { "Content-Type": "application/json" },
body: JSON.stringify({ request_type:'create_payment_intent' }),
}).then((r) => r.json());
// Create an instance of the Elements UI library and attach the client secret
elements = stripe.elements({ clientSecret });
// Create and mount the Payment Element
const paymentElementOptions = {
layout: "accordion",
};
const paymentElement = elements.create("payment", paymentElementOptions);
paymentElement.mount("#payment-element");
// Store the PaymentIntent ID for later use
payment_intent_id = id;
}
// Handle the payment form submission
async function handleSubmit(e) {
e.preventDefault();
setLoading(true);
// Retrieve the customer name and email from the form inputs
const name = document.getElementById('name').value;
const email = document.getElementById('email').value;
// Create a new customer in Stripe and associate it with the PaymentIntent
const createCustomerResp = await fetch("payment_init.php", {
method: "POST",
headers: { "Content-Type": "application/json" },
body: JSON.stringify({ request_type:'create_customer', payment_intent_id: payment_intent_id, name: name, email: email }),
}).then((r) => r.json());
// Check if the customer creation response contains an error
if (createCustomerResp) {
if (createCustomerResp.error) {
let messages = [];
if (createCustomerResp.error) {
messages.push(createCustomerResp.error);
}
// Show combined message(s)
if (messages.length) {
showMessage(messages.join(' '));
} else {
showMessage('Validation failed.');
}
setLoading(false);
return;
}
}
// Extract the customer ID from the response
const { id, customer_id } = createCustomerResp;
// Confirm the payment using the Payment Element and the customer ID
const { error } = await stripe.confirmPayment({
elements,
confirmParams: {
return_url: window.location.href+'?customer_id='+customer_id,
},
});
if (error.type === "card_error" || error.type === "validation_error") {
showMessage(error.message);
} else {
showMessage("An unexpected error occured.");
}
setLoading(false);
}
// Check the status of the PaymentIntent and display appropriate messages
async function checkStatus() {
const clientSecret = new URLSearchParams(window.location.search).get(
"payment_intent_client_secret"
);
const customerID = new URLSearchParams(window.location.search).get(
"customer_id"
);
if (!clientSecret) {
return;
}
const { paymentIntent } = await stripe.retrievePaymentIntent(clientSecret);
if (paymentIntent) {
switch (paymentIntent.status) {
case "succeeded":
// Post the transaction info to the server-side script and redirect to the payment status page
fetch("payment_init.php", {
method: "POST",
headers: { "Content-Type": "application/json" },
body: JSON.stringify({ request_type:'payment_insert', payment_intent: paymentIntent, customer_id: customerID }),
})
.then(response => response.json())
.then(data => {
if (data.payment_intent_id) {
window.location.href = 'payment-status.php?payment_intent='+data.payment_intent_id;
} else {
showMessage(data.error);
setReinit();
}
})
.catch(console.error);
break;
case "processing":
showMessage("Your payment is processing.");
setReinit();
break;
case "requires_payment_method":
showMessage("Your payment was not successful, please try again.");
setReinit();
break;
default:
showMessage("Something went wrong, please try again.");
setReinit();
break;
}
} else {
showMessage("Something went wrong, please try again.");
setReinit();
}
}
// Helper function to display messages to the user
function showMessage(messageText) {
const messageContainer = document.querySelector("#payment-message");
messageContainer.classList.remove("hidden");
messageContainer.textContent = messageText;
setTimeout(function () {
messageContainer.classList.add("hidden");
messageContainer.textContent = "";
}, 5000);
}
// Helper function to show or hide the loading spinner and disable/enable the submit button
function setLoading(isLoading) {
if (isLoading) {
// Disable the button and show a spinner
document.querySelector("#submit-button").disabled = true;
document.querySelector("#spinner").classList.remove("hidden");
document.querySelector("#button-text").classList.add("hidden");
} else {
// Enable the button and hide spinner
document.querySelector("#submit-button").disabled = false;
document.querySelector("#spinner").classList.add("hidden");
document.querySelector("#button-text").classList.remove("hidden");
}
}
// Helper function to show or hide the payment form and processing message
function setProcessing(isProcessing) {
if (isProcessing) {
paymentFrm.classList.add("hidden");
document.querySelector("#frmProcess").classList.remove("hidden");
} else {
paymentFrm.classList.remove("hidden");
document.querySelector("#frmProcess").classList.add("hidden");
}
}
// Helper function to show the reinitialization message and hide the payment form
function setReinit() {
document.querySelector("#frmProcess").classList.add("hidden");
document.querySelector("#payReinit").classList.remove("hidden");
}
The payment_init.php file contains the server-side code to process payment and charge credit card using Stripe API with PHP. The script handles three types of requests: creating a PaymentIntent, creating a Customer, and inserting payment transaction data into the database.
config.php) to access the Stripe API keys and database connection settings.stripe-php/init.php) to use the Stripe API functions.<?php
// Include the configuration file
require_once __DIR__ . '/config.php';
// Include the Stripe PHP library
require_once __DIR__ . '/stripe-php/init.php';
// Create an instance of the Stripe client
$stripe = new \Stripe\StripeClient(STRIPE_SECRET_KEY);
// Create a database connection
$mysqli = getDbConnection();
// Set response content type to JSON
header('Content-Type: application/json');
// Check if the request method is POST
if ($_SERVER['REQUEST_METHOD'] !== 'POST') {
http_response_code(405);
echo json_encode(['error' => 'Method not allowed']);
exit;
}
// Retrieve JSON from POST body
$jsonStr = file_get_contents('php://input');
$jsonObj = json_decode($jsonStr);
/*
* Handle different request types
* request_type: create_payment_intent
* request_type: create_customer
* request_type: payment_insert
*/
if($jsonObj->request_type == 'create_payment_intent'){
// Set the item price in cents
$itemPriceCents = (PRODUCT_AMOUNT * 100);
try {
// Create PaymentIntent with amount and currency
$paymentIntent = $stripe->paymentIntents->create([
'amount' => $itemPriceCents,
'currency' => PRODUCT_CURRENCY,
'description' => PRODUCT_NAME
]);
// Return the PaymentIntent ID and client secret to the client
$output = [
'id' => $paymentIntent->id,
'clientSecret' => $paymentIntent->client_secret
];
echo json_encode($output);
} catch (Error $e) {
http_response_code(500);
echo json_encode(['error' => $e->getMessage()]);
}
}elseif($jsonObj->request_type == 'create_customer'){
// Retrieve payment intent and customer details from the request
$payment_intent_id = !empty($jsonObj->payment_intent_id)?$jsonObj->payment_intent_id:'';
$name = !empty($jsonObj->name)?mb_substr(strip_tags($jsonObj->name), 0, 255):'';
$email = !empty($jsonObj->email)?mb_substr($jsonObj->email, 0, 255):'';
// Validate required fields
if(empty($payment_intent_id) || empty($name) || empty($email)){
http_response_code(500);
echo json_encode(['error' => 'Please fill all the required fields!']);
exit;
}
// Check if customer already exists with the given email
try {
// Check PaymentIntent for customer
if(!empty($payment_intent_id)){
$paymentIntent = $stripe->paymentIntents->retrieve($payment_intent_id);
if(!empty($paymentIntent->customer)){
$customer_id = $paymentIntent->customer;
}
}
// Search for existing customer by email
if(empty($customer_id)){
$customers = $stripe->customers->search([
'query' => 'email:\'' . $email . '\'',
]);
if (!empty($customers->data)) {
$customer = $customers->data[0];
$customer_id = $customer->id;
// Update customer name if changed
$customer = $stripe->customers->update(
$customer_id,
['name' => $name]
);
}
}
} catch (\Stripe\Exception\ApiErrorException $e) {
$api_error = $e->getMessage();
}
// Add customer to stripe if not created already
if(empty($customer_id)){
try {
$customer = $stripe->customers->create([
'name' => $name,
'email' => $email
]);
$customer_id = $customer->id;
}catch(Error $e) {
$api_error = $e->getMessage();
}
}
if(empty($api_error) && !empty($customer_id)){
try {
// Update PaymentIntent with the customer ID
$paymentIntent = $stripe->paymentIntents->update($payment_intent_id, [
'customer' => $customer_id,
'receipt_email' => $email,
]);
} catch (Error $e) {
$api_error = $e->getMessage();
}
// Return the PaymentIntent ID and customer ID to the client
if(empty($api_error) && $paymentIntent){
$output = [
'id' => $payment_intent_id,
'customer_id' => $customer_id
];
echo json_encode($output);
}else{
http_response_code(500);
echo json_encode(['error' => $api_error]);
}
}else{
http_response_code(500);
echo json_encode(['error' => $api_error]);
}
}elseif($jsonObj->request_type == 'payment_insert'){
$payment_intent = !empty($jsonObj->payment_intent)?$jsonObj->payment_intent:'';
$customer_id = !empty($jsonObj->customer_id)?$jsonObj->customer_id:'';
// Retrieve customer details from Stripe
try {
$customer = $stripe->customers->retrieve($customer_id);
}catch(Error $e) {
$api_error = $e->getMessage();
}
// Insert payment details into the database if the payment is successful
if(!empty($payment_intent) && $payment_intent->status == 'succeeded'){
$payment_intent_id = $payment_intent->id;
$amount = ($payment_intent->amount/100);
$currency = $payment_intent->currency;
$status = $payment_intent->status;
$description = !empty($payment_intent->description)?$payment_intent->description:'';
$customer_name = $customer_email = '';
if(!empty($customer)){
$customer_name = !empty($customer->name)?$customer->name:'';
$customer_email = !empty($customer->email)?$customer->email:'';
}
// Check if the payment intent already exists in the database
$sqlQ = "SELECT id FROM payments WHERE payment_intent_id = ?";
$stmt = $mysqli->prepare($sqlQ);
$stmt->bind_param("s", $payment_intent_id);
$stmt->execute();
$stmt->bind_result($row_id);
$stmt->fetch();
// Insert payment details into the database if the payment intent does not exist
if(empty($row_id)){
$sqlQ = "INSERT INTO payments (product, customer_name, customer_email, amount, currency, payment_intent_id, status, created_at) VALUES (?, ?, ?, ?, ?, ?, ?, NOW())";
$stmt = $mysqli->prepare($sqlQ);
$stmt->bind_param("sssdsss", $description, $customer_name, $customer_email, $amount, $currency, $payment_intent_id, $status);
$stmt->execute();
}
// Return the PaymentIntent ID to the client
$output = [
'payment_intent_id' => $payment_intent_id
];
echo json_encode($output);
}else{
http_response_code(500);
echo json_encode(['error' => 'Transaction has been failed!']);
}
}
?>
Based on the payment response from Stripe (paymentIntent.status), the user will be redirected to payment-status.php page. The payment-status.php file displays the payment status message to the user after the payment process is completed. The page shows a success message if the payment is successful, or an error message if the payment fails. The page also provides a link to go back to the product page (index.php) to make another payment.
config.php) to access the database connection settings.<?php
// Include the configuration file
require_once __DIR__ . '/config.php';
// Create a database connection
$mysqli = getDbConnection();
// Retrieve the payment intent ID from the query parameter
$paymentIntentId = trim((string) ($_GET['payment_intent'] ?? ''));
$paymentID = null;
$errorMessage = null;
if ($paymentIntentId !== '') {
try {
// Prepare and execute the SQL query to fetch transaction details
$sqlQ = "SELECT id, customer_name, customer_email, amount, currency, payment_intent_id, status FROM payments WHERE payment_intent_id = ?";
$stmt = $mysqli->prepare($sqlQ);
$stmt->bind_param("s", $paymentIntentId);
$stmt->execute();
$stmt->store_result();
// Check if a transaction was found
if ($stmt->num_rows > 0) {
$stmt->bind_result($paymentID, $customerName, $customerEmail, $paidAmount, $currency, $paymentIntentId, $status);
$stmt->fetch();
} else {
$errorMessage = 'No transaction found for the provided payment intent ID.';
}
} catch (mysqli_sql_exception $e) {
$errorMessage = 'Database error: ' . $e->getMessage();
} catch (Exception $e) {
$errorMessage = 'Error: ' . $e->getMessage();
}
}else{
header("Location: index.php");
exit;
}
?>
<?php if ($paymentID): ?>
<div class="success-badge">✓</div>
<h1>Payment Successful</h1>
<p>Thank you for your purchase. Your transaction has been recorded securely.</p>
<div class="summary-box">
<div><span>Product</span><strong><?= htmlspecialchars(PRODUCT_NAME) ?></strong> </div>
<div><span>Amount</span><strong>$<?= number_format($paidAmount, 2) ?> <?= strtoupper($currency) ?> <?= strtoupper($currency) ?></strong></div>
<div><span>Customer</span><strong><?= htmlspecialchars($customerName) ?></strong></div>
<div><span>Email</span><strong><?= htmlspecialchars($customerEmail) ?></strong></div>
<div><span>Reference</span><strong><?= htmlspecialchars($paymentIntentId) ?></strong></div>
<div><span>Status</span><strong><?= htmlspecialchars($status) ?></strong></div>
</div>
<a class="primary-link" href="index.php">Make another payment</a>
<?php else: ?>
<div class="error-badge">!</div>
<h1>Payment Could Not Be Confirmed</h1>
<p><?= htmlspecialchars($errorMessage ?: 'We could not verify your payment. Please try again.') ?></p>
<a class="primary-link" href="index.php">Return to checkout</a>
<?php endif: ?>
Now that you have completed the Stripe payment gateway integration in PHP, you can test the payment process using the test card details provided by Stripe.
To test the payment process, you need test card details. Use any of the following test card numbers, a valid future expiration date, and any random CVC number, to test Stripe payment gateway integration in PHP.
The 3D Secure feature requires additional authentication for credit card transactions. You can use the following test card numbers provided by Stripe to simulate the payment process that involves 3D Secure authentication. Use any of the following test card numbers, a valid future expiration date, and any random CVC number, to test Stripe payment gateway integration in PHP with 3D Secure authentication.
Once the integration is completed and the payment process is working properly, you can use the live API keys to accept real payments. The live API keys are used to process real payments and charge the customer’s credit card. You can get the live API keys from the Developers » API keys section of your Stripe dashboard.
config.php file with the live API keys.
define('STRIPE_PUBLISHABLE_KEY', 'pk_live_your_stripe_publishable_key_here');
define('STRIPE_SECRET_KEY', 'sk_live_your_stripe_secret_key_here');
PayPal Standard Checkout Integration in PHP
With this tutorial, you have learned how to integrate Stripe payment gateway in PHP web application to accept credit/debit card payments. The Stripe payment gateway is the easiest way to accept credit card payments on the web application. Our example code uses the Stripe PHP library to create a charge and make payment with a credit/debit card. The 3D Secure authentication is integrated to make this Stripe integration script ready for SCA (Strong Customer Authentication). If you want to use Stripe hosted checkout system, integrate redirect-based Stripe Checkout Integration in PHP (Hosted Checkout Page).
For accepting recurring payments online, you can follow the step-by-step guide in the Stripe Subscription Integration in PHP tutorial.
Looking for expert assistance to implement or extend this script’s functionality? Submit a Service Request
💰 Budget-friendly • 🌍 Global clients • 🚀 Production-ready solutions





Hi is any way to add amount(price) textfield
Hello,
how can we add price as a textfield how can we pass price dynamically
thanks
Is it support PHP 5.x ?
Please someone tell me what might be different about my webhosting package which means that the following lines of code in payment_init,php cause the gateway to hang indefinitely and never write the payment to the SQL database? If I delete these lines (and the first part of the following IF statement) then the gateway doesn’t crash and it writes the transaction to the database although it does NOT produce the “payment successful!” message with the details.
$sqlQ = “SELECT id FROM transactions WHERE txn_id = ?”;
$stmt = $db->prepare($sqlQ);
$stmt->bind_param(“s”, $db_txn_id);
$db_txn_id = $transactionID;
$stmt->execute();
$result = $stmt->get_result();
$prevRow = $result->fetch_assoc();
My web hosting package PHP info can be viewed here. On my PC at home, where this all works fine on my localhost, I have PHP 8.1 using Xampp.
https://www.harmonyinharlem.co.uk/new-stripe/phpinfo.php
Hello,
How to desing embeded iframes, am not able to do so.
Thanks
How can I get the ‘Charge ID’ during this process and have that inserted into the ‘transactions’ table?
Does something have to be added to checkout.js — or to payment_init.php?
I know how to add it to the DB, but I don’t know how to get the data from the API.
Thank you!
“charges”: {
“object”: “list”,
“data”: [
{
“id”: “ch_3KXXXXXDO2l53YI1XXXXXAl5”,
“object”: “charge”,
“amount”: 11000,
is there possible to have a database listing products and not usinf config.php as product.
and “Processing…” keeps processing and does nothing untill you refresh the page…….
Code all works great thank you. However I have one issue. When the payment is created everything is fine the payment shows in the stripe dashboard bt then except that a second (and then us used) paymentIntent is created in the stripe dashboard.
As per the latest payment flow by Stripe, a new
PaymentIntentneed to be created each time the payment input elements are loaded. TheclientSecretof this PaymentIntent will attach to the payment form.However, we have updated the payment processing flow to handle this, please download the latest version.
Hi, is this SCA ready?
The script has been updated with 3D Secure and SCA features, please download the latest version.
Thanks for the great tutorial.
Thank you, Your turorial is quite good.
But may i have a question , how we get the Test Card Details in the source code, I already download the souce code, but still no idea how they get the test card details? and we able to midfy the Test Card Details?
Hi, has this been updated for SCA compliance? Update date is 2020
The script has been updated with 3D Secure and SCA features, please download the latest version.
Has this been updated for SCA compliance
The script has been updated with 3D Secure and SCA features, please download the latest version.
Cool! Thank you
how do i get the same css as you created?
Please download the source code.
hello sir i need to integrate transfer amount seller and commision to admin in strip payment codigniter
Hello,
Thanks for the wonderful code. But I am getting warning from stripe as code is not safe since its not following SCA. And sometime throw Charge API error and as per Stripe Team, Charge API method is not safe at all.
Will you please provide a code which is SCA enabled?
Thanks & Regards,
Anshu
The script has been updated with 3D Secure and SCA features, please download the latest version.
Gladly made a payment today for this. The code is superb as is the instructions. Thank you for the work you done here, saved me about a week
Hi. Do you have a script for the signup to a recurring subscription?
See this tutorial – https://www.codexworld.com/stripe-subscription-payment-integration-php/
It is possible to add more then 1 amount? as i have more then 1 item and i can’t figure out how to add more then 1 price to be charged as well the item name.
Stripe does not support multiple products in a one-time charge.
Hi
On September will be applied a SCA europe normative. Can you update and share the new stripe payment script with this SCA normative applied?
Best regards
The script has been updated with 3D Secure and SCA features, please download the latest version.
Great code but one hiccup is that I don’t have the ‘require_once ‘stripe-php/init.php;’ …
Can you provide a link to download?
Please download the source code.
Thanks for the code. Is the new V3 version of Stripe coming?
Hi, thanks for the code. I have a question: How can I make the itemName and itemPrice as input fields from the user in the real world?
is this Stripe For Indian Merchants Available
Hello,
is it compatible with latest SCA stripe update ?
Best regards
Thanks for sharing Very helpful
hello, how i can use stripe API with a SEPA method ?
Please what value should I use to charge $164.50 . Thanks
In the
$itemPricevariable, specify the exact value you want to charge. The script will convert the given price to cents at the time of charge to the card.How can I add a subscription payment (by month) ?
Your all information are very useful. Thank for sharing.
Your work is very helpful Thanks You.
I have question i want to define local to ‘es’ how can i define on this method.
I am making payment of 60$ but in my Stripe dashboard, it is showing payment of $0.60 where in my database value is entering 60$.Please help me to resolve this problem.
Stripe API accept the amount in cents. Means, if you want to charge $60 USD, the amount needs to be specified 6000 cents.
I replace amount 55 to 15 then error showing “Amount must be at least 30 pence”
Stripe API accept the amount in cents. Means, if you want to charge $1 USD, the amount needs to be specified 100 cents. This error is showing because the minimum amount for a charge is $0.50 USD. You need to specified minimum 50 cents to charge via Stripe API.
i want that user put enter amount in input text. I don’t want fixed amount.
2checkout Payment Gateway Integration in PHP
You have? If you have then I will buy membership. thanks, Let me know
We have not published the 2Checkout Payment Gateway Integration tutorial. But we will try to publish this tutorial soon. Please subscribe our newsletter to get notified.
The artical is very good.
This Help me to integrate Stripe.
Thank you very much.
Dear Sir,
I appreciate your work very much. but how can I download Stripe Payment Gateway Integration in PHP file. Kindly help me.
I have create user and activate it from my email link. but I can not capable to download this file.
Thanks & warm reqards,
Brij Pal Kamboj
To download the source code, you need the membership of CodexWorld – https://www.codexworld.com/membership/
please upload Paytm Payment Gateway Integration in CodeIgniter…
The article i was looking for, very helpful thanks for sharing.