close
Online payments are an essential feature for modern websites and web applications. Instead of building a custom payment form that handles sensitive card information, Stripe Checkout provides a secure, PCI-compliant, and fully hosted payment page that significantly simplifies the payment process.
Stripe payment gateway helps streamline the payment process for developers and provides a seamless experience for customers. In this tutorial, you will learn how to integrate Stripe Checkout into a PHP application using the official Stripe PHP SDK. The example demonstrates how to create a Checkout Session, redirect customers to Stripe’s hosted payment page, verify the completed payment after checkout, and save the transaction details in a MySQL database.
Unlike basic examples that simply redirect users to Stripe, this implementation also records successful payments, making it suitable as a starting point for digital products, SaaS subscriptions, online courses, memberships, and other eCommerce applications.
This Stripe Checkout Integration in PHP (Hosted Checkout Page) script includes the following features:
To integrate Stripe Checkout, you need to obtain your API keys from the Stripe dashboard. These keys are used to authenticate your application with Stripe’s servers.
Test API Keys
Before going live, you should use the test API keys provided by Stripe. These keys allow you to simulate transactions without processing real payments. Follow these steps to obtain your test API keys:
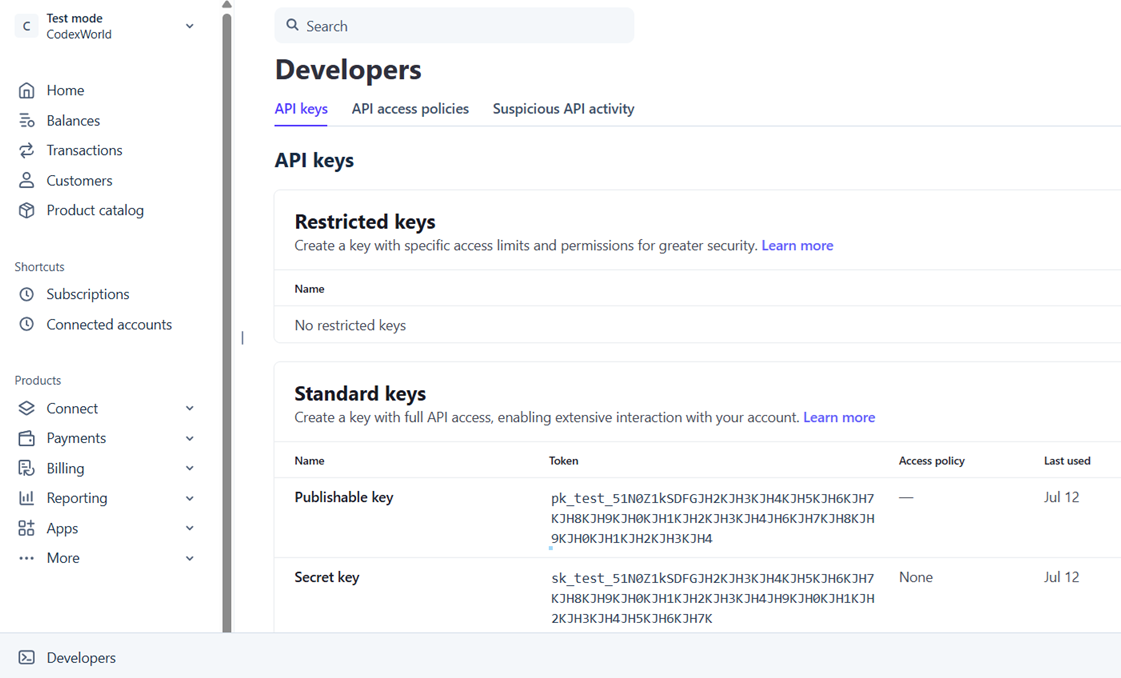
Note: Test API keys are used for development and testing, while live API keys are used for production. Make sure to switch to live keys when deploying your application.
Before you start integrating Stripe Checkout, take a look at the folder structure of the project. This will help you understand where to place your files and how to organize your code.
stripe_checkout_in_php/
├── config.php
├── index.php
├── create_checkout_session.php
├── success.php
├── cancel.php
├── stripe-php/
└── css/
    └── style.css
Let’s briefly explain the purpose of each file:
The payment flow with Stripe Checkout involves several steps:
To use Stripe’s API in your PHP application, you need to install the official Stripe PHP SDK. You can do this using Composer, which is a dependency manager for PHP.
composer require stripe/stripe-php
Note: Our ready-to-download source code package includes the Stripe PHP SDK. You don’t need to install it separately.
To store transaction details, you need to create a MySQL database and a table. First, create a database (e.g., checkout_db) and then create a table named transactions using the following SQL query:
CREATE TABLE `transactions` (
  `id` INT AUTO_INCREMENT PRIMARY KEY,
  `session_id` VARCHAR(255) NOT NULL UNIQUE,
  `payment_intent` VARCHAR(255) DEFAULT NULL,
  `customer_name` VARCHAR(50) DEFAULT NULL,
  `customer_email` VARCHAR(50) DEFAULT NULL,
  `product_name` VARCHAR(255) DEFAULT NULL,
  `amount` FLOAT(10,2) DEFAULT NULL,
  `currency` VARCHAR(10) DEFAULT 'usd',
  `payment_status` VARCHAR(50) DEFAULT NULL,
  `checkout_status` VARCHAR(50) DEFAULT NULL,
  `created_at` TIMESTAMP DEFAULT CURRENT_TIMESTAMP
) ENGINE=InnoDB DEFAULT CHARSET=utf8mb4;
We will use a configuration file named config.php to store Stripe API keys, product details, and MySQL database credentials. This approach allows you to manage your settings in one place and makes it easier to update them when needed.
$config array contains all the necessary configuration values.
product element contains details about the product being sold, such as name, description, and price.stripe element contains your Stripe API keys and webhook secret (e.g., secret_key, publishable_key).db element contains your MySQL database credentials (e.g., host, port, username, password, database).<?php
// Determine the base URL for the application
$scriptDir = dirname($_SERVER['SCRIPT_NAME'] ?? '/');
$scriptDir = $scriptDir === '/' ? '' : $scriptDir;
$baseUrl = (isset($_SERVER['HTTPS']) && $_SERVER['HTTPS'] !== 'off' ? 'https' : 'http') . '://' . ($_SERVER['HTTP_HOST'] ?? 'localhost') . $scriptDir;
// Configuration array for the application
$config = [
'app_name' => 'Stripe Checkout Demo',
'product' => [
'name' => 'Premium Digital Course',
'description' => 'A polished checkout experience for your online product.',
'price' => 49,
'currency' => 'usd',
],
'stripe' => [
'publishable_key' => 'pk_test_your_publishable_key_here',
'secret_key' => 'sk_test_your_secret_key_here',
'webhook_secret' => 'whsec_your_webhook_secret_here',
'success_url' => $baseUrl . '/success.php?session_id={CHECKOUT_SESSION_ID}',
'cancel_url' => $baseUrl . '/cancel.php',
],
'db' => [
'host' => 'localhost',
'port' => 3306,
'username' => 'root',
'password' => '',
'database' => 'checkout_db',
],
];
// Function to retrieve configuration values
function config($key = null)
{
global $config;
if ($key === null) {
return $config;
}
$segments = explode('.', $key);
$value = $config;
foreach ($segments as $segment) {
if (!is_array($value) || !array_key_exists($segment, $value)) {
return null;
}
$value = $value[$segment];
}
return $value;
}
// Function to establish a database connection using MySQLi
function getDbConnection()
{
$dbConfig = config('db');
$mysqli = @new mysqli($dbConfig['host'], $dbConfig['username'], $dbConfig['password'], $dbConfig['database'], $dbConfig['port']);
if ($mysqli->connect_error) {
throw new RuntimeException('Database connection failed: ' . $mysqli->connect_error);
}
$mysqli->set_charset('utf8mb4');
return $mysqli;
}
?>
In the index.php file, we display the product details and provide a form for users to enter their name and email address. When the user clicks the “Pay Now” button, the form is submitted to create_checkout_session.php via AJAX request, which creates a new Stripe Checkout Session.
👉 Include configuration file and retrieve product configuration:
<?php
// Load the configuration file
require_once __DIR__ . '/config.php';

// Get product configuration
$product = config('product');
?>
👉 Display product details (name, description, and price) and checkout form. Create HTML form input elements to input the customer’s name and email, and add a Pay Now button to initiate the Stripe Checkout session:
<!-- Product details -->
<div class="product-panel">
    <div>
        <h2><?= htmlspecialchars($product['name']) ?></h2>
        <p><?= htmlspecialchars($product['description']) ?></p>
    </div>
    <div class="price-box">
        <span class="price">$<?= htmlspecialchars(number_format($product['price'], 2)) ?></span>
        <span class="label">One-time payment</span>
    </div>
</div>

<!-- Checkout form -->
<div id="formMessage" class="alert" hidden></div>
<form id="checkoutForm" class="checkout-form">
    <label for="customer_name">Your name <span class="hint">(optional)</span></label>
    <input id="customer_name" name="customer_name" type="text" placeholder="Alex Morgan">

    <label for="customer_email">Email address <span class="hint">(optional)</span></label>
    <input id="customer_email" name="customer_email" type="email" placeholder="alex@example.com">

    <button id="submitButton" type="submit">Pay Now</button>
</form>
👉 JavaScript code to handle the form submission and initiate the Stripe Checkout session by sending request to the server-side script (create_checkout_session.php). If the Checkout Session is created successfully, the customer is redirected to Stripe’s hosted payment page:
<script>
// JavaScript to handle the form submission and initiate the Stripe Checkout session
document.addEventListener('DOMContentLoaded', function () {
    const form = document.getElementById('checkoutForm');
    const messageBox = document.getElementById('formMessage');
    const submitButton = document.getElementById('submitButton');

    form.addEventListener('submit', async function (event) {
        event.preventDefault();
        messageBox.hidden = true;
        messageBox.textContent = '';
        submitButton.disabled = true;
        submitButton.textContent = 'Preparing checkout...';

        const formData = new FormData(form);

        try {
            const response = await fetch('create_checkout_session.php', {
                method: 'POST',
                body: formData,
            });
            const payload = await response.json();

            if (!response.ok || !payload.success) {
                const errorMessage = payload.message || payload.error?.message || 'Unable to start checkout.';
                throw new Error(errorMessage);
            }

            window.location.href = payload.url;
        } catch (error) {
            messageBox.textContent = error.message;
            messageBox.hidden = false;
            submitButton.disabled = false;
            submitButton.textContent = 'Pay Now';
        }
    });
});
</script>
After receiving the Checkout URL, JavaScript simply redirects the browser.
The create_checkout_session.php file is responsible for creating a new Stripe Checkout Session. It retrieves the customer’s name and email from the POST request, creates a Checkout Session using the Stripe PHP SDK, and returns the session URL to the client.
<?php
// Load the configuration file
require_once __DIR__ . '/config.php';

// Get product and Stripe configuration
$productConfig = config('product');
$stripeConfig = config('stripe');

// Include the Stripe PHP library
require_once __DIR__ . '/stripe-php/init.php';

// Set the content type to JSON for the response
header('Content-Type: application/json');

// Check if the request method is POST
if ($_SERVER['REQUEST_METHOD'] !== 'POST') {
    http_response_code(405);
    echo json_encode(['success' => false, 'message' => 'Only POST requests are supported.']);
    exit;
}

try {
    if (empty($stripeConfig['secret_key'])) {
        throw new InvalidArgumentException('Stripe secret key is not configured. Please update the Stripe settings in config.php.');
    }

    // Create a new Stripe client instance
    $stripe = new \Stripe\StripeClient($stripeConfig['secret_key']);

    // Retrieve and sanitize customer name and email from POST data
    $customerName = trim($_POST['customer_name'] ?? '');
    $customerEmail = trim($_POST['customer_email'] ?? '');

    // Validate the email format if provided
    if ($customerEmail !== '' && !filter_var($customerEmail, FILTER_VALIDATE_EMAIL)) {
        throw new InvalidArgumentException('Please provide a valid email address if you want to include one.');
    }

    // Prepare the parameters for creating a Stripe Checkout session
    $sessionParams = [
        'mode' => 'payment',
        'line_items' => [[
            'price_data' => [
                'currency' => $productConfig['currency'],
                'product_data' => [
                    'name' => $productConfig['name'],
                    'description' => $productConfig['description'],
                ],
                'unit_amount' => ($productConfig['price'] * 100),
            ],
            'quantity' => 1,
        ]],
        'metadata' => [
            'customer_name' => $customerName,
            'customer_email' => $customerEmail,
            'product_name' => $productConfig['name'],
        ],
        'success_url' => $stripeConfig['success_url'],
        'cancel_url' => $stripeConfig['cancel_url'],
    ];

    if ($customerEmail !== '') {
        $sessionParams['customer_email'] = $customerEmail;
    }

    // Create the Stripe Checkout session
    $checkoutSession = $stripe->checkout->sessions->create($sessionParams);

    // Return the session URL in the JSON response
    echo json_encode(['success' => true, 'url' => $checkoutSession->url]);
    exit;
} catch (Throwable $exception) {
    $statusCode = $exception instanceof InvalidArgumentException ? 400 : 500;
    http_response_code($statusCode);

    $errorMessage = $exception->getMessage();
    echo json_encode([
        'success' => false,
        'message' => $errorMessage !== '' ? $errorMessage : 'Unable to create checkout session.',
        'error' => [
            'type' => get_class($exception),
            'message' => $errorMessage,
        ],
    ]);
    exit;
}
?>
After the payment is completed, Stripe redirects the customer back to the success page and appends the Checkout Session ID to the URL.
The success.php file handles the successful payment callback from Stripe. It verifies the Checkout Session using the Stripe API, retrieves the payment details, and stores the transaction information in the MySQL database. Finally, it displays a payment summary to the customer.
<?php
// Load configuration and database helper functions
require_once __DIR__ . '/config.php';

// Retrieve the Stripe session ID from the query parameters
$sessionId = $_GET['session_id'] ?? null;

$errorMessage = null;
$transaction = null;

if (!$sessionId) {
    $errorMessage = 'No checkout session was provided.';
} else {
    try {
        // Establish a database connection
        $mysqli = getDbConnection();

        // Check if the transaction already exists in the database
        $statement = $mysqli->prepare('SELECT * FROM transactions WHERE session_id = ?');
        $statement->bind_param('s', $sessionId);
        $statement->execute();
        $result = $statement->get_result();
        if ($result->num_rows > 0) {
            // Fetch the existing transaction details from the database
            $transaction = $result->fetch_assoc();
            $statement->close();
        } else {
            // Load the Stripe configuration
            $stripeConfig = config('stripe');

            // Include the Stripe PHP library
            require_once __DIR__ . '/stripe-php/init.php';

            // Create a new Stripe client instance
            $stripe = new \Stripe\StripeClient($stripeConfig['secret_key']);

            // Retrieve the Stripe Checkout session details
            $stripeSession = $stripe->checkout->sessions->retrieve($sessionId);

            $metadata = $stripeSession->metadata ?? null;
            $customerName = '';
            $customerEmail = '';

            if (is_object($metadata) && isset($metadata->customer_name)) {
                $customerName = (string) $metadata->customer_name;
            }

            if (is_object($metadata) && isset($metadata->customer_email)) {
                $customerEmail = (string) $metadata->customer_email;
            }

            if ($customerName === '' && isset($stripeSession->customer_details->name)) {
                $customerName = (string) $stripeSession->customer_details->name;
            }

            if ($customerEmail === '' && isset($stripeSession->customer_details->email)) {
                $customerEmail = (string) $stripeSession->customer_details->email;
            }

            $paymentStatus = $stripeSession->payment_status ?? 'unknown';
            $checkoutStatus = $stripeSession->status ?? 'unknown';
            $paymentIntent = $stripeSession->payment_intent ?? null;
            $productName = is_object($metadata) && isset($metadata->product_name) ? (string) $metadata->product_name : config('product')['name'];
            $amount = ($stripeSession->amount_total / 100 ?? 0);
            $currency = $stripeSession->currency ?? config('product')['currency'];

            // Store the transaction details in the database
            $statement = $mysqli->prepare(
                "INSERT INTO transactions (session_id, payment_intent, customer_name, customer_email, product_name, amount, currency, payment_status, checkout_status) VALUES (?, ?, ?, ?, ?, ?, ?, ?, ?)"
            );
            $statement->bind_param('sssssdsss', $sessionId, $paymentIntent, $customerName, $customerEmail, $productName, $amount, $currency, $paymentStatus, $checkoutStatus);
            $statement->execute();
            $statement->close();

            // Prepare the transaction data for display
            $transaction = [
                'session_id' => $sessionId,
                'payment_intent' => $paymentIntent,
                'customer_name' => $customerName,
                'customer_email' => $customerEmail,
                'product_name' => $productName,
                'amount' => $amount,
                'currency' => $currency,
                'payment_status' => $paymentStatus,
                'checkout_status' => $checkoutStatus,
            ];
        }
    } catch (Throwable $exception) {
        $errorMessage = $exception->getMessage();
    } finally {
        if (isset($mysqli)) {
            $mysqli->close();
        }
    }
}
?>

<h1><?= $errorMessage ? 'We could not confirm the payment yet' : 'Payment completed successfully' ?></h1>
<p class="lead">The Stripe checkout session was verified and the transaction details were stored in the database.</p>

<?php if ($errorMessage): ?>
    <div class="alert"><?= htmlspecialchars($errorMessage) ?></div>
<?php else: ?>
    <div class="result-card">
        <h2>Transaction summary</h2>
        <ul class="result-list">
            <li><strong>Customer:</strong> <?= htmlspecialchars($transaction['customer_name']) ?></li>
            <li><strong>Email:</strong> <?= htmlspecialchars($transaction['customer_email']) ?></li>
            <li><strong>Product:</strong> <?= htmlspecialchars($transaction['product_name']) ?></li>
            <li><strong>Amount:</strong> <?= htmlspecialchars(number_format($transaction['amount'], 2)) ?> <?= strtoupper($transaction['currency']) ?></li>
            <li><strong>Payment status:</strong> <?= htmlspecialchars($transaction['payment_status']) ?></li>
            <li><strong>Checkout status:</strong> <?= htmlspecialchars($transaction['checkout_status']) ?></li>
            <li><strong>Session ID:</strong> <?= htmlspecialchars($transaction['session_id']) ?></li>
        </ul>
    </div>
<?php endif; ?>
If the customer cancels the payment, Stripe redirects them to the cancel page. The cancel.php file handles cases where the user cancels the checkout process. It simply displays a message to the customer indicating that the payment was cancelled and provides a link to return to the product page.
<h1>Payment was not completed</h1>
<p class="lead">The Stripe payment page was closed before the transaction was finalized. You can try again at any time.</p>
<p class="footnote"><a href="index.php">Return to the checkout page</a></p>
Webhooks allow your application to receive real-time notifications about events that occur in your Stripe account, such as successful payments, failed payments, or subscription updates. It is important to handle webhooks to ensure that your application stays in sync with Stripe’s events and can take appropriate actions based on those events.
If you want to handle webhooks, you can create a webhook.php file that listens for incoming webhook requests from Stripe. This file should verify the authenticity of the requests using the webhook secret and process the events accordingly.
<?php
require_once __DIR__ . '/config.php';
require_once __DIR__ . '/stripe-php/init.php';

header('Content-Type: application/json');

function respond(int $statusCode, array $payload): void
{
    http_response_code($statusCode);
    echo json_encode($payload);
    exit;
}

if ($_SERVER['REQUEST_METHOD'] !== 'POST') {
    respond(405, [
        'success' => false,
        'message' => 'Only POST requests are supported.',
    ]);
}

$stripeConfig = config('stripe');
$webhookSecret = getenv('STRIPE_WEBHOOK_SECRET') ?: ($stripeConfig['webhook_secret'] ?? '');

if (empty($webhookSecret) || $webhookSecret === 'whsec_your_webhook_secret_here') {
    respond(500, [
        'success' => false,
        'message' => 'Stripe webhook secret is not configured.',
    ]);
}

$payload = @file_get_contents('php://input');
if ($payload === false || $payload === '') {
    respond(400, [
        'success' => false,
        'message' => 'The request body was empty.',
    ]);
}

$sigHeader = $_SERVER['HTTP_STRIPE_SIGNATURE'] ?? '';

try {
    $event = \Stripe\Webhook::constructEvent($payload, $sigHeader, $webhookSecret);
} catch (\UnexpectedValueException $exception) {
    respond(400, [
        'success' => false,
        'message' => 'Invalid Stripe payload.',
        'error' => $exception->getMessage(),
    ]);
} catch (\Stripe\Exception\SignatureVerificationException $exception) {
    respond(401, [
        'success' => false,
        'message' => 'Webhook signature verification failed.',
        'error' => $exception->getMessage(),
    ]);
}

$eventType = $event->type ?? 'unknown';
$eventObject = $event->data->object ?? null;

if (!$eventObject) {
    respond(400, [
        'success' => false,
        'message' => 'Stripe event payload did not include an object.',
    ]);
}

$sessionId = null;
$paymentIntent = null;
$customerName = '';
$customerEmail = '';
$productName = config('product')['name'] ?? 'Stripe Checkout Product';
$amount = 0.0;
$currency = strtoupper((string) (config('product')['currency'] ?? 'usd'));
$paymentStatus = '';
$checkoutStatus = '';

if (in_array($eventType, ['checkout.session.completed', 'checkout.session.async_payment_succeeded', 'checkout.session.expired'], true)) {
    $session = $eventObject;
    $sessionId = (string) ($session->id ?? '');
    $paymentIntent = isset($session->payment_intent) ? (string) $session->payment_intent : '';
    $paymentStatus = isset($session->payment_status) ? (string) $session->payment_status : '';
    $checkoutStatus = isset($session->status) ? (string) $session->status : '';

    if (isset($session->amount_total)) {
        $amount = (float) ($session->amount_total / 100);
    }

    if (isset($session->currency)) {
        $currency = strtoupper((string) $session->currency);
    }

    $metadata = $session->metadata ?? null;
    if (is_object($metadata)) {
        if (isset($metadata->customer_name)) {
            $customerName = (string) $metadata->customer_name;
        }
        if (isset($metadata->customer_email)) {
            $customerEmail = (string) $metadata->customer_email;
        }
        if (isset($metadata->product_name) && $metadata->product_name !== '') {
            $productName = (string) $metadata->product_name;
        }
    }

    $customerDetails = $session->customer_details ?? null;
    if ($customerName === '' && is_object($customerDetails) && isset($customerDetails->name)) {
        $customerName = (string) $customerDetails->name;
    }
    if ($customerEmail === '' && is_object($customerDetails) && isset($customerDetails->email)) {
        $customerEmail = (string) $customerDetails->email;
    }
} elseif (in_array($eventType, ['payment_intent.succeeded', 'payment_intent.payment_failed'], true)) {
    $paymentIntent = (string) ($eventObject->id ?? '');
    $paymentStatus = isset($eventObject->status) ? (string) $eventObject->status : '';
    $checkoutStatus = $paymentStatus;
}

try {
    $mysqli = getDbConnection();

    if ($sessionId !== null && $sessionId !== '') {
        $statement = $mysqli->prepare(
            'INSERT INTO transactions (session_id, payment_intent, customer_name, customer_email, product_name, amount, currency, payment_status, checkout_status) VALUES (?, ?, ?, ?, ?, ?, ?, ?, ?) ON DUPLICATE KEY UPDATE payment_intent = VALUES(payment_intent), customer_name = VALUES(customer_name), customer_email = VALUES(customer_email), product_name = VALUES(product_name), amount = VALUES(amount), currency = VALUES(currency), payment_status = VALUES(payment_status), checkout_status = VALUES(checkout_status)'
        );
        $statement->bind_param('sssssdsss', $sessionId, $paymentIntent, $customerName, $customerEmail, $productName, $amount, $currency, $paymentStatus, $checkoutStatus);
        $statement->execute();
        $statement->close();
    } elseif ($paymentIntent !== null && $paymentIntent !== '') {
        $statement = $mysqli->prepare('UPDATE transactions SET payment_status = ?, checkout_status = ? WHERE payment_intent = ?');
        $statement->bind_param('sss', $paymentStatus, $checkoutStatus, $paymentIntent);
        $statement->execute();
        $statement->close();
    }

    $mysqli->close();
} catch (Throwable $exception) {
    respond(500, [
        'success' => false,
        'message' => 'Webhook processing failed.',
        'error' => $exception->getMessage(),
    ]);
}

respond(200, [
    'success' => true,
    'received' => true,
    'event_type' => $eventType,
    'session_id' => $sessionId,
    'payment_intent' => $paymentIntent,
]);
?>
Setup Webhook
To set up a webhook in your Stripe account, follow these steps:
https://yourdomain.com/webhook.php).Now, set webhook secret in your config.php file to verify incoming webhook requests. You can find the webhook secret in the Stripe dashboard after creating the webhook endpoint.
$config = [
    'stripe' => [
        'webhook_secret' => 'whsec_your_webhook_secret_here',
    ]
];
After completing the integration, you should test the payment flow using Stripe’s test mode. Use the test API keys and test card numbers provided by Stripe to simulate transactions without processing real payments. Make sure to test various scenarios, including successful payments, failed payments, and cancelled payments, to ensure that your application handles all cases correctly.
Use the following test card numbers, along with any future expiration date and any random CVC code, to simulate different payment scenarios:
Once you have thoroughly tested the integration and are ready to go live, switch to your live API keys in the config.php file. Ensure that you have also set up your webhook endpoint with the live webhook secret to handle real payment events.
$config = [
    'stripe' => [
        'publishable_key' => 'pk_live_your_publishable_key_here',
        'secret_key' => 'sk_live_your_secret_key_here'
    ]
];
When integrating Stripe Checkout, it is crucial to follow security best practices to protect sensitive information and ensure a secure payment process. Here are some key recommendations:
Stripe Checkout offers one of the fastest and most secure ways to accept online payments in PHP applications. By using the official Stripe PHP SDK, your application can create hosted Checkout Sessions without handling sensitive card data, significantly reducing PCI compliance requirements.
Integrating Stripe Checkout into your PHP application provides a secure and seamless payment experience for your customers. In this tutorial, you built a complete Stripe Checkout workflow that displays a product page, creates a Checkout Session, redirects customers to Stripe, verifies the completed payment on the server, and stores transaction details in a MySQL database. This architecture provides a solid foundation for selling digital products, memberships, online courses, SaaS subscriptions, and other one-time purchases while keeping your payment integration secure and maintainable.
For accepting recurring payments online, you can follow the step-by-step guide in the Stripe Subscription Integration in PHP tutorial.
Looking for expert assistance to implement or extend this script’s functionality? Submit a Service Request
💰 Budget-friendly • 🌍 Global clients • 🚀 Production-ready solutions




I have a doubt: if the paying user doesn’t wait for the redirect, the payment-success.php file doesn’t work. the system does not know if the payment was successful and not the order in the database.
Stripe doesn’t work like paypal with IPN (Instant Payment Notification)?
Hi!
I am a novice on stripe and not an engineer, my abilities are limited.
Your code is great but how to recover the charge id?
thanks a lot for your answer.
best regards.
Hi is this Strong Customer Authentication (SCA) as i get a message on my Stripe dashboard about
Hi,
Your code is working fine. For other members please purchase this tutorial then it will work fine. At least Codexworld also need some support so please pay some amount to them and buy it.
how i can customize the stripe pop up with a select box and based on the option value of that select box i want to change the payment amount how its come possibble ?
Your site really has good content
Good luck
Thanks for this.