close
Protecting a PHP contact form from spam is no longer just about checking whether a visitor ticked an “I’m not a robot” checkbox. A more robust implementation should validate the reCAPTCHA response on the server, inspect the assessment returned by Google’s reCAPTCHA Enterprise API, and make the final decision based on the risk score.
In this tutorial, we will integrate a Google reCAPTCHA Enterprise Checkbox into a PHP contact form and verify it on the server using a score-based decision model.
The Google reCAPTCHA Checkbox (v2) is a user-friendly way to protect your website from spam and abuse. It requires users to check a box to prove they are human, while also analyzing their behavior to determine the likelihood of them being a bot. By using the reCAPTCHA Enterprise API, we can get a risk score for each submission and make informed decisions about whether to accept or reject it.
In this example, we will create a simple contact form that includes a reCAPTCHA checkbox. When the form is submitted, we will send the reCAPTCHA response to the server for verification. The server will then call the reCAPTCHA Enterprise API to get a risk score and decide whether to accept or reject the submission based on that score.
The Google reCAPTCHA with PHP implementation uses three PHP files:
Before writing the PHP code, it is important to understand the difference between the checkbox and the score.
The checkbox is the user-facing part of the integration. It gives the visitor an explicit reCAPTCHA interaction.
The score is the server-side risk signal returned by the reCAPTCHA Enterprise assessment.
So, these are two different things:
Checkbox → User completes reCAPTCHA → Token generated → Server validates token → Google returns risk assessment → PHP evaluates score
Simply receiving a token is not enough. The backend should create an assessment and verify that the token is valid before trusting the score.
Google specifically recommends creating an assessment from the backend to verify the token and assess the risk associated with the interaction.
The simplest way to create a reCAPTCHA key is through the reCAPTCHA Admin console.
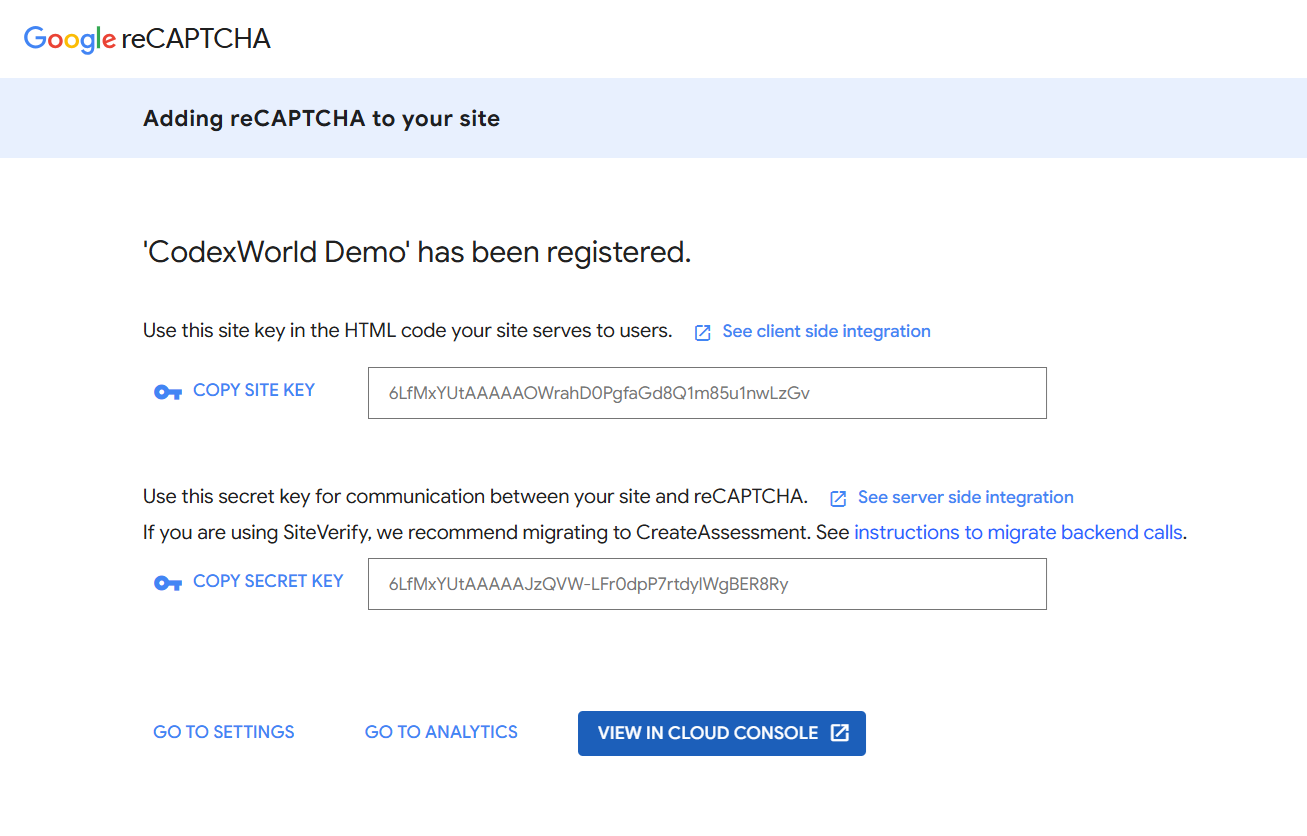
To use Google reCAPTCHA Enterprise, you need to set up a project in the Google Cloud Console and enable the reCAPTCHA Enterprise API.
Since, you already created a reCAPTCHA key in the reCAPTCHA Admin console, you don’t need to create a new project in the Google Cloud Console. You can use the same project that was automatically created for you when you created the reCAPTCHA key.
After completing the above steps, you will have the necessary keys (reCAPTCHA Site Key, API Key, and Project ID) to integrate reCAPTCHA Enterprise into your PHP application.
Create a configuration file (e.g., config.php) in your PHP application to store the reCAPTCHA Site Key, API Key, and Project ID as constants or variables. This will allow you to easily access these keys throughout your application.
<?php
// Define constants for Google reCAPTCHA Enterprise configuration
define('GCP_PROJECT_ID', '_YOUR_GOOGLE_CLOUD_PROJECT_ID_HERE_');
define('GCP_API_KEY', '_GOOGLE_PROJECT_API_KEY_HERE_');
define('RECAPTCHA_SITE_KEY', '_YOUR_RECAPTCHA_SITE_KEY_HERE_');
define('RECAPTCHA_THRESHOLD', 0.5); // Minimum score required for reCAPTCHA validation

// Other configuration constants can be added here as needed,
// such as email settings, database credentials, etc.
?>
Build your HTML form (e.g., index.php) and include the reCAPTCHA checkbox using the Site Key.
First, include the reCAPTCHA Enterprise JavaScript API in the <head> section of your HTML:
<script src="https://www.google.com/recaptcha/enterprise.js" async defer></script>
Create a simple contact form with fields for name, email, subject, and message. Add the reCAPTCHA checkbox to the form, the data-sitekey attribute should be set to your reCAPTCHA Site Key and the data-action attribute should be set to a custom action name (e.g., “submit”).
<form method="POST" action="process_form.php">
    <!-- Name Field -->
    <div class="form-group">
        <label for="name">Your Name <span class="required">*</span></label>
        <input type="text" name="name" placeholder="John Doe" required>
    </div>

    <!-- Email Field -->
    <div class="form-group">
        <label for="email">Your Email <span class="required">*</span></label>
        <input type="email" name="email" placeholder="john@example.com" required>
    </div>

    <!-- Subject Field -->
    <div class="form-group">
        <label for="subject">Subject <span class="required">*</span></label>
        <input type="text" name="subject" placeholder="How can we help?" required>
    </div>

    <!-- Message Field -->
    <div class="form-group">
        <label for="message">Message <span class="required">*</span></label>
        <textarea name="message" placeholder="Tell us more about your inquiry..." required></textarea>
    </div>

    <div class="form-group">
        <!-- Google reCAPTCHA Checkbox -->
        <div class="g-recaptcha" data-sitekey="YOUR_RECAPTCHA_SITE_KEY" data-action="submit"></div>
    </div>

    <!-- Submit Button -->
    <input type="submit" name="submit" value="Send Message" class="form-submit">
</form>
On form submission, the reCAPTCHA checkbox will generate a response token that will be sent to the server (process_form.php) along with the form data.
In your form submission handler (e.g., process_form.php), you will need to capture the reCAPTCHA response token from the form submission and send it to the reCAPTCHA Enterprise API for verification.
<?php
// Include the configuration file
require_once 'config.php';

// Check if the form was submitted via POST
if ($_SERVER['REQUEST_METHOD'] === 'POST') {
    // Sanitize input fields
    $name = trim($_POST['name'] ?? '');
    $email = trim($_POST['email'] ?? '');
    $subject = trim($_POST['subject'] ?? '');
    $message = trim($_POST['message'] ?? '');

    // Validate input fields
    $validationErrors = [];
    if(empty($name)){
        $validationErrors['name'] = 'Name is required.';
    }
    if(empty($email)){
        $validationErrors['email'] = 'Email is required.';
    } elseif(!filter_var($email, FILTER_VALIDATE_EMAIL)){
        $validationErrors['email'] = 'Invalid email format.';
    }
    if(empty($subject)){
        $validationErrors['subject'] = 'Subject is required.';
    }
    if(empty($message)){
        $validationErrors['message'] = 'Message is required.';
    }

    if(!empty($validationErrors)){
        // Return validation errors if any fields are invalid
        $response = [
            'success' => false,
            'message' => 'Please correct the errors in the form.',
            'errors' => $validationErrors
        ];
    }else{
        // Verify the reCAPTCHA token
        $token = $_POST['g-recaptcha-response'] ?? '';
        if(empty($token)){
            $response = [
                'success' => false,
                'message' => 'reCAPTCHA verification failed. Please try again.',
                'errors' => ['recaptcha' => 'reCAPTCHA token is missing.']
            ];
        }else{
            // Create the reCAPTCHA Enterprise API endpoint URL
            $url = 'https://recaptchaenterprise.googleapis.com/v1/projects/' . GCP_PROJECT_ID . '/assessments?key=' . GCP_API_KEY;

            // Build the assessment request payload
            $assessmentRequest = [
                'event' => [
                    'token' => $token,
                    'siteKey' => RECAPTCHA_SITE_KEY,
                    'expectedAction' => 'submit',
                    'userAgent' => $_SERVER['HTTP_USER_AGENT'] ?? 'Unknown',
                    'userIpAddress' => $_SERVER['REMOTE_ADDR'] ?? ''
                ]
            ];

            // Initialize CURL and send the request to the reCAPTCHA Enterprise API
            $curl = curl_init();
            curl_setopt_array($curl, [
                CURLOPT_URL => $url,
                CURLOPT_POST => true,
                CURLOPT_POSTFIELDS => json_encode($assessmentRequest),
                CURLOPT_RETURNTRANSFER => true,
                CURLOPT_SSL_VERIFYPEER => true,
                CURLOPT_SSL_VERIFYHOST => 2,
                CURLOPT_HTTPHEADER => [
                    'Content-Type: application/json; charset=utf-8'
                ]
            ]);
            $response = curl_exec($curl);
            $httpCode = curl_getinfo($curl, CURLINFO_HTTP_CODE);
            $curlError = curl_error($curl);
            curl_close($curl);

            if ($curlError) {
                $response = [
                    'success' => false,
                    'message' => 'Error communicating with reCAPTCHA API: ' . $curlError,
                    'errors' => ['recaptcha' => 'CURL error: ' . $curlError]
                ];
            } elseif ($httpCode !== 200) {
                $response = [
                    'success' => false,
                    'message' => 'reCAPTCHA API returned an unexpected HTTP code: ' . $httpCode,
                    'errors' => ['recaptcha' => 'HTTP error code: ' . $httpCode]
                ];
            } else {
                // Decode the API response and check the assessment result
                $assessmentResponse = json_decode($response, true);
                if (isset($assessmentResponse['tokenProperties']['valid']) && $assessmentResponse['tokenProperties']['valid'] === true) {
                    $score = $assessmentResponse['riskAnalysis']['score'] ?? 0.0;
                    if ($score >= RECAPTCHA_THRESHOLD) {
                        // Here you would typically send the email or save the form data to a database

                        // For demonstration, we'll just return a success response
                        $response = [
                            'success' => true,
                            'message' => 'Thank you! Your message has been sent successfully. We will get back to you soon.'
                        ];

                        // Unset the POST data to prevent resubmission on page refresh
                        unset($_POST);
                    } else {
                        $response = [
                            'success' => false,
                            'message' => 'reCAPTCHA verification failed. Your score was too low.',
                            'errors' => ['recaptcha' => 'Low reCAPTCHA score: ' . $score]
                        ];
                    }
                } else {
                    $response = [
                        'success' => false,
                        'message' => 'Invalid reCAPTCHA token.',
                        'errors' => ['recaptcha' => 'Token is invalid or expired.']
                    ];
                }
            }
        }
    }
}
?>
After processing the form submission and evaluating the risk score, you can display an appropriate message to the user. If the submission is accepted, you might show a success message. If it is rejected due to a low risk score, you can inform the user that their submission could not be processed and suggest trying again later.
If you want to display the status message on the same page as the form, do the following:
index.php file to check for a status message passed from process_form.php.
require_once 'process_form.php';
<?php if (!empty($response['message'])): ?>
    <div class="alert alert-<?php echo $response['success'] ? 'success' : 'error'; ?>">
        <?php echo htmlspecialchars($response['message']); ?>
    </div>
<?php endif; ?>
Note: Ensure that you remove process_form.php from the form’s action attribute and instead submit the form to index.php to handle the status message display.
Integrating Google reCAPTCHA Enterprise into a PHP contact form is more effective when the implementation treats reCAPTCHA as a server-side risk assessment system, rather than merely a checkbox. By validating the reCAPTCHA response on the server and using the risk score to make decisions, you can significantly reduce spam submissions and improve the security of your contact form.
This approach provides a clean separation between the public reCAPTCHA widget and the private server-side verification logic, while giving the PHP application a configurable risk-based decision instead of relying solely on whether the checkbox was completed.
Understanding Checkbox vs. Score-Based reCAPTCHA:
The terminology can be confusing because the implementation can use a checkbox key while the backend still receives a risk score.
If you want to use a score-based key and don’t want to display the checkbox, see our Google reCAPTCHA v3 with PHP tutorial. It uses a score-based key and does not display the checkbox, but still provides risk signals for backend verification.
Looking for expert assistance to implement or extend this script’s functionality? Submit a Service Request
💰 Budget-friendly • 🌍 Global clients • 🚀 Production-ready solutions




You people are the best in terms of programming, thanks very much for motivating me
Hi, I have a problem with the contact form.
I followed all the instructions:
1. Register your site in the Google reCAPTCHA admin console – https://www.google.com/recaptcha/admin
2. Collect the site key and secret key.
3. In the “submit.php” file:
===> Specify the site key ($siteKey) and secret key ($secretKey).
===> Specify the recipient’s email address in the $recipientEmail variable to receive email notification when the contact form is submitted.
But still it doesn’t work when I access the site in the form there is always written “ERROR for the site owner: invalid site key”.
As the error message says, you have not set the correct Site Key in the reCAPTCHA container element. You need to specify the Site Key in the
data-sitekeyattribute.Works great but on iOS16 doesn’t work!!! Any ideas?