close
Google reCAPTCHA helps protect web forms from bots, automated submissions, and other abusive traffic without forcing legitimate visitors to solve traditional CAPTCHA challenges. With a score-based reCAPTCHA key, Google evaluates the interaction and returns a risk score that your server can use to decide whether the form submission should be accepted, rejected, or subjected to additional verification.
In this tutorial, you’ll learn how to integrate Google reCAPTCHA v3 with an HTML form using PHP and the Google reCAPTCHA Enterprise API. The implementation uses the reCAPTCHA Enterprise JavaScript API on the frontend and a server-side cURL request to create an assessment and retrieve the score.
Unlike a traditional CAPTCHA, the score-based integration works silently in the background. The visitor simply fills out the form and clicks Submit. Your JavaScript obtains a reCAPTCHA token, sends it along with the form data to PHP, and the PHP backend asks Google to evaluate the token.
In this tutorial, you’ll build a simple contact form that uses Google reCAPTCHA v3 to protect against spam and abuse. The form will include reCAPTCHA integration on the frontend and PHP backend verification to ensure only legitimate submissions are processed.
This example uses the following files:
Traditional CAPTCHA systems often ask the visitor to identify images, type distorted characters, or click a checkbox.
A score-based reCAPTCHA integration takes a different approach.
When the user performs an important action, such as submitting a contact form, the browser calls:
grecaptcha.enterprise.execute()
Google generates a token representing that interaction. Your server then sends the token to the reCAPTCHA Enterprise assessment endpoint.
Google returns information including:
The score ranges from 0.0 to 1.0.
A score close to 1.0 indicates a low-risk interaction that is more likely to be legitimate, while a score close to 0.0 indicates higher risk. Google currently describes 11 possible score levels from 0.0 through 1.0, although access to all score levels depends on the project’s configuration and billing status.
For a contact form, you might use a policy such as:
0.5 – 1.0 → Accept0.3 – 0.5 → Review / optionally accept0.0 – 0.3 → Reject or flagThese values are examples, not universal Google-recommended thresholds. Your website should determine an appropriate threshold based on its real traffic and false-positive/false-negative requirements.
To use reCAPTCHA Enterprise, you need to create reCAPTCHA Site keys and enable the reCAPTCHA Enterprise API in your Google Cloud Project. Total 3 types of keys are required for reCAPTCHA Enterprise API integration:
The simplest way to do this is to use the reCAPTCHA Admin console:
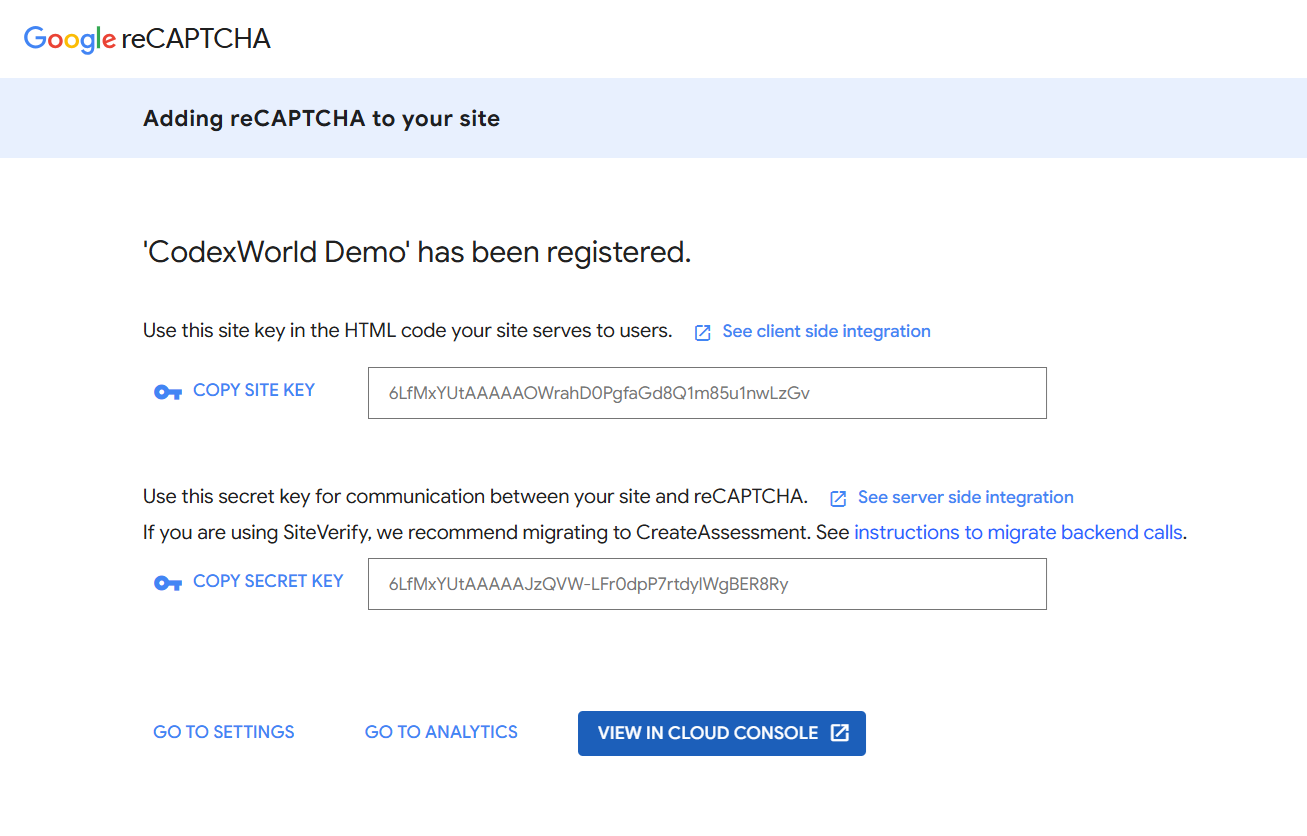
After creating the reCAPTCHA key, you will also need to create an API key for your Google Cloud Project to authenticate your server requests to the reCAPTCHA Enterprise API.
Now, you have all the required keys, including the Site Key, Project ID, and API Key for your reCAPTCHA Enterprise integration.
Create a file named config.php in your project directory. This file will hold your Google Cloud Project ID, API Key, reCAPTCHA Site Key, and the threshold score for accepting submissions. Here’s an example configuration:
<?php
// Define constants for Google reCAPTCHA Enterprise configuration
define('GCP_PROJECT_ID', 'YOUR_GOOGLE_CLOUD_PROJECT_ID_HERE');
define('GCP_API_KEY', 'YOUR_PROJECT_API_KEY_HERE');
define('RECAPTCHA_SITE_KEY', 'YOUR_RECAPTCHA_SITE_KEY_HERE');
define('RECAPTCHA_THRESHOLD', 0.5); // Minimum score required for reCAPTCHA validation

// Other configuration constants can be added here as needed, such as email settings, database credentials, etc.
Create a file named index.php in your project directory. This file will contain the HTML form and the reCAPTCHA Enterprise JavaScript API integration.
To load reCAPTCHA on the web page, include the Enterprise JavaScript API with your score-based Site Key in the <head> section of your HTML:
<script src="https://www.google.com/recaptcha/enterprise.js?render=YOUR_RECAPTCHA_SITE_KEY"></script>
Define a JavaScript function to handle the form submission and obtain a reCAPTCHA token. The token will be sent to your PHP backend for verification.
<script>
function onSubmit(token) {
    document.getElementById("contact-form").submit();
}
</script>
Add the reCAPTCHA attributes to your form’s submit button. The data-sitekey attribute should contain your score-based Site Key, and the data-callback attribute should reference the JavaScript function that handles the token submission.
<button class="g-recaptcha"
data-sitekey="YOUR_RECAPTCHA_SITE_KEY"
data-callback="onSubmit"
data-action="submit">Submit</button>
Here’s an example of a simple contact form with reCAPTCHA v3 integration:
<form id="contact-form" method="POST" action="">
    <!-- Name Field -->
    <div class="form-group">
        <label for="name">Your Name <span class="required">*</span></label>
        <input type="text" name="name" placeholder="John Doe" required>
    </div>

    <!-- Email Field -->
    <div class="form-group">
        <label for="email">Your Email <span class="required">*</span></label>
        <input type="email" name="email" placeholder="john@example.com" required>
    </div>

    <!-- Subject Field -->
    <div class="form-group">
        <label for="subject">Subject <span class="required">*</span></label>
        <input type="text" name="subject" placeholder="How can we help?" required>
    </div>

    <!-- Message Field -->
    <div class="form-group">
        <label for="message">Message <span class="required">*</span></label>
        <textarea name="message" placeholder="Tell us about your inquiry..." required></textarea>
    </div>

    <!-- Submit Button with reCAPTCHA attributes -->
    <button class="form-submit g-recaptcha"
    data-sitekey="YOUR_RECAPTCHA_SITE_KEY"
    data-callback="onSubmit"
    data-action="submit">Send Message</button>
</form>
Create a file named process_form.php in your project directory. This file will handle the form submission, verify the reCAPTCHA token with Google, and process the form data if the score meets your threshold.
<?php
// Include the configuration file
require_once 'config.php';

// Check if the form was submitted via POST
if ($_SERVER['REQUEST_METHOD'] === 'POST') {
    // Sanitize input fields
    $name = trim($_POST['name'] ?? '');
    $email = trim($_POST['email'] ?? '');
    $subject = trim($_POST['subject'] ?? '');
    $message = trim($_POST['message'] ?? '');

    // Validate input fields
    $validationErrors = [];
    if(empty($name)){
        $validationErrors['name'] = 'Name is required.';
    }
    if(empty($email)){
        $validationErrors['email'] = 'Email is required.';
    } elseif(!filter_var($email, FILTER_VALIDATE_EMAIL)){
        $validationErrors['email'] = 'Invalid email format.';
    }
    if(empty($subject)){
        $validationErrors['subject'] = 'Subject is required.';
    }
    if(empty($message)){
        $validationErrors['message'] = 'Message is required.';
    }

    if(!empty($validationErrors)){
        // Return validation errors if any fields are invalid
        $response = [
            'success' => false,
            'message' => 'Please correct the errors in the form.',
            'errors' => $validationErrors
        ];
    }else{
        // Verify the reCAPTCHA token
        $token = $_POST['g-recaptcha-response'] ?? '';
        if(empty($token)){
            $response = [
                'success' => false,
                'message' => 'reCAPTCHA verification failed. Please try again.',
                'errors' => ['recaptcha' => 'reCAPTCHA token is missing.']
            ];
        }else{
            // Create the reCAPTCHA Enterprise API endpoint URL
            $url = 'https://recaptchaenterprise.googleapis.com/v1/projects/' . GCP_PROJECT_ID . '/assessments?key=' . GCP_API_KEY;

            // Build the assessment request payload
            $assessmentRequest = [
                'event' => [
                    'token' => $token,
                    'siteKey' => RECAPTCHA_SITE_KEY,
                    'expectedAction' => 'submit',
                    'userAgent' => $_SERVER['HTTP_USER_AGENT'] ?? 'Unknown',
                    'userIpAddress' => $_SERVER['REMOTE_ADDR'] ?? ''
                ]
            ];

            // Initialize CURL and send the request to the reCAPTCHA Enterprise API
            $curl = curl_init();
            curl_setopt_array($curl, [
                CURLOPT_URL => $url,
                CURLOPT_POST => true,
                CURLOPT_POSTFIELDS => json_encode($assessmentRequest),
                CURLOPT_RETURNTRANSFER => true,
                CURLOPT_SSL_VERIFYPEER => true,
                CURLOPT_SSL_VERIFYHOST => 2,
                CURLOPT_HTTPHEADER => [
                    'Content-Type: application/json; charset=utf-8'
                ]
            ]);
            $response = curl_exec($curl);
            $httpCode = curl_getinfo($curl, CURLINFO_HTTP_CODE);
            $curlError = curl_error($curl);
            curl_close($curl);

            if ($curlError) {
                $response = [
                    'success' => false,
                    'message' => 'Error communicating with reCAPTCHA API: ' . $curlError,
                    'errors' => ['recaptcha' => 'CURL error: ' . $curlError]
                ];
            } elseif ($httpCode !== 200) {
                $response = [
                    'success' => false,
                    'message' => 'reCAPTCHA API returned an unexpected HTTP code: ' . $httpCode,
                    'errors' => ['recaptcha' => 'HTTP error code: ' . $httpCode]
                ];
            } else {
                // Decode the API response and check the assessment result
                $assessmentResponse = json_decode($response, true);
                if (isset($assessmentResponse['tokenProperties']['valid']) && $assessmentResponse['tokenProperties']['valid'] === true) {
                    $score = $assessmentResponse['riskAnalysis']['score'] ?? 0.0;
                    if ($score >= RECAPTCHA_THRESHOLD) {
                        // Here you would typically send the email or save the form data to a database

                        // For demonstration, we'll just return a success response
                        $response = [
                            'success' => true,
                            'message' => 'Thank you! Your message has been sent successfully. We will get back to you soon.'
                        ];

                        // Unset the POST data to prevent resubmission on page refresh
                        unset($_POST);
                    } else {
                        $response = [
                            'success' => false,
                            'message' => 'reCAPTCHA verification failed. Your score was too low.',
                            'errors' => ['recaptcha' => 'Low reCAPTCHA score: ' . $score]
                        ];
                    }
                } else {
                    $response = [
                        'success' => false,
                        'message' => 'Invalid reCAPTCHA token.',
                        'errors' => ['recaptcha' => 'Token is invalid or expired.']
                    ];
                }
            }
        }
    }
}
?>
Once the form is submitted and verified, you can display the results to the user. This could be a simple success message or more detailed information about the submission.
Add the following code block in your index.php to display success or error messages based on the response from process_form.php.
<?php if (!empty($response['message'])): ?>
    <div class="alert alert-<?php echo $response['success'] ? 'success' : 'error'; ?>">
        <?php echo htmlspecialchars($response['message']); ?>
    </div>
<?php endif; ?>
Note: Ensure that you remove process_form.php from the form’s action attribute and instead submit the form to index.php to handle the status message display.
Adding Google reCAPTCHA v3 to an HTML contact form with PHP using the reCAPTCHA Enterprise score-based API involves three main stages:
The frontend uses:
grecaptcha.enterprise.execute()
while the PHP backend creates an assessment through:
POST /v1/projects/PROJECT_ID/assessments
The backend should then verify the token, confirm the expected action, retrieve the risk score, and apply an application-specific threshold before processing the form.
The key principle is simple:
Never trust the browser to decide whether a submission is legitimate. Generate the token in the browser, but verify and evaluate it on the server.
With this architecture, you can add a largely invisible layer of bot and abuse protection to contact forms, registration forms, login forms, newsletter forms, and other sensitive HTML form submissions while keeping the user experience friction-free.
Looking for expert assistance to implement or extend this script’s functionality? Submit a Service Request
💰 Budget-friendly • 🌍 Global clients • 🚀 Production-ready solutions





How to implement in wordpress?
Hi. I have implemented the script and uploaded the files on server.
it says displays success message also, but I have not received any message in my inbox.
HI, Thanks for this. I am new to this so it was really helpful. I just have one question. With reCAPTCHA v3 shouldn’t you also check that $responseData->score if below your chosen threshold e.g 0.5 before sending the email?