close
Representational state transfer (REST) or RESTful web services provide a way to exchange data between applications or systems on the Internet. RESTful web service also refers as RESTful API, uses HTTP requests to GET, PUT, POST, and DELETE data across platforms. In present days, RESTful API is an essential component of the web application that ensures supporting multiple devices.
When the CodeIgniter application requires communicating with another application, RESTful API is needed to integrate into CodeIgniter. Using RESTful API in CodeIgniter, you can exchange data between different applications or platforms. This tutorial shows RESTful server implementation for CodeIgniter and you will learn how to create RESTful web services in CodeIgniter 3.
If you are a beginner to CodeIgniter, first see CodeIgniter from Scratch tutorial to set up and configure the CodeIgniter application.
In this example CodeIgniter REST Server application, we will implement CRUD operations with REST API in the CodeIgniter web service. The following tasks will be performed to create a simple REST API in CodeIgniter.
Before getting started, take a look at the file structure of CodeIgniter REST API.
codeigniter_restserver/
├── application/
    ├── config/
    |   └── rest.php
    ├── controllers/
    |   └── Api.php
    ├── language/
    |   └── english/
    |       └── rest_controller_lang.php
    ├── libraries/
    |   ├── Format.php
    |   └── REST_Controller.php
    └── models/
        └── User.php
You need to create a database that can be used for this application. After that, run the SQL command below to create tables in the database.
1. Use the following SQL statement to create the keys table where the API key and respective settings will be stored.
CREATE TABLE `keys` (
  `id` int(11) NOT NULL AUTO_INCREMENT,
  `user_id` int(11) NOT NULL,
  `key` varchar(40) NOT NULL,
  `level` int(2) NOT NULL,
  `ignore_limits` tinyint(1) NOT NULL DEFAULT 0,
  `is_private_key` tinyint(1) NOT NULL DEFAULT 0,
  `ip_addresses` text DEFAULT NULL,
  `date_created` datetime NOT NULL,
  PRIMARY KEY (`id`)
) ENGINE=InnoDB DEFAULT CHARSET=utf8;
For now, run the following SQL statement to add the default API settings in the keys table. These API key settings will be used for REST API authentication.
INSERT INTO `keys` (`id`, `user_id`, `key`, `level`, `ignore_limits`, `is_private_key`, `ip_addresses`, `date_created`) VALUES
(1, 0, 'CODEX@123', 0, 0, 0, NULL, '2023-02-10 13:34:33');
Note that: We have added CODEX@123 as the API key for this demo application, you should use a secure key for your application in production.
2. Use the following SQL statement to create the “users” table in the MySQL database where the user’s information will be stored.
CREATE TABLE `users` (
  `id` int(11) NOT NULL AUTO_INCREMENT,
  `first_name` varchar(50) COLLATE utf8_unicode_ci NOT NULL,
  `last_name` varchar(50) COLLATE utf8_unicode_ci NOT NULL,
  `email` varchar(50) COLLATE utf8_unicode_ci NOT NULL,
  `phone` varchar(20) COLLATE utf8_unicode_ci DEFAULT NULL,
  `created` datetime NOT NULL DEFAULT current_timestamp(),
  `modified` datetime NOT NULL DEFAULT current_timestamp(),
  `status` tinyint(1) NOT NULL DEFAULT 1 COMMENT '1=Active | 0=Inactive',
  PRIMARY KEY (`id`)
) ENGINE=InnoDB DEFAULT CHARSET=utf8 COLLATE=utf8_unicode_ci;
This REST_Controller is a custom library that helps to implement RESTful server in CodeIgniter. Follow the below steps to set up REST Controller Library in the CodeIgniter application.
1. REST config: The configurations related to the REST_Controller library are defined in the rest.php file and placed it in the application/config/ directory.
In the application/config/rest.php file, specify the following settings.
REST Login: Set authorization type for REST API login authentication.
FALSE – No login requiredbasic – Unsecured logindigest – More secure loginsession – Check for a PHP session variable$config['rest_auth'] = 'basic';
REST Login Source: If login authentication is required, set the source.
'' – Use config specified in rest.phpldap – Use LDAP authenticationlibrary – Use an authentication libraryrest_auth is set to session then set the name of the session variable in auth_source.$config['auth_source'] = '';
REST Login Credentials: Specify the API login usernames and passwords in an array.
$config['rest_valid_logins'] = ['admin' => '1234'];
REST Enable Keys: When set to TRUE, the REST API will look for a column name called key and compare its value with the given API key.
$config['rest_enable_keys'] = TRUE;
2. REST Controller: Place the REST_Controller.php file in the application/libraries/ directory.
3. Format Library: Place the Format.php file in the application/libraries/ directory.
4. Language: Place the rest_controller_lang.php file in the application/language/english/ directory.
Note that: All the required library files are included in our example CodeIgniter application, so, you don’t need to download these files separately. Download our source code to get a sample CodeIgniter RESTful Web service application.
The User model (application/models/User.php) handles the database related operations.
users table of the database. Returns a single row if an ID is passed, otherwise all records.users table.users table based on the given ID.users table based on the given ID.<?php
defined('BASEPATH') OR exit('No direct script access allowed');
class User extends CI_Model {
public function __construct() {
parent::__construct();
// Load database library
$this->load->database();
// Database table name
$this->tbl_name = 'users';
}
/*
* Fetch user data
*/
function getRows($id = ""){
if(!empty($id)){
$query = $this->db->get_where($this->tbl_name, array('id' => $id));
return $query->row_array();
}else{
$query = $this->db->get($this->tbl_name);
return $query->result_array();
}
}
/*
* Insert user data
*/
public function insert($data = array()) {
if(!array_key_exists('created', $data)){
$data['created'] = date("Y-m-d H:i:s");
}
if(!array_key_exists('modified', $data)){
$data['modified'] = date("Y-m-d H:i:s");
}
$insert = $this->db->insert($this->tbl_name, $data);
if($insert){
return $this->db->insert_id();
}else{
return false;
}
}
/*
* Update user data
*/
public function update($data, $id) {
if(!empty($data) && !empty($id)){
if(!array_key_exists('modified', $data)){
$data['modified'] = date("Y-m-d H:i:s");
}
$update = $this->db->update($this->tbl_name, $data, array('id' => $id));
return $update?true:false;
}else{
return false;
}
}
/*
* Delete user data
*/
public function delete($id){
$delete = $this->db->delete($this->tbl_name, array('id' => $id));
return $delete?true:false;
}
}
The Api controller (application/controllers/Api.php) handles API request and response operations.
The Api controller has the following methods to handle the GET, POST, PUT, and DELETE requests.
<?php
defined('BASEPATH') OR exit('No direct script access allowed');

// Include Rest Controller library
require APPPATH . '/libraries/REST_Controller.php';

class Api extends REST_Controller {

    public function __construct() {
        parent::__construct();

        // Load user model
        $this->load->model('user');
    }

    public function users_get($id = 0) {
        // Returns all rows if the id parameter doesn't exist,
        //otherwise single row will be returned
        $users = $this->user->getRows($id);

        //check if the user data exists
        if(!empty($users)){
            // Set the response and exit
            //OK (200) being the HTTP response code
            $this->response($users, REST_Controller::HTTP_OK);
        }else{
            // Set the response and exit
            //NOT_FOUND (404) being the HTTP response code
            $this->response([
                'status' => FALSE,
                'message' => 'No users were found.'
            ], REST_Controller::HTTP_NOT_FOUND);
        }
    }

    public function users_post() {
        $userData = array(
            'first_name' => $this->post('first_name'),
            'last_name' => $this->post('last_name'),
            'email' => $this->post('email'),
            'phone' => $this->post('phone')
        );

        if(!empty($userData['first_name']) && !empty($userData['last_name']) && !empty($userData['email']) && filter_var($userData['email'], FILTER_VALIDATE_EMAIL)){
            // Insert user record in database
            $insert = $this->user->insert($userData);

            // Check if the user data inserted
            if($insert){
                // Set the response and exit
                $this->response([
                    'status' => TRUE,
                    'message' => 'User has been added successfully.'
                ], REST_Controller::HTTP_OK);
            }else{
                // Set the response and exit
                $this->response("Something went wrong, please try again.", REST_Controller::HTTP_BAD_REQUEST);
            }
        }else{
            // Set the response and exit
            //BAD_REQUEST (400) being the HTTP response code
            $this->response("Provide complete user information to create.", REST_Controller::HTTP_BAD_REQUEST);
        }
    }

    public function users_put() {
        $id = $this->put('id');

        if(!empty($id)){
            $userData = array();
            if(!empty($this->put('first_name'))){
                $userData['first_name'] = $this->put('first_name');
            }
            if(!empty($this->put('last_name'))){
                $userData['last_name'] = $this->put('last_name');
            }
            if(!empty($this->put('email'))){
                $userData['email'] = $this->put('email');
            }
            if(!empty($this->put('phone'))){
                $userData['phone'] = $this->put('phone');
            }

            if(!empty($userData)){
                // Update user record in database
                $update = $this->user->update($userData, $id);

                // Check if the user data updated
                if($update){
                    // Set the response and exit
                    $this->response([
                        'status' => TRUE,
                        'message' => 'User has been updated successfully.'
                    ], REST_Controller::HTTP_OK);
                }else{
                    // Set the response and exit
                    $this->response("Something went wrong, please try again.", REST_Controller::HTTP_BAD_REQUEST);
                }
            }else{
                $this->response("Provide user information to update.", REST_Controller::HTTP_BAD_REQUEST);
            }
        }else{
            // Set the response and exit
            $this->response("Provide the reference ID of the user to be updated.", REST_Controller::HTTP_BAD_REQUEST);
        }
    }

    public function users_delete($id){
        // Check whether user ID is not empty
        if($id){
            // Delete user record from database
            $delete = $this->user->delete($id);

            if($delete){
                // Set the response and exit
                $this->response([
                    'status' => TRUE,
                    'message' => 'User has been removed successfully.'
                ], REST_Controller::HTTP_OK);
            }else{
                // Set the response and exit
                $this->response("Something went wrong, please try again.", REST_Controller::HTTP_BAD_REQUEST);
            }
        }else{
            // Set the response and exit
            $this->response([
                'status' => FALSE,
                'message' => 'No users were found.'
            ], REST_Controller::HTTP_NOT_FOUND);
        }
    }
}
By default, the index.php file will be included in the URL of the Codeigniter application. Do the following steps to remove the index.php from the API URLs.
1. In the config/config.php file, remove “index.php” from index_page and set blank to it.
$config['index_page'] = '';
2. Create a .htaccess file in the application’s root directory and add the following rules in HTACCESS.
RewriteEngine On
RewriteCond %{REQUEST_FILENAME} !-f
RewriteCond %{REQUEST_FILENAME} !-d
RewriteRule ^(.*)$ index.php/$1 [L]
Note that: The mod_rewrite must be enabled on your Apache server to rewrite the URL using a .htaccess file.
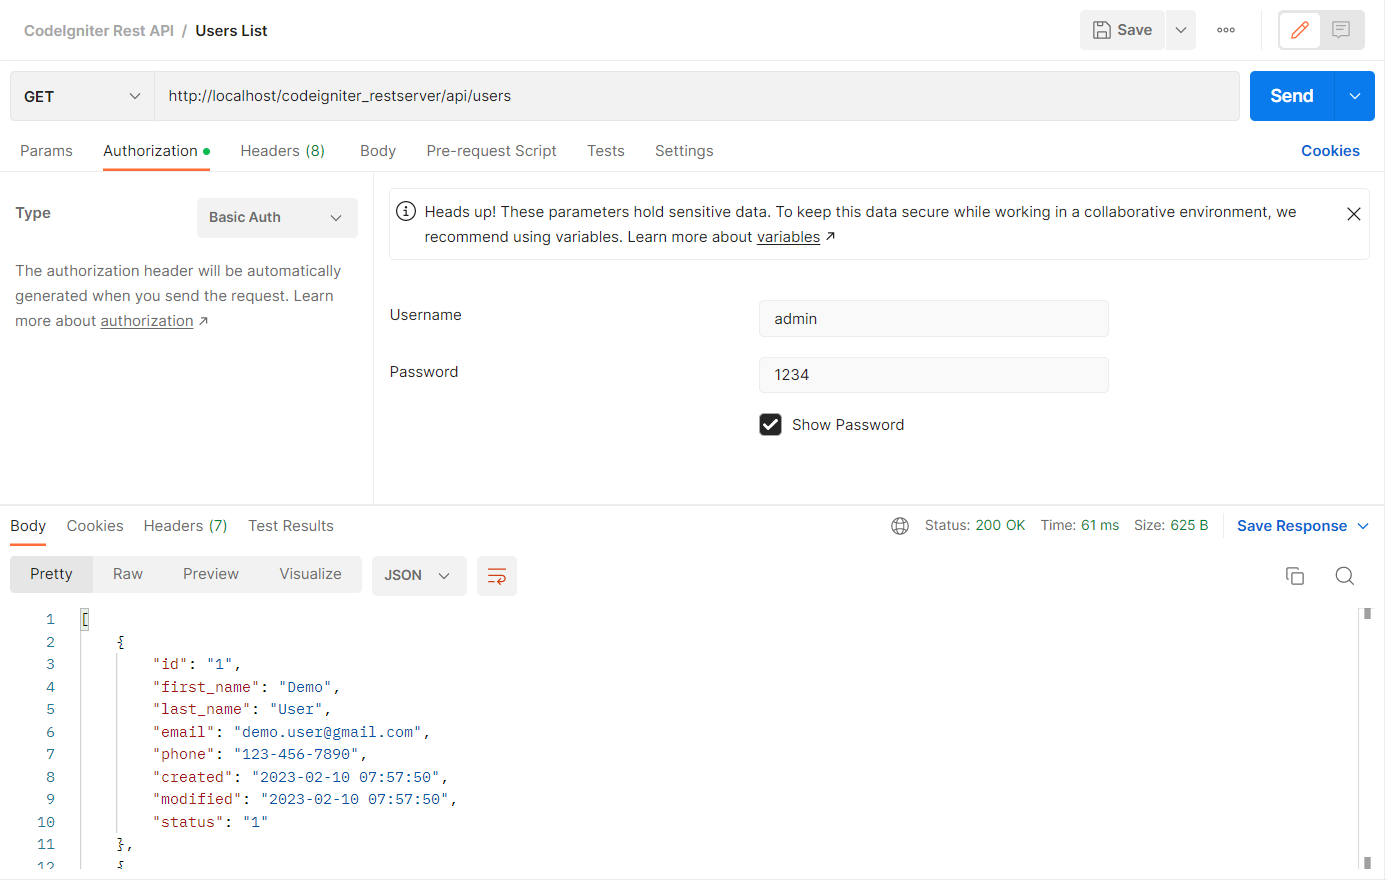
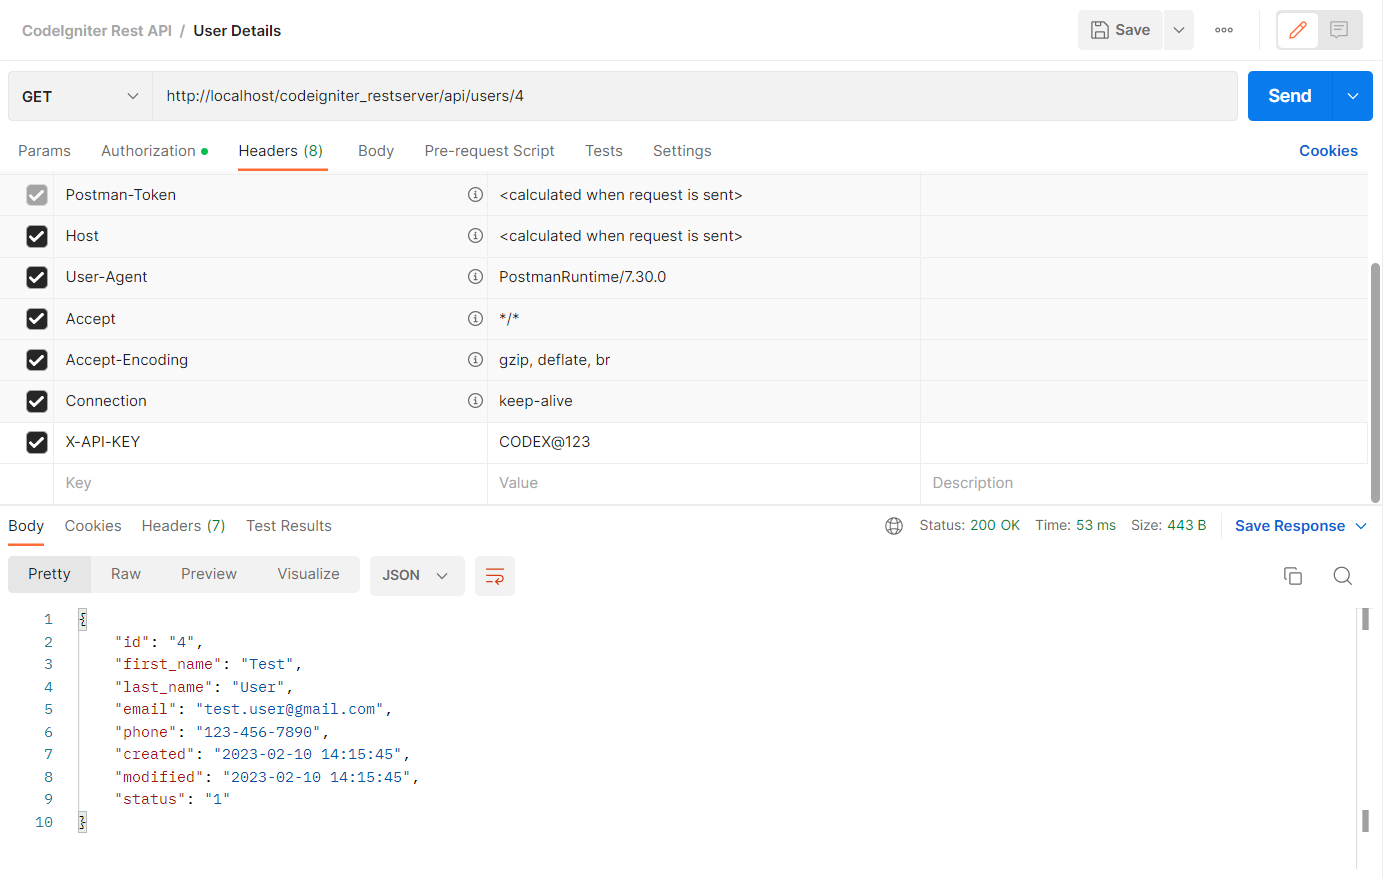
Now it’s time to interact with the CodeIgniter RESTful Web Services. The cURL is the most flexible and easiest way to interact with a REST API. In the following example code, we will show you how to send GET, POST, PUT, and DELETE requests to CodeIgniter REST API using the PHP cURL method. The HTTP Basic authentication and API key will be used to connect with RESTful API.
Retrieve User Data via REST API:
The following code performs a GET request to fetch the user data via RESTful Web Services.
//API URL
$url = 'http://your_app_base_url/api/users';

//API key
$apiKey = 'CODEX@123';

//Auth credentials
$username = "admin";
$password = "1234";

//create a new cURL resource
$ch = curl_init($url);

curl_setopt($ch, CURLOPT_TIMEOUT, 30);
curl_setopt($ch, CURLOPT_RETURNTRANSFER,1);
curl_setopt($ch, CURLOPT_HTTPAUTH, CURLAUTH_ANY);
curl_setopt($ch, CURLOPT_HTTPHEADER, array("X-API-KEY: " . $apiKey));
curl_setopt($ch, CURLOPT_USERPWD, "$username:$password");

$result = curl_exec($ch);

//close cURL resource
curl_close($ch);
Pass ID in API URL to get specific user data.
http://your_app_base_url/api/users/{id}
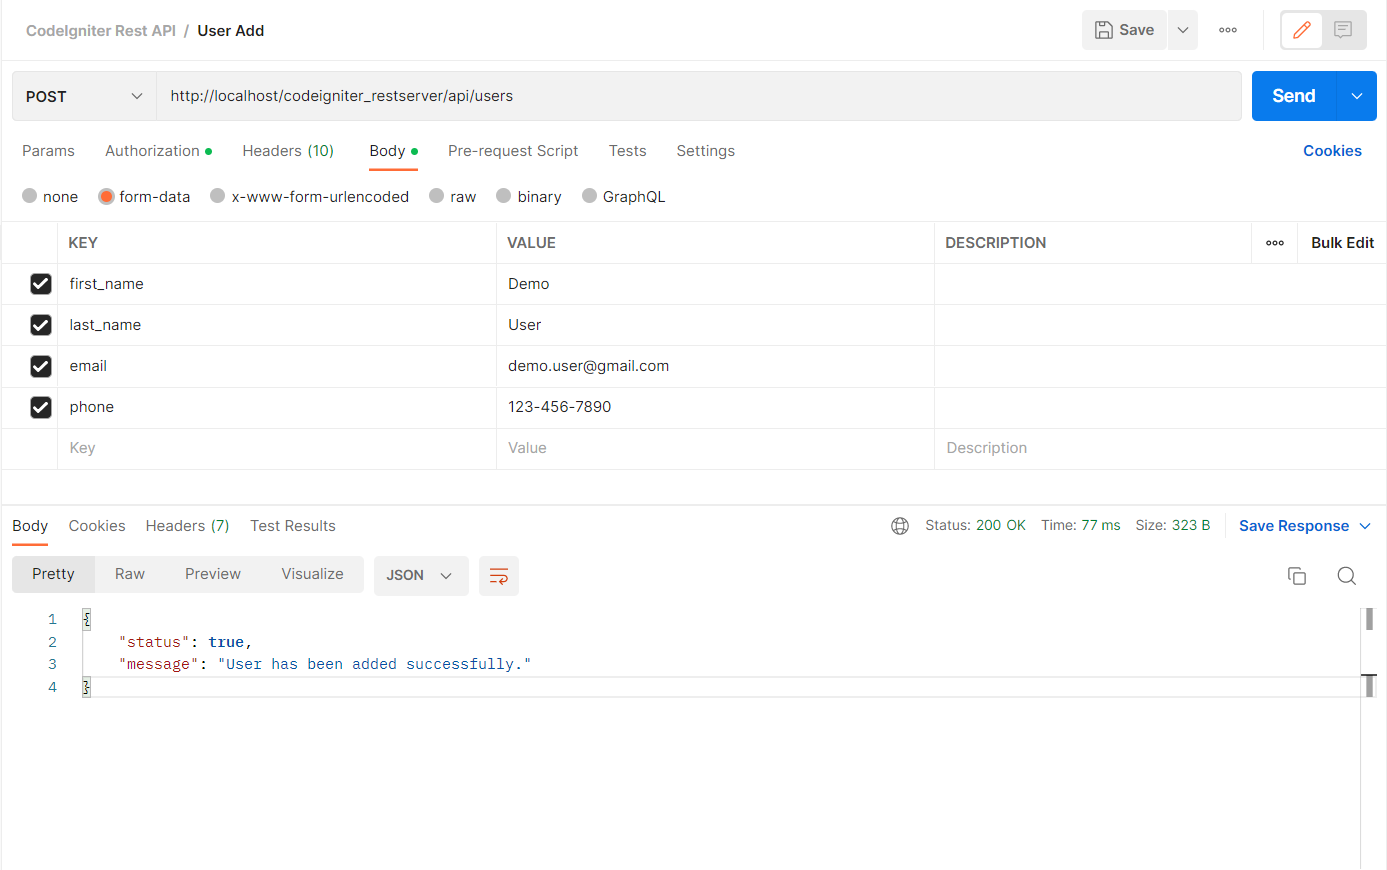
Insert User Data via REST API:
The following code performs a POST request to insert user data via RESTful Web Services.
//API URL
$url = 'http://your_app_base_url/api/users';

//API key
$apiKey = 'CODEX@123';

//Auth credentials
$username = "admin";
$password = "1234";

//user information
$userData = array(
    'first_name' => 'John',
    'last_name' => 'Doe',
    'email' => 'john@example.com',
    'phone' => '123-456-7890'
);

//create a new cURL resource
$ch = curl_init($url);

curl_setopt($ch, CURLOPT_TIMEOUT, 30);
curl_setopt($ch, CURLOPT_RETURNTRANSFER,1);
curl_setopt($ch, CURLOPT_HTTPAUTH, CURLAUTH_ANY);
curl_setopt($ch, CURLOPT_HTTPHEADER, array("X-API-KEY: " . $apiKey));
curl_setopt($ch, CURLOPT_USERPWD, "$username:$password");
curl_setopt($ch, CURLOPT_POST, 1);
curl_setopt($ch, CURLOPT_POSTFIELDS, $userData);

$result = curl_exec($ch);

//close cURL resource
curl_close($ch);
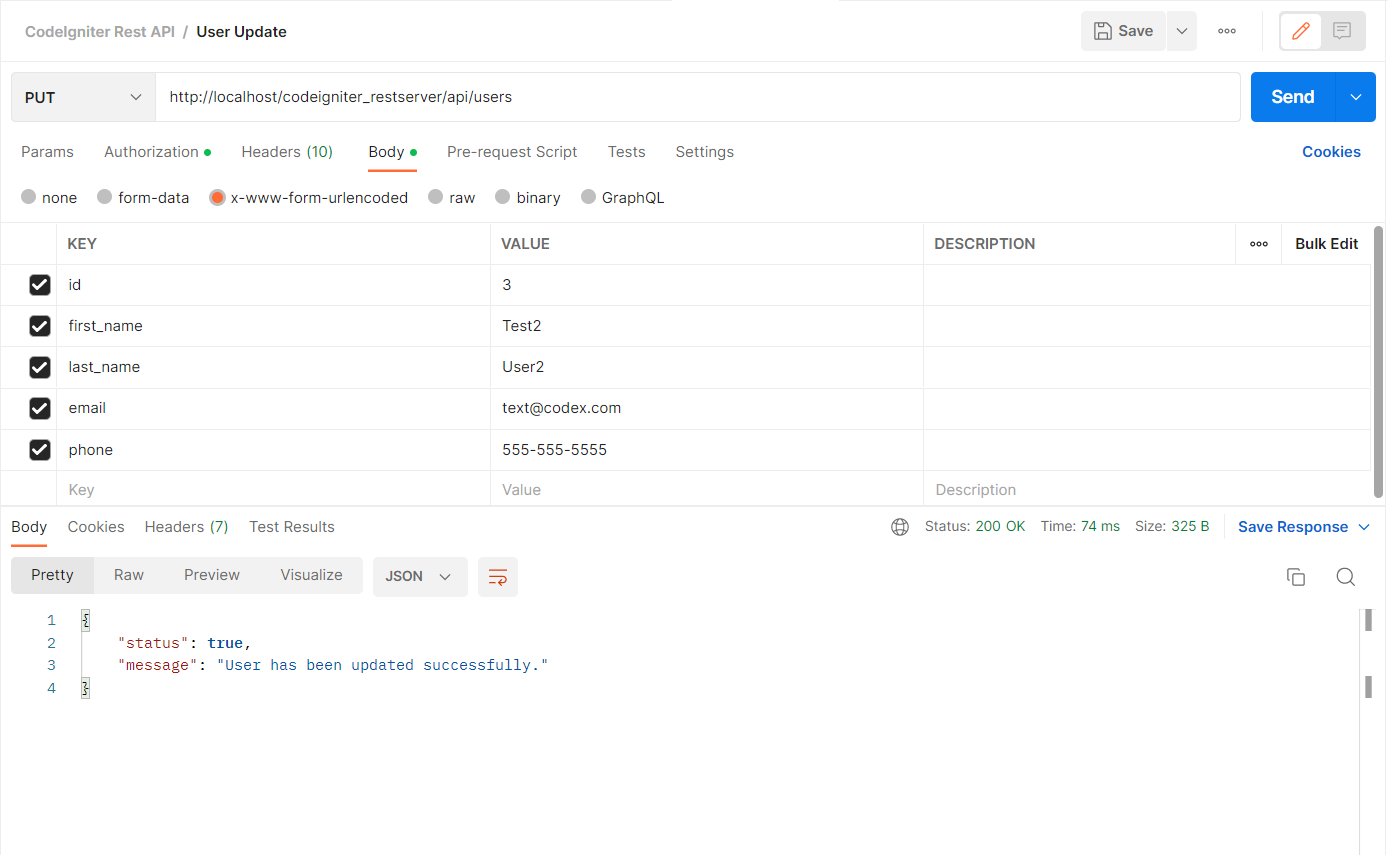
Update User Data via REST API:
The following code performs a PUT request to update user data via RESTful Web Services.
//API URL
$url = 'http://your_app_base_url/api/users';

//API key
$apiKey = 'CODEX@123';

//Auth credentials
$username = "admin";
$password = "1234";

//user information
$userData = array(
    'id' => 2,
    'first_name' => 'John2',
    'last_name' => 'Doe2',
    'email' => 'john2@example.com',
    'phone' => '098-765-4321'
);

//create a new cURL resource
$ch = curl_init($url);

curl_setopt($ch, CURLOPT_TIMEOUT, 30);
curl_setopt($ch, CURLOPT_RETURNTRANSFER,1);
curl_setopt($ch, CURLOPT_HTTPAUTH, CURLAUTH_ANY);
curl_setopt($ch, CURLOPT_HTTPHEADER, array('X-API-KEY: '.$apiKey, 'Content-Type: application/x-www-form-urlencoded'));
curl_setopt($ch, CURLOPT_USERPWD, "$username:$password");
curl_setopt($ch, CURLOPT_CUSTOMREQUEST, "PUT");
curl_setopt($ch, CURLOPT_POSTFIELDS, http_build_query($userData));

$result = curl_exec($ch);

//close cURL resource
curl_close($ch);
Delete User Data via REST API:
The following code performs a DELETE request to delete user data via RESTful Web Services.
//API URL
$url = 'http://your_app_base_url/api/users/{id}';

//API key
$apiKey = 'CODEX@123';

//Auth credentials
$username = "admin";
$password = "1234";

//create a new cURL resource
$ch = curl_init($url);

curl_setopt($ch, CURLOPT_TIMEOUT, 30);
curl_setopt($ch, CURLOPT_RETURNTRANSFER,1);
curl_setopt($ch, CURLOPT_HTTPAUTH, CURLAUTH_ANY);
curl_setopt($ch, CURLOPT_HTTPHEADER, array("X-API-KEY: " . $apiKey));
curl_setopt($ch, CURLOPT_USERPWD, "$username:$password");
curl_setopt($ch, CURLOPT_CUSTOMREQUEST, 'DELETE');

$result = curl_exec($ch);

//close cURL resource
curl_close($ch);
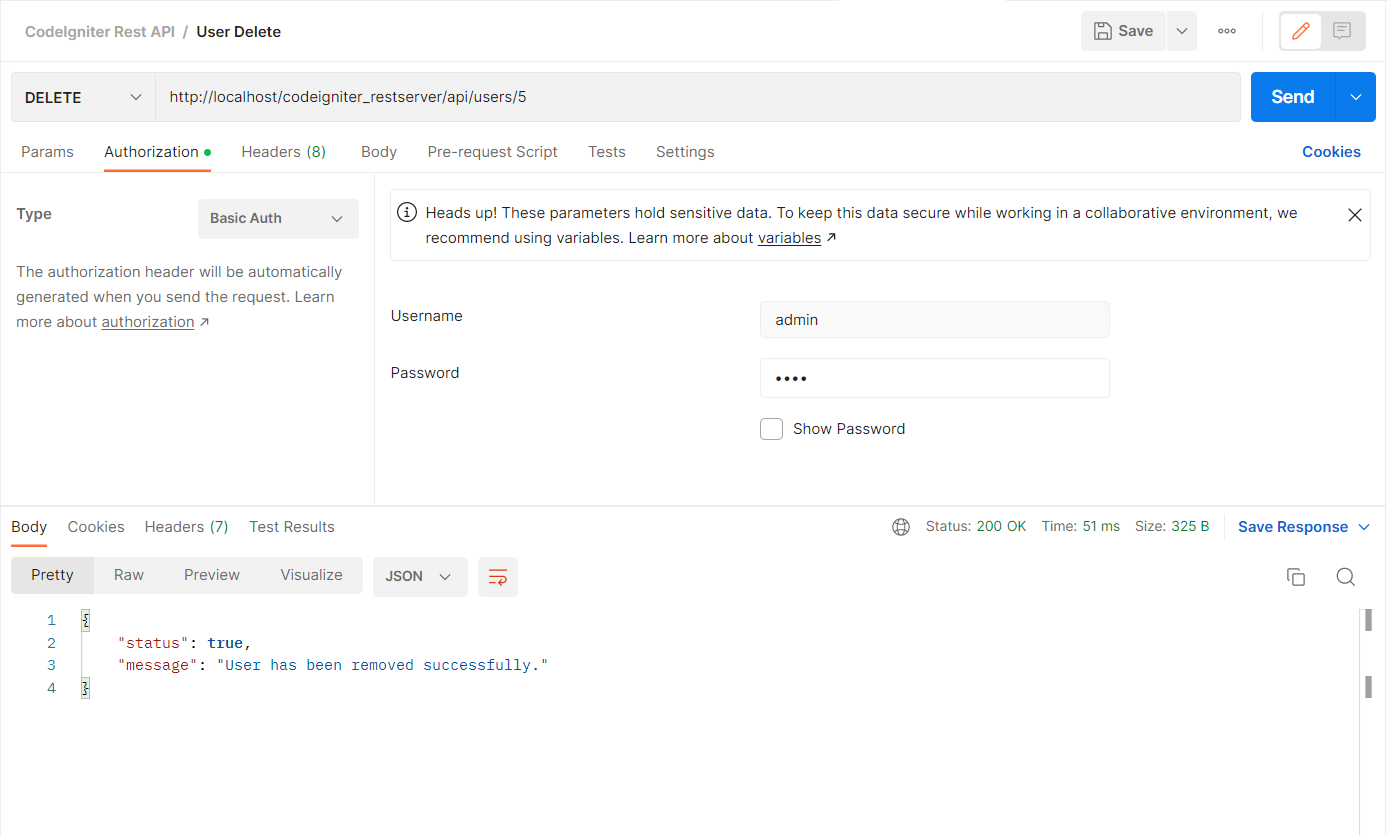
Postman makes API development faster, easier, and better. Install Postman API Platform application helps developers test API calls in real-time. Install the Postman application on the device (MacOS/Windows/Linux) for testing the REST APIs.
Assume that the Base URL of the example CodeIgniter Rest Server is http://localhost/codeigniter_restserver/.
GET http://localhost/codeigniter_restserver/api/users
GET http://localhost/codeigniter_restserver/api/users/{id}
POST http://localhost/codeigniter_restserver/api/users
PUT http://localhost/codeigniter_restserver/api/users
DELETE http://localhost/codeigniter_restserver/api/users/{id}
User Login and Registration with CodeIgniter REST API
This example CodeIgniter application allows you to build RESTful web services and REST API development faster. Here we have discussed the most used HTTP requests (GET, POST, PUT, and DELETE) in RestServer. You can easily integrate the CRUD operations with REST API using the CodeIgniter framework.
Looking for expert assistance to implement or extend this script’s functionality? Submit a Service Request
💰 Budget-friendly • 🌍 Global clients • 🚀 Production-ready solutions


Good afternoon I acquired the rest condeigniter api script and I have a question: After configuring the library in codeigniter do I need to configure the routes file?
is compatible with codeigniter 4?
Yes.
Kindly make tutorial on one to many relation in codeiginter.
where to put the cURL code of the update, insert, delete, retrive.
I need token authentication for each request
Hello CODEX,
i love your tutorial and i need a little help here.
Pls how can i make User Login and Registration?
Thanks
We will try to publish your requested tutorial soon. Please subscribe to our newsletter to get notified.
We have published the User Login and Registration with CodeIgniter REST API tutorial, see it from here – https://www.codexworld.com/codeigniter-rest-api-user-login-registration/
please make user login and registration rest api in codeigniter
can u send your complete setup folder because i have lots of trouble for installation ……
I have a question. We write `api/example/user/` in the URL. I wonder, where comes from that ‘user’ in the URL?