close
Login with Google OAuth library is a quick and powerful way to integrate login system in the web application. You can easily integrate Google Sign-In on the website using PHP. But, if you want to provide a user-friendly way to login with Google Account, the JavaScript client library is the best option. You can integrate Google login without page refresh using JavaScript OAuth library. Google JavaScript API client helps the user to login with their Google account on the third-party website.
Google Identity API lets you allow the user to login to your website with their Google account using JavaScript. The best advantage of using the Google JavaScript API library is that the login process can be implemented on a single page without page refresh. In this tutorial, we will show you how to integrate Sign In with Google account using JavaScript API client library and store the profile data in the database using PHP and MySQL.
Before getting started to integrate Login with Google using JavaScript, take a look at the file structure.
google_login_with_javascript/
├── index.html
├── dbConfig.php
└── auth_init.php
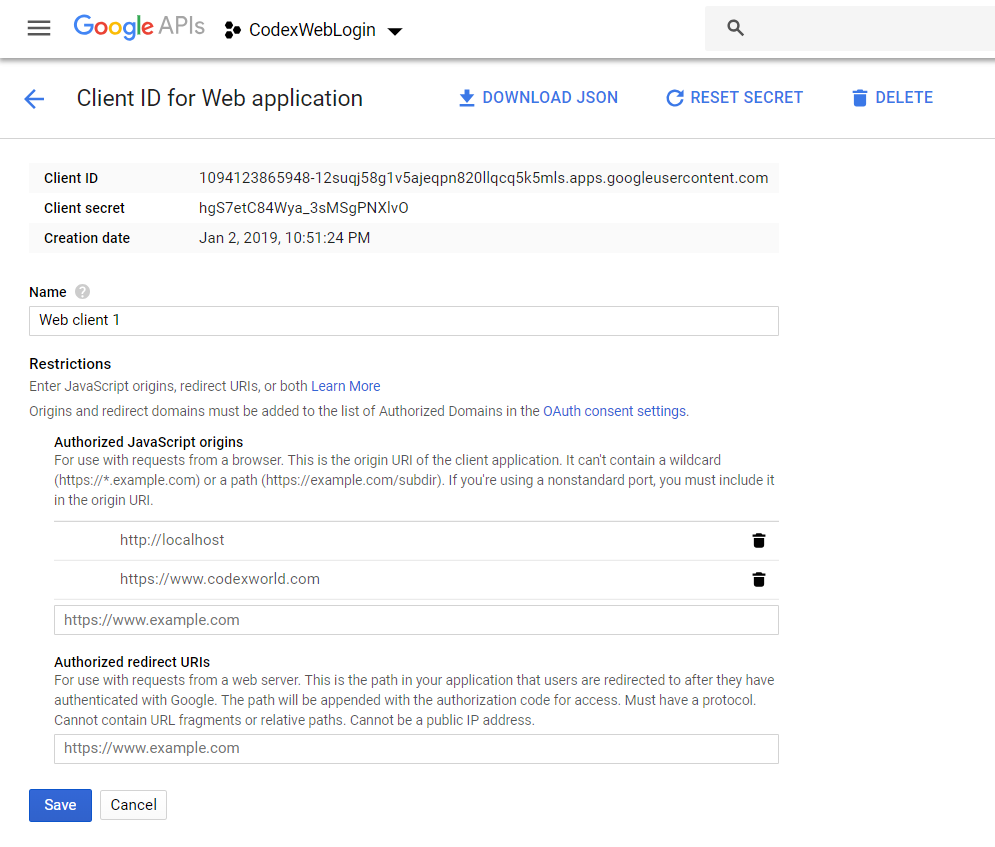
Before you begin to integrate Google sign-in into the website, create a Google API Console Project for generating Client ID. The Client ID is required to call the Google Sign-In JavaScript API.
Note that: You must do the following settings on the Google API console project to access JavaScript API.
Once the API Console Project is created successfully, copy the Client ID for later use in the script.
The following functionality will be implemented to integrate the Google Login feature into the website using Google Identity API.
A table is required in the database to store the user account information from Google. The following SQL creates a users table in the MySQL database to hold the Google profile information.
CREATE TABLE `users` (
  `id` int(11) NOT NULL AUTO_INCREMENT,
  `oauth_provider` enum('google','facebook','twitter','linkedin') NOT NULL DEFAULT 'google',
  `oauth_uid` varchar(50) NOT NULL,
  `first_name` varchar(25) NOT NULL,
  `last_name` varchar(25) NOT NULL,
  `email` varchar(50) NOT NULL,
  `picture` varchar(255) DEFAULT NULL,
  `created` datetime NOT NULL,
  `modified` datetime NOT NULL,
  PRIMARY KEY (`id`)
) ENGINE=InnoDB DEFAULT CHARSET=utf8 COLLATE=utf8_unicode_ci;
Since the example code uses HTML API, only one page (index.html) is required to add the Sign In With Google button and process Google account authentication without page refresh using JavaScript.
Load Google Client Library:
Include the Google Identity API Client library.
<script src="https://accounts.google.com/gsi/client" async></script>
Define HTML Elements:
Create an element with ID g_id_onload and specify data attributes that are supported by Google HTML data attributes API.
data-client_id: Set the app’s client ID, which is created in the Google Developers Console.data-context: Set the context type for the button text.
data-ux_mode: Set the UX flow will be used by the Sign In With Google button.
data-callback: Set a JavaScript function that handles the returned response token.data-auto_prompt: Set true/false to determine whether you want to display the Google One Tap login dialog.Create an element with class g_id_signin and specify the visual data attributes to render the Sign In With Google button.
data-type: Set the button type: “icon” or “standard” button.data-shape: Set the button shape: “rectangular”, “pill”, “circle”, or “square”.data-theme: Set the button theme: “outline”, “filled_blue”, or “filled_black”.data-text: Set the button text: “signin_with”, “signup_with”, “continue_with”, or “signin”.data-size: Set the button size: “large”, “medium”, or “small”.data-logo_alignment: Set the alignment of the Google logo in the button: “left”, or “center”.Define an element (.pro-data) where the account data from Google profile info will be displayed.
<!-- Sign In With Google button with HTML data attributes API -->
<div id="g_id_onload"
    data-client_id="CLIENT_ID.apps.googleusercontent.com"
    data-context="signin"
    data-ux_mode="popup"
    data-callback="handleCredentialResponse"
    data-auto_prompt="false">
</div>

<div class="g_id_signin"
    data-type="standard"
    data-shape="rectangular"
    data-theme="outline"
    data-text="signin_with"
    data-size="large"
    data-logo_alignment="left">
</div>

<!-- Display the user's profile info -->
<div class="pro-data hidden"></div>
Decode Response ID Token and Display Account Data from Google:
In the following JavaScript code, we will get the credential token in the callback handler method and display the account information of the logged-in Google account.
handleCredentialResponse() function POST the ID token to the server-side script (auth_init.php) to decode JWT token and get the account info using JavaScript.
.pro-data) of the web page.signOut() function helps to Sign-Out the user from their Google account using JavaScript and display the Google Sign In button.<script>
// Credential response handler function
function handleCredentialResponse(response){
// Post JWT token to server-side
fetch("auth_init.php", {
method: "POST",
headers: { "Content-Type": "application/json" },
body: JSON.stringify({ request_type:'user_auth', credential: response.credential }),
})
.then(response => response.json())
.then(data => {
if(data.status == 1){
let responsePayload = data.pdata;
// Display the user account data
let profileHTML = '<h3>Welcome '+responsePayload.given_name+'! <a href="javascript:void(0);" onclick="signOut('+responsePayload.sub+');">Sign out</a></h3>';
profileHTML += '<img src="'+responsePayload.picture+'"/><p><b>Auth ID: </b>'+responsePayload.sub+'</p><p><b>Name: </b>'+responsePayload.name+'</p><p><b>Email: </b>'+responsePayload.email+'</p>';
document.getElementsByClassName("pro-data")[0].innerHTML = profileHTML;
document.querySelector("#btnWrap").classList.add("hidden");
document.querySelector(".pro-data").classList.remove("hidden");
}
})
.catch(console.error);
}
// Sign out the user
function signOut(authID) {
document.getElementsByClassName("pro-data")[0].innerHTML = '';
document.querySelector("#btnWrap").classList.remove("hidden");
document.querySelector(".pro-data").classList.add("hidden");
}
</script>
Handle Element Visibility with CSS:
Define CSS for the hidden class used in HTML elements to handle visibility.
.hidden{
    display: none;
}
The dbConfig.php file is used to connect and select the database. Specify the database host ($dbHost), username ($dbUsername), password ($dbPassword), and name ($dbName) as per your MySQL server credentials.
<?php

// Database configuration
$dbHost     = "localhost";
$dbUsername = "root";
$dbPassword = "root";
$dbName     = "codexworld_db";

// Create database connection
$db = new mysqli($dbHost, $dbUsername, $dbPassword, $dbName);

// Check connection
if ($db->connect_error) {
    die("Connection failed: " . $db->connect_error);
}

?>
The auth_init.php file is loaded by the ID token response handler function (handleCredentialResponse) from the client-side.
<?php
// Load the database configuration file
require_once 'dbConfig.php';

// Retrieve JSON from POST body
$jsonStr = file_get_contents('php://input');
$jsonObj = json_decode($jsonStr);

if(!empty($jsonObj->request_type) && $jsonObj->request_type == 'user_auth'){
    $credential = !empty($jsonObj->credential)?$jsonObj->credential:'';

    // Decode response payload from JWT token
    list($header, $payload, $signature) = explode (".", $credential);
    $responsePayload = json_decode(base64_decode($payload));

    if(!empty($responsePayload)){
        // The user's profile info
        $oauth_provider = 'google';
        $oauth_uid  = !empty($responsePayload->sub)?$responsePayload->sub:'';
        $first_name = !empty($responsePayload->given_name)?$responsePayload->given_name:'';
        $last_name  = !empty($responsePayload->family_name)?$responsePayload->family_name:'';
        $email      = !empty($responsePayload->email)?$responsePayload->email:'';
        $picture    = !empty($responsePayload->picture)?$responsePayload->picture:'';

        // Check whether the user data already exist in the database
        $query = "SELECT * FROM users WHERE oauth_provider = '".$oauth_provider."' AND oauth_uid = '".$oauth_uid."'";
        $result = $db->query($query);

        if($result->num_rows > 0){
            // Update user data if already exists
            $query = "UPDATE users SET first_name = '".$first_name."', last_name = '".$last_name."', email = '".$email."', picture = '".$picture."', modified = NOW() WHERE oauth_provider = '".$oauth_provider."' AND oauth_uid = '".$oauth_uid."'";
            $update = $db->query($query);
        }else{
            // Insert user data
            $query = "INSERT INTO users VALUES (NULL, '".$oauth_provider."', '".$oauth_uid."', '".$first_name."', '".$last_name."', '".$email."', '".$picture."', NOW(), NOW())";
            $insert = $db->query($query);
        }

        $output = [
            'status' => 1,
            'msg' => 'Account data inserted successfully!',
            'pdata' => $responsePayload
        ];
        echo json_encode($output);
    }else{
        echo json_encode(['error' => 'Account data is not available!']);
    }
}
?>
If you want to integrate Google One Tap Sign-In in the web application, use the data-auto_prompt attribute in the g_id_onload element.
data-auto_prompt to true, it will display Google One tap prompt dialog.data-auto_select attribute and set it to true, it will enable automatic account selection on Google One Tap.<div id="g_id_onload"
data-client_id="CLIENT_ID.apps.googleusercontent.com"
data-context="signin"
data-ux_mode="popup"
data-callback="handleCredentialResponse"
data-auto_prompt="true">
</div>
Login with Google Account in CodeIgniter
Google Sing-in with JavaScript is the instant way to add user login functionality to the website. In the example code, we have made it simple to integrate Google Login without page refresh using JavaScript. This script will help to make your social login system user-friendly because the user can log in with their Google account on the dialog window without leaving the web page.
Do you want to get implementation help, or enhance the functionality of this script? Click here to Submit Service Request


How do I do if I want to redirect the user after authentication to another page?
Thank you, it’s really helpful.
Excellent Detailed post, working in one shot.
Thanks a lot for sharing this.
Excellent Post – Thanks
Excellent Post!
Code work nice…but i getting problem while rendering two google login button on same page,..Please help Thanks..
I’ve copied and revised all the code in my localhost with xampp and also upload to my web site, and in both cases the result is the same: the google button works correctly for signing, but no way in order to show the user profile information. I don’t understand, since exactly the same code is working perfectly on your site.
Any ideas?? thank you in advance
Please a demo login with facebook account using JS. Thank you so much!