close
The Stripe Subscription API provides an easy way to integrate recurring payments on the website. If you want to implement the membership subscription system on the web application, subscription payment is required for recurring billing. Stripe subscription is a quick and effective way to allow your website members to purchase a membership online using their credit cards. In Stripe subscription payment, the buyer is charged recurringly based on the specific interval. The member of your website can subscribe to a plan and make payments with their credit/debit card without leaving the website.
Stripe payment gateway provides one of the most secure and developer-friendly platforms for accepting recurring payments online. Instead of building your own card collection form, you can use the Stripe Payment Element, which supports cards and multiple payment methods while keeping sensitive payment information outside of your server.
In this tutorial, you’ll build a complete Stripe subscription system in PHP using the Stripe Payment Element for collecting payment details, Stripe.js for payment confirmation, and the Stripe PHP SDK for creating customers, subscriptions, and validating successful payments. The application also stores subscription records in a MySQL database and demonstrates how to handle webhook events for payment lifecycle updates.
By the end of this tutorial, you’ll have a production-ready subscription workflow that can be adapted for SaaS applications, membership websites, digital products, or recurring billing platforms.
Features of this Stripe Subscription in PHP Implementation:
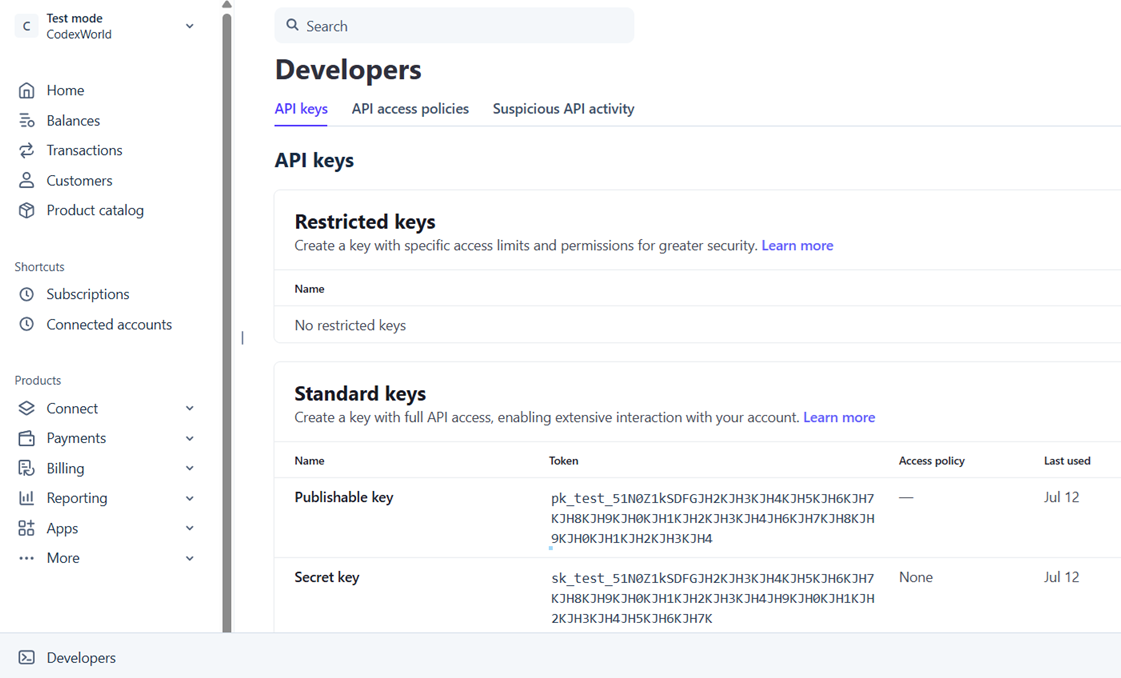
To use the Stripe API, you’ll need to obtain your API keys from the Stripe Dashboard:
Test API Keys:
Before going live, you can use the test API keys provided by Stripe to simulate transactions without processing real payments. This allows you to test your subscription system thoroughly before deploying it to production. To obtain test API keys, follow the steps below:
The project file structure for the Stripe subscription integration in PHP is organized as follows:
stripe_subscription_in_php/
├── config.php
├── db.php
├── index.php
├── checkout.php
├── subscription_handler.php
├── status.php
├── stripe-php/
├── js/
|    └── checkout.js
└── css/
    └── style.css
Here’s a brief description of each file in the project structure:
– config.php: Contains the configuration settings for the Stripe API keys and other necessary configurations.
– db.php: Handles the database connection and provides functions for interacting with the MySQL database.
– index.php: The main landing page where users can view available subscription plans and initiate the subscription process.
– checkout.php: Handles the checkout process, including displaying the Stripe Payment Element and collecting payment details from users.
– subscription_handler.php: Processes the subscription creation, customer management, and payment confirmation using the Stripe PHP SDK.
– status.php: Displays the status of the subscription, including successful payments, failed payments, and subscription details.
– stripe-php/: Contains the Stripe PHP SDK library for interacting with the Stripe API.
– js/checkout.js: Contains JavaScript code for handling the Stripe Payment Element and payment confirmation.
– css/style.css: Contains the CSS styles for the application, ensuring a user-friendly and visually appealing interface.
The Stripe subscription payment process involves several key steps to ensure a seamless experience for both the website owner and the subscriber. Here’s a breakdown of how it works:
Let’s dive into the implementation details of each step to build a robust Stripe subscription system in PHP.
To get started with the Stripe subscription system in PHP, you need to install the Stripe PHP SDK. This SDK provides a convenient way to interact with the Stripe API and handle subscription-related operations.
You can install the Stripe PHP SDK using Composer, a dependency manager for PHP. Run the following command to install the Stripe PHP SDK:
composer require stripe/stripe-php
Note: If you don’t have Composer installed, or want to install Stripe PHP SDK without Composer, you can download our source code package. Our ready-to-use package includes all the necessary files and configurations to get you started quickly.
To store subscription plans and subscription records, you need to create the necessary tables in your MySQL database. Below are the SQL statements to create the required tables (plans and subscriptions):
CREATE TABLE `plans` (
  `id` int(11) NOT NULL AUTO_INCREMENT,
  `name` varchar(255) NOT NULL,
  `slug` varchar(255) DEFAULT NULL,
  `price` decimal(10,2) NOT NULL,
  `currency` varchar(10) NOT NULL DEFAULT 'usd',
  `billing_interval` varchar(20) NOT NULL DEFAULT 'month',
  `billing_interval_count` int(11) NOT NULL DEFAULT 1,
  `interval_label` varchar(100) DEFAULT NULL,
  `description` text DEFAULT NULL,
  `created_at` timestamp NOT NULL DEFAULT current_timestamp(),
  PRIMARY KEY (`id`),
  UNIQUE KEY `slug` (`slug`)
) ENGINE=InnoDB DEFAULT CHARSET=utf8mb4;
CREATE TABLE `subscriptions` (
  `id` int(11) NOT NULL AUTO_INCREMENT,
  `customer_name` varchar(100) NOT NULL,
  `customer_email` varchar(255) NOT NULL,
  `plan_id` int(11) NOT NULL,
  `stripe_customer_id` varchar(100) NOT NULL,
  `stripe_payment_intent_id` varchar(100) NOT NULL,
  `stripe_subscription_id` varchar(100) NOT NULL,
  `payment_status` varchar(30) NOT NULL,
  `subscription_status` varchar(30) NOT NULL,
  `amount` decimal(10,2) NOT NULL,
  `currency` varchar(3) NOT NULL,
  `started_at` datetime NOT NULL,
  `valid_until` datetime NOT NULL,
  `created_at` timestamp NOT NULL DEFAULT current_timestamp(),
  PRIMARY KEY (`id`),
  KEY `plan_id` (`plan_id`),
  CONSTRAINT `subscriptions_ibfk_1` FOREIGN KEY (`plan_id`) REFERENCES `plans` (`id`)
) ENGINE=InnoDB DEFAULT CHARSET=utf8mb4;
Insert sample subscription plans into the plans table to test the subscription system. You can use the following SQL statements to insert sample data:
INSERT INTO `plans` (`name`, `slug`, `price`, `currency`, `billing_interval`, `billing_interval_count`, `interval_label`, `description`) VALUES
('Basic Plan', 'basic-plan', 9.99, 'usd', 'week', 1, 'Weekly', 'Access to basic features and content.'),
('Standard Plan', 'standard-plan', 19.99, 'usd', 'month', 1, 'Monthly', 'Access to standard features and content, including premium articles.'),
('Premium Plan', 'premium-plan', 29.99, 'usd', 'year', 1, 'Yearly', 'Access to all features and content, including exclusive resources and priority support.');
The configuration file (config.php) contains settings for the database connection, Stripe API keys, and application-specific settings. It is used throughout the application to access these configurations in a centralized manner.
<?php
// Start a session to manage user state and data across requests
if (session_status() === PHP_SESSION_NONE) {
    session_start();
}

// Configuration for database connection, Stripe API keys, and application-specific settings
return [
    'db' => [
        'host' => 'localhost',
        'port' => 3306,
        'username' => 'root',
        'password' => '',
        'database' => 'subscription_db',
        'charset' => 'utf8mb4'
    ],
    'stripe' => [
        'publishable_key' => '_replace_me_with_your_publishable_key_',
        'secret_key' => '_replace_me_with_your_secret_key_',
        'webhook_secret' => 'whsec_replace_me'
    ],
    'app' => [
        'name' => 'Stripe Subscription Checkout',
        'currency' => 'usd',
    ]
];
?>
The database connection file (db.php) contains helper functions to establish a connection with the MySQL database using the MySQLi extension. It provides a reusable function to connect to the database and handle any connection errors gracefully.
<?php
// Load the configuration settings
$config = require __DIR__ . '/config.php';

// Heper function to establish a database connection using the provided configuration settings. It returns a mysqli object representing the connection.
function getDbConnection(array $config): mysqli
{
    $mysqli = new mysqli(
        $config['db']['host'],
        $config['db']['username'],
        $config['db']['password'],
        $config['db']['database'],
        $config['db']['port']
    );

    if ($mysqli->connect_errno) {
        throw new RuntimeException('Database connection failed: ' . $mysqli->connect_error);
    }

    $mysqli->set_charset($config['db']['charset']);

    return $mysqli;
}

// Helper function to get a singleton instance of the database connection. It ensures that only one connection is established and reused throughout the application.
function getDb(): mysqli
{
    static $db = null;

    if ($db === null) {
        global $config;
        $db = getDbConnection($config);
    }

    return $db;
}
?>
The landing page (index.php) displays the available subscription plans to users. It retrieves the plans from the database and presents them in a user-friendly format, allowing users to select a plan and proceed to the checkout page. Each plan includes details such as the name, price, billing interval, and description.
subscription_handler.php file.First, establish a database connection and load the configuration settings. Then, fetch the available subscription plans from the database and handle any potential errors during the process.
<?php
// Establish a database connection
require_once __DIR__ . '/db.php';
$db = getDb();

// Load the configuration settings
$config = require __DIR__ . '/config.php';

// Fetch the available subscription plans from the database.
try {
    $result = $db->query('SELECT * FROM plans ORDER BY price ASC');
    $plans = $result->fetch_all(MYSQLI_ASSOC);
} catch (Throwable $e) {
    die($e->getMessage());
}
?>
HTML structure for displaying the subscription plans, including a form for users to enter their name and email address, and a “Subscribe” button to initiate the subscription process.
<!-- Section for selecting a subscription plan -->
<section class="card">
    <h2>Select a plan</h2>
    <div class="plan-list">
        <?php foreach ($plans as $plan): ?>
            <label class="plan-option">
                <input type="radio" name="plan_id" value="<?= (int)$plan['id'] ?>" <?= ($plan === $plans[0]) ? 'checked' : '' ?> />
                <span>
                    <strong><?= htmlspecialchars($plan['name']) ?></strong>
                    <span><?= htmlspecialchars($plan['description']) ?></span>
                </span>
                <strong>$<?= number_format((float)$plan['price'], 2) ?>/<?= htmlspecialchars($plan['interval_label']) ?></strong>
            </label>
        <?php endforeach; ?>
    </div>
</section>

<!-- Section for entering customer details and submitting the subscription form -->
<section class="card">
    <div class="summary">
        <div>Selected plan</div>
        <div id="selected-plan-name" class="amount"></div>
        <div>Amount due</div>
        <div id="selected-plan-price" class="amount"></div>
    </div>

    <form id="subscription-form">
        <div class="form-group">
            <label for="customer_name">Full name</label>
            <input id="customer_name" name="customer_name" placeholder="John Doe" required />
        </div>
        <div class="form-group">
            <label for="customer_email">Email</label>
            <input id="customer_email" name="customer_email" type="email" placeholder="john.doe@example.com" required />
        </div>
        <button id="submit-button" type="submit">Subscribe securely</button>
        <div id="status-message" class="status-message"></div>
    </form>
</section>
JavaScript code to handle the subscription form submission, send an AJAX request to the server-side script, and manage the response.
<script>
const plans = <?= json_encode($plans) ?>;
const planOptions = document.querySelectorAll('input[name="plan_id"]');
const selectedPlanName = document.getElementById('selected-plan-name');
const selectedPlanPrice = document.getElementById('selected-plan-price');

// Function to update the displayed selected plan details based on user selection
function updateSelectedPlan() {
    const selectedPlanId = document.querySelector('input[name="plan_id"]:checked').value;
    const selectedPlan = plans.find(plan => plan.id == selectedPlanId);
    selectedPlanName.textContent = selectedPlan.name;
    selectedPlanPrice.textContent = `$${parseFloat(selectedPlan.price).toFixed(2)}/${selectedPlan.interval_label}`;
}

// Add event listeners to update the selected plan details when the user changes their selection
planOptions.forEach((option) => option.addEventListener('change', async () => {
    updateSelectedPlan();
}));

// Initialize the display with the first plan
updateSelectedPlan();

// Handle the subscription form submission and send the data to the server for processing
const form = document.getElementById('subscription-form');
form.addEventListener('submit', async (event) => {
    event.preventDefault();
    const submitButton = form.querySelector('#submit-button');
    submitButton.disabled = true;
    submitButton.textContent = 'Processing...';
    const statusMessage = document.getElementById('status-message');

    try {
        const formData = new FormData(form);
        const selectedPlanId = document.querySelector('input[name="plan_id"]:checked').value;
        formData.append('plan_id', selectedPlanId);
        formData.append('action', 'create_subscription');

        const response = await fetch('subscription_handler.php', {
            method: 'POST',
            body: formData
        });
        const result = await response.json();

        if (result.success) {
            statusMessage.classList.add('success');
            statusMessage.textContent = 'Subscription created successfully! Redirecting...';
            window.location.href = `checkout.php?subscription_id=${encodeURIComponent(result.subscription_id)}`;
        } else {
            throw new Error(result.error || 'An error occurred while creating the subscription.');
        }
    } catch (error) {
        statusMessage.classList.add('error');
        statusMessage.textContent = `Error: ${error.message}`;
    } finally {
        submitButton.disabled = false;
        submitButton.textContent = 'Subscribe securely';
    }
});
</script>
The checkout page (checkout.php) initializes the Stripe Payment Element, allowing users to enter their payment information securely. It handles the payment processing and redirects the user to the status page upon completion.
First, establish a connection to the database and retrieve the selected plan details based on the subscription_data passed in the SESSION. If the plan is not found, display an error message.
<?php
// Establish a database connection
require_once __DIR__ . '/db.php';
$db = getDb();

// Load the configuration settings
$config = require __DIR__ . '/config.php';

// Get the subscription ID from the query parameters
$subscriptionId = (string)($_GET['subscription_id'] ?? '');

// Check if the subscription ID is valid and matches the session data; if not, redirect to the index page
if (!$subscriptionId || !isset($_SESSION['subscription_data']) || $_SESSION['subscription_data']['subscription_id'] !== $subscriptionId) {
    header('Location: index.php');
    exit;
}

// Fetch selected plan details from the database
try {
    $stmt = $db->prepare("SELECT * FROM plans WHERE id = ?");
    $stmt->bind_param('i', $_SESSION['subscription_data']['plan_id']);
    $stmt->execute();
    $plan = $stmt->get_result()->fetch_assoc();
    $stmt->close();
} catch (Throwable $e) {
    die($e->getMessage());
}
?>
Include the Stripe.js library for handling the payment confirmation and the Stripe Payment Element for collecting payment details.
<script src="https://js.stripe.com/dahlia/stripe.js"></script>
Include the JavaScript file (js/checkout.js) that contains the logic for initializing the Stripe Payment Element, handling form submission, and confirming the payment. Pass stripe.publishable_key and client_secret to the JavaScript file using custom attributes.
<script src="js/checkout.js" defer STRIPE_PUBLISHABLE_KEY="<?= htmlspecialchars($config['stripe']['publishable_key']) ?>" STRIPE_CLIENT_SECRET="<?= htmlspecialchars($_SESSION['subscription_data']['client_secret']) ?>"></script>
Define HTML elements to display selected plan details, customer information, and payment form with Stripe Payment Element.
<!-- Section displaying the selected plan details and customer information -->
<section class="card">
    <div class="summary">
        <div>Selected plan</div>
        <div class="amount"><?= htmlspecialchars($plan['name']) ?></div>
        <div>Amount due</div>
        <div class="amount">$<?= number_format((float)$plan['price'], 2) ?> / <?= htmlspecialchars($plan['interval_label']) ?></div>
        <div>Customer details</div>
        <div class="amount"><?= htmlspecialchars($_SESSION['subscription_data']['customer_name']) ?> (<?= htmlspecialchars($_SESSION['subscription_data']['customer_email']) ?>)</div>
    </div>
</section>

<section class="card">
    <!-- Form for entering payment information and completing the subscription -->
    <form id="subscription-form">
        <div class="form-group">
            <div id="payment-element" class="payment-card"></div>
        </div>
        <button id="submit-button" type="submit">Complete Subscription</button>
    </form>

    <!-- Display processing notification -->
    <div id="frmProcess" class="hidden">
        <span class="ring"></span> Processing...
    </div>

    <!-- Display re-initiate button -->
    <div id="payReinit" class="hidden">
        <button onClick="window.location.href=window.location.href.split('?')[0]">Re-initiate Payment</button>
    </div>

    <div id="status-message" class="status-message"></div>
</section>
The client-side JavaScript file (js/checkout.js) handles the interaction with the Stripe Payment Element and manages the payment confirmation process. It initializes the Stripe object, mounts the Payment Element, and listens for form submission events.
confirmPayment method to confirm the payment using the provided client_secret.subscription_handler.php server-side script to validate the subscription and insert it into the database.// Retrieve the Stripe publishable key and client secret from the script's attributes
const STRIPE_PUBLISHABLE_KEY = document.currentScript.getAttribute('STRIPE_PUBLISHABLE_KEY');
const STRIPE_CLIENT_SECRET = document.currentScript.getAttribute('STRIPE_CLIENT_SECRET');
// Initialize Stripe with the publishable key
const stripe = Stripe(STRIPE_PUBLISHABLE_KEY);
let elements = null;
let paymentElement = null;
const subscrFrm = document.querySelector("#subscription-form");
// Get payment_intent_client_secret param from URL
const clientSecretParam = new URLSearchParams(window.location.search).get(
"payment_intent_client_secret"
);
// Check whether the payment_intent_client_secret is already exist in the URL
setProcessing(true);
if(!clientSecretParam){
setProcessing(false);
// Initialize the payment element with the client secret
initializePaymentElement(STRIPE_CLIENT_SECRET).catch(error => {
console.error('Error initializing payment element:', error);
showMessage('Failed to initialize payment form. Please try again.');
});
}
// Check the PaymentIntent status if the client secret is present in the URL
checkPaymentIntentStatus();
// Function to initialize the Stripe Payment Element
async function initializePaymentElement(clientSecret) {
elements = stripe.elements({ clientSecret });
paymentElement = elements.create('payment', {
layout: "tabs"
});
paymentElement.mount("#payment-element");
}
// Handle the form submission for subscription
subscrFrm.addEventListener("submit", async (event) => {
event.preventDefault();
const submitButton = subscrFrm.querySelector('#submit-button');
submitButton.disabled = true;
submitButton.textContent = 'Processing...';
showMessage('Preparing your subscription...', 'info');
const { error } = await stripe.confirmPayment({
elements,
confirmParams: {
return_url: window.location.href,
}
});
if (error) {
console.error('Error confirming payment:', error);
showMessage(error.message || 'Payment confirmation failed. Please try again.');
submitButton.disabled = false;
submitButton.textContent = 'Complete Subscription';
}
});
// Function to check the status of the PaymentIntent and handle the subscription accordingly
async function checkPaymentIntentStatus() {
const clientSecret = new URLSearchParams(window.location.search).get("payment_intent_client_secret");
const subscriptionId = new URLSearchParams(window.location.search).get("subscription_id");
if(!clientSecret || !subscriptionId) {
return;
}
const { paymentIntent } = await stripe.retrievePaymentIntent(clientSecret);
if (paymentIntent) {
switch (paymentIntent.status) {
case 'succeeded':
fetch('subscription_handler.php', {
method: "POST",
headers: { 'Content-Type': 'application/x-www-form-urlencoded;charset=UTF-8' },
body: new URLSearchParams({
action: 'validate_subscription',
payment_intent_id: paymentIntent.id,
subscription_id: subscriptionId
}).toString()
})
.then(response => response.json())
.then(data => {
if (data.success) {
showMessage('Payment succeeded! Your subscription is now active.', 'success');
window.location.href = 'status.php?subscription_id='+data.subscription_id;
} else {
throw new Error(data.error || 'Payment succeeded, but failed to update subscription status. Please contact support.');
}
})
.catch(error => {
showMessage(error.message || 'Payment succeeded, but failed to update subscription status. Please contact support.');
setReinit();
});
break;
case 'processing':
showMessage('Payment processing. We\'ll update you when payment is received.', 'info');
setReinit();
break;
case 'requires_payment_method':
showMessage('Payment failed. Please try another payment method.');
setReinit();
break;
default:
showMessage('Something went wrong, please try again.');
setReinit();
break;
}
} else {
showMessage('Failed to retrieve payment information. Please try again.');
setReinit();
}
}
// Helper function to display messages to the user
function showMessage(message, type = 'error') {
const messageContainer = document.querySelector("#status-message");
messageContainer.classList.add(type);
messageContainer.textContent = message;
}
// Helper function to show or hide the payment form and processing message
function setProcessing(isProcessing) {
if (isProcessing) {
subscrFrm.classList.add("hidden");
document.querySelector("#frmProcess").classList.remove("hidden");
} else {
subscrFrm.classList.remove("hidden");
document.querySelector("#frmProcess").classList.add("hidden");
}
}
// Helper function to show the reinitialization message and hide the payment form
function setReinit() {
subscrFrm.classList.add("hidden");
document.querySelector("#frmProcess").classList.add("hidden");
document.querySelector("#payReinit").classList.remove("hidden");
}
The server-side script (subscription_handler.php) handles the subscription creation, customer management, and payment confirmation using the Stripe PHP SDK. It processes the AJAX request from the checkout page, creates a customer and subscription in Stripe, and validates the payment status.
<?php
// Include the database connection helper functions
require_once __DIR__ . '/db.php';

// Load the configuration settings
$config = require __DIR__ . '/config.php';

// Include the Stripe PHP library and initialize the Stripe client with the secret key from the configuration
require_once __DIR__ . '/stripe-php/init.php';
$stripe = new \Stripe\StripeClient($config['stripe']['secret_key']);

// Check if the request method is POST; if not, return a 405 Method Not Allowed response
if ($_SERVER['REQUEST_METHOD'] !== 'POST') {
    http_response_code(405);
    echo json_encode(['error' => 'Method not allowed']);
    exit;
}

// Establish a database connection using the getDb function and handle any connection errors
try {
    $db = getDb();
} catch (RuntimeException $e) {
    http_response_code(500);
    echo json_encode(['success' => false, 'error' => $e->getMessage()]);
    exit;
}

// Retrieve the action parameter from the POST request to determine which operation to perform
$action = $_POST['action'] ?? '';

try {
    // Handle the 'create_subscription' action to create a new subscription
    if ($action === 'create_subscription') {
        // Retrieve user input from the POST request
        $customerName = trim($_POST['customer_name'] ?? '');
        $customerEmail = trim($_POST['customer_email'] ?? '');
        $planId = (int)($_POST['plan_id'] ?? 0);

        // Validate the required fields; if any are missing, return an error response
        if (!$customerName || !$customerEmail || !$planId) {
            echo json_encode(['success' => false, 'error' => 'Please complete all required fields.']);
            exit;
        }

        // Search for an existing customer in Stripe by email to avoid creating duplicate customers
        $existingCustomers = $stripe->customers->search(['query' => "email:'{$customerEmail}'", 'limit' => 1]);
        if (count($existingCustomers->data) > 0) {
            $customer = $existingCustomers->data[0];
        } else {
            // If no existing customer is found, create a new customer in Stripe
            $customer = $stripe->customers->create([
                'email' => $customerEmail,
                'name' => $customerName,
                'metadata' => ['source' => 'codexworld_subscription_demo']
            ]);
        }

        // Fetch the selected plan details from the database
        $stmt = $db->prepare('SELECT * FROM plans WHERE id = ?');
        $stmt->bind_param('i', $planId);
        $stmt->execute();
        $plan = $stmt->get_result()->fetch_assoc();
        $stmt->close();

        if (!$plan) {
            echo json_encode(['success' => false, 'error' => 'Selected plan does not exist.']);
            exit;
        }

        // Create a new price for the plan in Stripe
        $billingInterval = $plan['billing_interval'] ?: 'month';
        $intervalCount = max(1, (int)($plan['billing_interval_count'] ?: 1));
        $amount = round($plan['price'] * 100);
        $price = $stripe->prices->create([
            'unit_amount' => $amount,
            'currency' => $plan['currency'],
            'recurring' => ['interval' => $billingInterval, 'interval_count' => $intervalCount],
            'product_data' => ['name' => $plan['name']]
        ]);
        $priceId = $price->id;

        // Create a subscription for the customer with the selected plan
        $subscription = $stripe->subscriptions->create([
            'customer' => $customer->id,
            'items' => [['price' => $priceId]],
            'payment_behavior' => 'default_incomplete',
            'payment_settings' => ['save_default_payment_method' => 'on_subscription'],
            'billing_mode' => ['type' => 'flexible'],
            'expand' => ['latest_invoice.confirmation_secret'],
            'metadata' => ['plan_id' => (int) $plan['id']]
        ]);

        // Store subscription details in session for later use
        $_SESSION['subscription_data'] = [
            'subscription_id' => $subscription->id,
            'client_secret' => $subscription->latest_invoice->confirmation_secret->client_secret,
            'customer_id' => $customer->id,
            'plan_id' => $planId,
            'customer_name' => $customerName,
            'customer_email' => $customerEmail
        ];

        // Return a success response for further processing on the frontend
        echo json_encode([
            'success' => true,
            'subscription_id' => $subscription->id,
            'client_secret' => $subscription->latest_invoice->confirmation_secret->client_secret
        ]);
        exit;
    }

    // Handle the 'validate_subscription' action to validate the subscription after payment confirmation
    if ($action === 'validate_subscription') {
        $paymentIntentId = $_POST['payment_intent_id'] ?? '';
        $subscriptionId = $_POST['subscription_id'] ?? '';

        if (!$paymentIntentId || !$subscriptionId) {
            echo json_encode(['success' => false, 'error' => 'Missing payment intent ID or subscription ID.']);
            exit;
        }

        // Retrieve the PaymentIntent from Stripe
        $paymentIntent = $stripe->paymentIntents->retrieve($paymentIntentId);

        // Check if the PaymentIntent is successful
        if ($paymentIntent->status === 'succeeded') {
            // Retrieve the subscription details from Stripe
            $subscription = $stripe->subscriptions->retrieve($subscriptionId);

            // Retrieve customer details from Stripe using the customer ID associated with the subscription
            $customer = $stripe->customers->retrieve($subscription->customer);

            // Check if the subscription already exists in the database
            $stmt = $db->prepare('SELECT id FROM subscriptions WHERE stripe_subscription_id = ?');
            $stmt->bind_param('s', $subscriptionId);
            $stmt->execute();
            $stmt->store_result();
            if ($stmt->num_rows > 0) {
                $stmt->close();
                echo json_encode(['success' => true, 'subscription_id' => $subscriptionId]);
                exit;
            }

            // Insert subscription details into the database
            $stmt = $db->prepare('INSERT INTO subscriptions (customer_name, customer_email, plan_id, stripe_customer_id, stripe_payment_intent_id, stripe_subscription_id, payment_status, subscription_status, amount, currency, started_at, valid_until) VALUES (?, ?, ?, ?, ?, ?, ?, ?, ?, ?, ?, ?)');
            $started_at = date('Y-m-d H:i:s', $subscription->items->data[0]->current_period_start);
            $valid_until = date('Y-m-d H:i:s', $subscription->items->data[0]->current_period_end);
            $amount = ($paymentIntent->amount / 100); // Convert from cents to dollars
            $stmt->bind_param(
                'ssisssssdsss',
                $customer->name,
                $customer->email,
                $subscription->metadata->plan_id,
                $customer->id,
                $paymentIntent->id,
                $subscription->id,
                $paymentIntent->status,
                $subscription->status,
                $amount,
                $paymentIntent->currency,
                $started_at,
                $valid_until
            );
            $stmt->execute();
            $insertId = $stmt->insert_id;
            $stmt->close();

            if ($insertId) {
                // Clear subscription data from session after successful insertion
                unset($_SESSION['subscription_data']);
            }

            echo json_encode(['success' => true, 'subscription_id' => $subscription->id, 'insert_id' => $insertId]);
            exit;
        } else {
            echo json_encode(['success' => false, 'error' => 'Payment not successful.']);
            exit;
        }
    }

    http_response_code(400);
    echo json_encode(['error' => 'Unsupported action.']);
} catch (Throwable $e) {
    http_response_code(500);
    echo json_encode(['error' => 'Stripe request failed: ' . $e->getMessage()]);
}

?>
The status page (status.php) displays the status of the subscription, including successful payments, failed payments, and subscription details. It retrieves the subscription information from the database and presents it to the user in a clear and organized manner. The page provides feedback on the subscription process and allows users to view their subscription details, including the plan name, payment status, and subscription validity.
<?php
// Establish a database connection
require_once __DIR__ . '/db.php';
$db = getDb();

// Load the configuration settings
$config = require __DIR__ . '/config.php';

// Retrieve the subscription ID from the query parameters
$subscriptionId = (string)($_GET['subscription_id'] ?? '');

// Fetch the subscription details from the database if a valid subscription ID is provided
if ($subscriptionId) {
    $stmt = $db->prepare("SELECT s.*, p.name AS plan_name, p.price AS plan_price, p.interval_label FROM subscriptions s JOIN plans p ON s.plan_id = p.id WHERE s.stripe_subscription_id = ?");
    $stmt->bind_param('s', $subscriptionId);
    $stmt->execute();
    $subscription = $stmt->get_result()->fetch_assoc();
    $stmt->close();
} else {
    $subscription = null;
}
?>

<?php if ($subscription): ?>
    <h1 class="success">Subscription successful</h1>
    <p>Your subscription is now active and your billing details have been recorded.</p>
    <div class="meta">
        <div><strong>Customer:</strong> <?= htmlspecialchars($subscription['customer_name']) ?></div>
        <div><strong>Email:</strong> <?= htmlspecialchars($subscription['customer_email']) ?></div>
        <div><strong>Plan:</strong> <?= htmlspecialchars($subscription['plan_name']) ?> - $<?= number_format((float)$subscription['plan_price'], 2) ?> / <?= htmlspecialchars($subscription['interval_label']) ?></div>
        <div><strong>Subscription ID:</strong> <?= htmlspecialchars($subscription['stripe_subscription_id']) ?></div>
        <div><strong>Subscription Amount:</strong> $<?= number_format((float)$subscription['amount'], 2) ?> <?= strtoupper($subscription['currency']) ?></div>
        <div><strong>Status:</strong> <?= htmlspecialchars($subscription['subscription_status']) ?></div>
        <div><strong>Validity Period:</strong> <?= htmlspecialchars($subscription['started_at']) ?> to <?= htmlspecialchars($subscription['valid_until']) ?></div>
    </div>
    <a href="index.php"><button type="button">Back to homepage</button></a>
<?php else: ?>
    <h1 class="error">We couldn't find that subscription</h1>
    <p>Please return to the homepage and try again.</p>
    <a href="index.php"><button type="button">Return to homepage</button></a>
<?php endif: ?>
👉 We have completed the implementation of the Stripe subscription payment integration. Now it’s time to test the system and ensure everything is working as expected.
To test the Stripe subscription payment integration, you can use the following test card numbers provided by Stripe. These card numbers simulate different scenarios, such as successful payments, failed payments, and authentication requirements. Use these test cards in the checkout page to verify the functionality of your subscription system.
4242 4242 4242 4242 with any future expiration date, any CVC, and any billing ZIP code to simulate a successful payment.4000 0000 0000 9995 to simulate a failed payment due to insufficient funds. Use any future expiration date, any CVC, and any billing ZIP code.4000 00250000 0002 to simulate a payment that requires authentication (3D Secure). Use any future expiration date, any CVC, and any billing ZIP code.To make your Stripe subscription system live, you need to replace the test API keys (in config.php) with your actual Stripe API keys from the Stripe Dashboard.
return [
    'stripe' => [
        'publishable_key' => 'pk_live_your_stripe_publishable_key_here',
        'secret_key' => 'sk_live_your_stripe_secret_key_here'
    ]
];
Congratulations! You have successfully built a complete recurring subscription payment system in PHP using Stripe Payment Element, Stripe.js, and the Stripe PHP SDK.
The application demonstrates a modern subscription workflow by creating Stripe customers and subscriptions on the server, securely collecting payment information with the Payment Element, confirming payments using Stripe.js, validating successful PaymentIntents, storing subscription records in MySQL, and preparing your application for ongoing subscription management through webhooks.
You can further extend this project by adding features such as subscription upgrades and downgrades, customer billing portals, coupon and promotion code support, trial periods, subscription cancellation, invoice history, and email notifications. These enhancements make the solution suitable for SaaS platforms, membership websites, digital services, and any application that requires secure recurring billing.
Looking for expert assistance to implement or extend this script’s functionality? Submit a Service Request
💰 Budget-friendly • 🌍 Global clients • 🚀 Production-ready solutions





Hi, how could I modified period end?
Hi everyone,
I love the tutorial!
My question is how would I implement this in wordpress? Do I just import the sql database into wordpress? I am looking to integrate custom (without Stripe Gateway) checkout on my wordpress site. I really really , appreciate your help! If you are going to remove this comment from here (as it seems it was already, as I tried posting it an hour ago) please let me know why or where I can post it instead?
Artem
Hi there,
I love the tutorial you have put together. My question is how would I implement this in wordpress? Do I just copy your folder structure into wordpress? I am looking to integrate custom (without Stripe Gateway) checkout on my site. I really really , appreciate your help!
https://www.codexworld.com/stripe-subscription-payment-integration-php/
Artem
I am using your Stripe integration php scripts. I love it and it works perfectly. I am creating a subsciption tht has three plans: 1 year, 2 year, and 3 year.
How do I change the calculations for the subscription end date to include a 2 & 3 year subscription.
Right now it only uses a 30-day and 1-year expiration date.
Thanks
NOTE: The subscription function is under development. So it won’t be on the website/
how this code setup in laravel? can anyone guide ?
Can I add a field for discount code? And in that case how?
Thanks for the tutorial,
Now, i can create subscription for user, but how to get to know if user is billed/payment collected by stripe next month ? how to get this information ? webhook or any api ? please help
Great information! Many thanks.
I was just wondering if the downloadable code include changing and cancelling subscriptions?
I would like to notify that this code creates a subscription named weekly/monthly/yearly on each time of script execution, is that good thing?
Hello,
It can create the plan/subscription, but what about the recurring payments ? It is going to update automatically the plan_period_start/end and the plan_interval_count ?
Best regards
how can i cancel a subscription?
Thanks
how this code setup in codeigniter? can anyone guide ?
See this tutorial – https://www.codexworld.com/stripe-subscription-payment-integration-in-codeigniter/
Hi,
Is this SCA ready?
I used your other example for stripe API and Stripe emailed me to say the API usage was not future proof as the SCA measurements being brought in meant C/Card companies will started rejecting requests in the future if not SCA compilant.
Thanks
Martin
The script has been updated with 3D Secure and SCA features, please download the latest version.