close
Google OAuth API is the simple and powerful way to integrate the login system on the website. Google OAuth Login API lets you allow the user to sign in the web application using their Google account without registration. The main advantage of Google login is the user can log in to the web application with their existing Google account without register the account on the website. Nowadays almost all web users have a Google account, Sign-in with Google helps to increase the user’s subscription on your website.
Google API allows to authenticate with Google account and retrieve the user’s profile data. You can easily integrate login with Google API using PHP and Google OAuth library. If your web application built with CodeIgniter, Google API Client library needs to be integrated into the CodeIgniter application. In this tutorial, we will show you how to integrate Google login in CodeIgniter using Google API PHP client and allow the user to Sign In with Google in CodeIgniter.
In the example code, we will provide a step-by-step guide to implement Google login in CodeIgniter and get the Google profile information using Google API Client Library. Also, the user’s account data will be stored in the MySQL database.
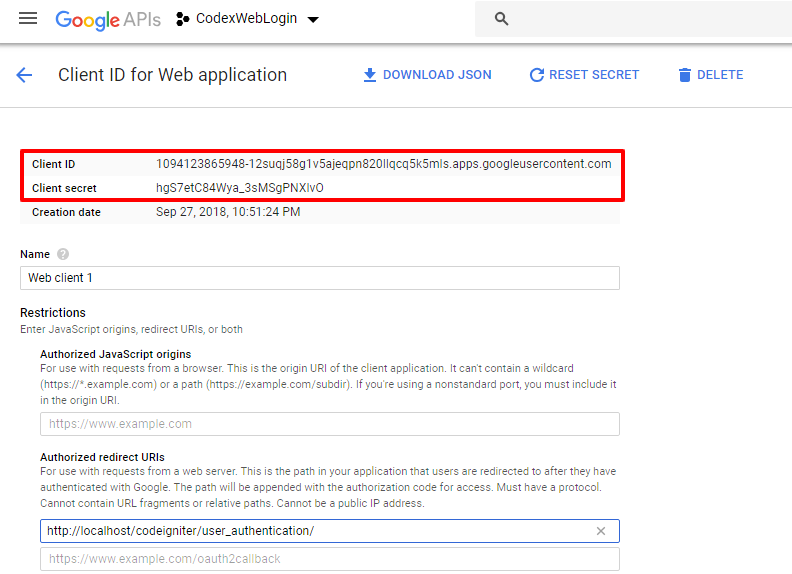
Before you begin to implement Google login in CodeIgniter 3 using PHP Client Library, create a Project in Google API Console and generate the Client ID and Client secret.
A dialog window will appear with OAuth API credentials (Client ID and Client secret). Copy the Client ID and Client secret for later use in the script to access the Google APIs.
Before getting started to Google login integration process, take a look at the files structure of Login with Google in CodeIgniter.
codeigniter_google_login/
├── application/
│   ├── config/
│   │   └── google.php
│   ├── controllers/
│   │   └── User_authentication.php
│   ├── libraries/
│   │   └── Google.php
│   ├── models/
│   │   └── User.php
│   ├── third_party/
│   │   └── google-api-client/
│   ├── views/
│   │   ├── user_authentication/
│   │   │   ├── index.php
│   │   │   └── profile.php
└── assets/
    ├── css/
    └── images/
To store the Google account information, a table needs to be created in the database. The following SQL creates a users table with some basic fields in the MySQL database.
CREATE TABLE `users` (
 `id` int(11) NOT NULL AUTO_INCREMENT,
 `oauth_provider` varchar(10) COLLATE utf8_unicode_ci NOT NULL,
 `oauth_uid` varchar(50) COLLATE utf8_unicode_ci NOT NULL,
 `first_name` varchar(25) COLLATE utf8_unicode_ci NOT NULL,
 `last_name` varchar(25) COLLATE utf8_unicode_ci NOT NULL,
 `email` varchar(50) COLLATE utf8_unicode_ci NOT NULL,
 `gender` varchar(10) COLLATE utf8_unicode_ci DEFAULT NULL,
 `locale` varchar(10) COLLATE utf8_unicode_ci DEFAULT NULL,
 `picture` varchar(255) COLLATE utf8_unicode_ci DEFAULT NULL,
 `link` varchar(255) COLLATE utf8_unicode_ci NOT NULL,
 `created` datetime NOT NULL,
 `modified` datetime NOT NULL,
 PRIMARY KEY (`id`)
) ENGINE=InnoDB DEFAULT CHARSET=utf8 COLLATE=utf8_unicode_ci;
autoload.php
Specify the commonly used library (database and session) or helper (url) to load by default.
$autoload['libraries'] = array('database', 'session');

$autoload['helper'] = array('url');
google.php
Google API configuration variables are defined in this file. Specify the Client ID, Client Secret and Redirect URL according to the API credentials of your Google API Console Project.
<?php
defined('BASEPATH') OR exit('No direct script access allowed');

/*
| -------------------------------------------------------------------
|  Google API Configuration
| -------------------------------------------------------------------
|
| To get API details you have to create a Google Project
| at Google API Console (https://console.developers.google.com)
|
|  client_id         string   Your Google API Client ID.
|  client_secret     string   Your Google API Client secret.
|  redirect_uri      string   URL to redirect back to after login.
|  application_name  string   Your Google application name.
|  api_key           string   Developer key.
|  scopes            string   Specify scopes
*/
$config['google']['client_id']        = 'Google_API_Client_ID';
$config['google']['client_secret']    = 'Google_API_Client_Secret';
$config['google']['redirect_uri']     = 'https://example.com/project_folder_name/user_authentication/';
$config['google']['application_name'] = 'Login to CodexWorld.com';
$config['google']['api_key']          = '';
$config['google']['scopes']           = array();
Note that: You’ll find the Client ID and Client Secret at your Google API Console Project. (Go to the Google API Credentials page » Click on OAuth Client ID for Web application » Copy the Client ID and Client secret » Replace the client_id value with Client ID and client_secret value with Client secret)
google-api-client/
Google API PHP client is used to connect and authenticate with Google OAuth API. The google-api-client library needs to be placed in the third_party/ directory of your CodeIgniter application.
Note that: You don’t need to download the Google API PHP client library separately, all the required files are included in the source code.
Google.php
The Google OAuth library helps to integrate Google API client in CodeIgniter 3.x application. You can easily add the login with Google functionality to the CodeIgniter application using Google API PHP client library.
Note that: You don’t need to download it separately, the Google library file is included in the source code.
User_authentication.php
The User_Authentication controller handles the authentication, Sign-in, and Sign out process with Google account.
For the non-authenticated user, Google authentication URL is generated and login view is loaded.
<?php
defined('BASEPATH') OR exit('No direct script access allowed');

class User_Authentication extends CI_Controller {

    function __construct(){
        parent::__construct();

        // Load google oauth library
        $this->load->library('google');

        // Load user model
        $this->load->model('user');
    }

    public function index(){
        // Redirect to profile page if the user already logged in
        if($this->session->userdata('loggedIn') == true){
            redirect('user_authentication/profile/');
        }

        if(isset($_GET['code'])){

            // Authenticate user with google
            if($this->google->getAuthenticate()){

                // Get user info from google
                $gpInfo = $this->google->getUserInfo();

                // Preparing data for database insertion
                $userData['oauth_provider'] = 'google';
                $userData['oauth_uid']         = $gpInfo['id'];
                $userData['first_name']     = $gpInfo['given_name'];
                $userData['last_name']         = $gpInfo['family_name'];
                $userData['email']             = $gpInfo['email'];
                $userData['gender']         = !empty($gpInfo['gender'])?$gpInfo['gender']:'';
                $userData['locale']         = !empty($gpInfo['locale'])?$gpInfo['locale']:'';
                $userData['picture']         = !empty($gpInfo['picture'])?$gpInfo['picture']:'';

                // Insert or update user data to the database
                $userID = $this->user->checkUser($userData);

                // Store the status and user profile info into session
                $this->session->set_userdata('loggedIn', true);
                $this->session->set_userdata('userData', $userData);

                // Redirect to profile page
                redirect('user_authentication/profile/');
            }
        }

        // Google authentication url
        $data['loginURL'] = $this->google->loginURL();

        // Load google login view
        $this->load->view('user_authentication/index',$data);
    }

    public function profile(){
        // Redirect to login page if the user not logged in
        if(!$this->session->userdata('loggedIn')){
            redirect('/user_authentication/');
        }

        // Get user info from session
        $data['userData'] = $this->session->userdata('userData');

        // Load user profile view
        $this->load->view('user_authentication/profile',$data);
    }

    public function logout(){
        // Reset OAuth access token
        $this->google->revokeToken();

        // Remove token and user data from the session
        $this->session->unset_userdata('loggedIn');
        $this->session->unset_userdata('userData');

        // Destroy entire session data
        $this->session->sess_destroy();

        // Redirect to login page
        redirect('/user_authentication/');
    }

}
User.php
The User model is used to insert/update data in the users table.
<?php
defined('BASEPATH') OR exit('No direct script access allowed');

class User extends CI_Model {

    function __construct() {
        $this->tableName = 'users';
    }

    public function checkUser($data = array()){
        $this->db->select('id');
        $this->db->from($this->tableName);

        $con = array(
            'oauth_provider' => $data['oauth_provider'],
            'oauth_uid' => $data['oauth_uid']
        );
        $this->db->where($con);
        $query = $this->db->get();

        $check = $query->num_rows();
        if($check > 0){
            // Get prev user data
            $result = $query->row_array();

            // Update user data
            $data['modified'] = date("Y-m-d H:i:s");
            $update = $this->db->update($this->tableName, $data, array('id' => $result['id']));

            // Get user ID
            $userID = $result['id'];
        }else{
            // Insert user data
            $data['created'] = date("Y-m-d H:i:s");
            $data['modified'] = date("Y-m-d H:i:s");
            $insert = $this->db->insert($this->tableName, $data);

            // Get user ID
            $userID = $this->db->insert_id();
        }

        // Return user ID
        return $userID?$userID:false;
    }

}
user_authentication/index.php
In this view, the Sign-In with Google account button is displayed and it redirects the user to the Google OAuth URL.
<h2>CodeIgniter Google Login</h2>
<!-- Display sign in button -->
<a href="<?php echo $loginURL; ?>"><img src="<?php echo base_url('assets/images/google-sign-in-btn.png'); ?>" /></a>
user_authentication/profile.php
If the user logged in with their Google account, the profile details are shown with a Logout link.
<h2>Google Account Details</h2>
<div class="ac-data">
    <!-- Display Google profile information -->
    <img src="<?php echo $userData['picture']; ?>"/>
    <p><b>Google ID:</b> <?php echo $userData['oauth_uid']; ?></p>
    <p><b>Name:</b> <?php echo $userData['first_name'].' '.$userData['last_name']; ?></p>
    <p><b>Email:</b> <?php echo $userData['email']; ?></p>
    <p><b>Gender:</b> <?php echo $userData['gender']; ?></p>
    <p><b>Locale:</b> <?php echo $userData['locale']; ?></p>
    <p><b>Logged in with:</b> Google</p>
    <p>Logout from <a href="<?php echo base_url().'user_authentication/logout'; ?>">Google</a></p>
</div>
We have tried to make the Google login integration easier for CodeIgniter application. Google API client library makes it easier to integrate login with Google in CodeIgniter. You can easily integrate Google login using our Google OAuth library for CodeIgniter. Also, you can extend the functionality of the example CodeIgniter Google authentication script as per your needs. To make the social login more user-friendly, you can add Facebook login option in CodeIgniter.
Looking for expert assistance to implement or extend this script’s functionality? Submit a Service Request
💰 Budget-friendly • 🌍 Global clients • 🚀 Production-ready solutions

Hello,
Do you have the same script for Apple Login ?
Thanks
Are all the given process possible only online database or possible local server . Please suggest me as well as possible.
libraries/
│ │ └── Google.php
How to Google library Pls sir help me
Download the source code.
Hi thank you for the tutorial, just wondering is it possible to show the google login in an iframe or popup so the visitor not redirected to google page?
Thank you, i has implement your tutorial in cpanel
Thanks You save my life .
Successfully Configured With my project…It works perfectly…Thanx For the simple and clear Explanation…Keep it up…It Helps lot.
How to set login with google and facebook both in codeignator
how can i get google api php client?
You can get the Google API PHP Client library in our source code package.
Hello!
I’ve been struggling using this guide a bit. I’ve followed every step exactly but I’m still running into errors.
I’m using a XAMPP server but when I type the url: “http://localhost/codeigniter/user_authentication”, I get a 404.
I made sure all the paths and everything are correct but I still run into the same error.
When I set the default_controller to User_authentication, it does correctly lead me to the page, but how can I access it directly via URL?
Thanks!
Probably, you haven’t specified the URL rewrite rules in the
.htaccessfile. Please see this guide to removeindex.phpfrom URL in CodeIgniter – http://www.codexworld.com/how-to/remove-index-php-from-url-codeigniter-htaccess/Hi guys.
This is awesome! Thanks for sharing. Implimenting this into our platform, but wondering if the system knows if a user is already logged in to Google and they visit the site, should it automatically redirect them into the system?
Thanks
@Matt No, the user needs to click on Login with Google button to log into the system.
I am getting this error ‘Call to undefined function redirect() in ……/User_authentication.php on line 31’ and
line 31 : $redirectUrl = ‘http://www.abc.com/index.php/User_authentication/index’; Kindly let me know what’s wrong
@Brijesh URL helper needs to be loaded for using redirect() function.
its great u save my life
Hi everyone!
i want to use upload google driver with this library.
How can do it?
Thanks CodexWord!
$redirectUrl = base_url() . ‘user_authentication/’;
what should be placed at the place of redirectUrl?
@Ashutosh Put the URL where you want to redirect the user after authentication with Google account.
Very Nice and Simple. Do you have a similar tutorial for Facebook Login.? Please share the link if you have it.
thank you guys for prompt reply, I already subscribe, waiting for more codeigniter and PHP and Mysqli tutorials 🙂
PLEASE CREATE A TUTORIAL IN CODEIGNITER OF HOW TO CREATE AN ADVANCED SHOPPING CART IN AJAX OR JQUERY TO UPDATE AND CHOOSE QUANTITIES AND INTEGRATE IT WITH PAYPAYL…
@Cade We’ll try to publish your requested tutorial soon. Please connected with us and subscribe our newsletter to get the update in your mailbox.
Please create a tutorial for Login with FACEBOOK and TWITTER Account in CodeIgniter, thanks for your help guys…
@Cade We’ll try to publish your requested tutorial soon. Please connected with us and subscribe our newsletter to get the update in your mailbox.