close
According to the WordPress Codex: “A WordPress theme is a collection of files that work together to produce a graphical interface with an underlying unifying design for a weblog.” In simple words, a theme is just like a skin of your web page or website which allows you to modify the looks of your content.
So, if you want to create a WordPress theme, I would say let’s start from scratch. This tutorial will help you build the simplest theme in WordPress. This tutorial will help you build the most rudimentary theme of your own and enables you to spawn them with your own feature.
Note: For this tutorial, you must have a thorough understanding of HTML and CSS, as both are essential building blocks for working with WordPress.You should also have a localhost environment set up on your computer in which you work in WordPress.
The first thing you need to know is where WordPress store themes. You can find them on the directory wp-content/themes in your install. You can also change the location of your themes by giving some commands in the wp-config.php but it is done very rarely.
In order to create new themes you need to do some fairly easy things:
my-first-themes.style.css & index.php
/*
Theme Name: My Awesome Theme
Theme URI: http://www.codexworld.com
Author: CodexWorld
Author URI: http://www.codexworld.com
Description: The theme for my awesome site
Version: 1.0
License: GNU General Public License v2 or later
License URI: http://www.gnu.org/licenses/gpl-2.0.html
Text Domain: my-first-theme

This theme, like WordPress, is licensed under the GPL.
Use it to make something cool, have fun, and share what you've learned with others.
*/
The components of a WordPress theme are composed of 3 files at the very least.
Basically, we need to create 6 files for our sample practice theme.
style.css
This file contains the codes that will add style to our HTML structure. It also holds the basic information about the theme which includes theme’s name, Author, Description, Version, Filter Tags, and license declared.
index.php
This file contains the codes that make up the structure of the WordPress theme. This is the main template file. It acts as the reserve template when other templates are unavailable. This is the file where the WordPress loop is added.
header.php
This file contains the elements of a website like a document type, language attribute, website title, charset, metas and various links and more. It also contains the theme’s “header” and “main menu”. This file must have the wp_head() action hook because it is used for WordPress functions and plugins. This file is called by the index.php file and other templates by using the get_header() function.
footer.php
As by name, this file contains the footer part of your theme which includes links, theme info, and footer widgets if any. This file is called by the index.php file and other templates by using the get_footer() function.
comments.php
it usually outputs the comment form and individual comments. This file can be called by adding comments_template() on templates that display single post or page.
functions.php
This file is very important as it contains custom functionality. Here, you can add various functions such as registering menus, registering dynamic sidebars and queuing styles and scripts.
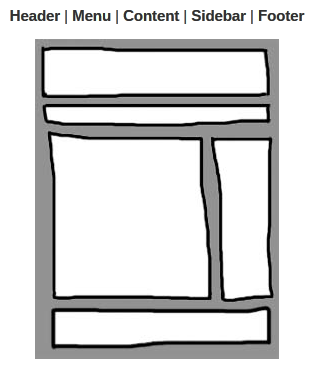
Let’s make the design simple so that we can understand it properly. A blog with a single sidebar on the right will be idle for that. Also, it is very easy to design and even easier to add responsive properties later.
Header.php – Let’s first describe the content of the header.php. The first code to enter is:
<!DOCTYPE html>
<html <?php language_attributes( ); ?>>
<head>
<meta charset="<?php bloginfo( 'charset' ); ?>" />
<title><?php wp_title( '|', true, 'right' ); ?></title>
<link rel="pingback" href="<?php bloginfo( 'pingback_url' );  ?>" />
<?php wp_head(); ?>
</head>
Always make sure to add wp_head(); just before the closing </head>. That action hook is needed to add and modify the contents of the header.php.
After the <head> codes, the next part is the header where you will display site name and site description.
Note that the terms <head> and Header are different things. The <head> is a part of the HTML document that is not visible on the browser and handles the site’s Title, Favicon, Meta, Stylesheets, Scripts and a lot more. The header is the part of a theme that is displayed at the very top where the Name and Description of the website are usually shown. It may also show a custom header image but that’s for another tutorial. For now, we’ll focus on the very basics of creating a WordPress theme.
Now, we add container tag and opening body. Then we add the header title and description.
<body <?php body_class(); ?>>
<div id="container">
    <div id="header">
        <div id="header-info-wrap">
            <h1 id="site-title"><?php bloginfo( 'name' ); ?></h1>
            <h4 id="site-description"><?php bloginfo( 'description' ); ?></h4>
        </div>
    </div>
Now add The Menu on the header.php
<nav id ="nav">
    <?php
        wp_nav_menu( array(
            'theme_location' =>  'menu-primary',
            'container'      =>  false,
            'fallback_cb'    =>  'wp_page_menu'
        ) );

    ?>
</nav>
The WordPress loop is responsible for showing the website’s content Posts and Pages.
<?php get_header(); ?>

<?php if ( have_posts() ) : while ( have_posts() ) : the_post(); ?>

    <div id="post-<?php the_ID(); ?>" <?php post_class(); ?>>
        <h1>
            <a href="<?php the permalink(); ?>"><?php the_title(); ?></a>
        </h1>
        <?php the_content(); ?>
    </div>

<?php endwhile; else: ?>

    <h2> Post or Page not Found! </h2>

<?php endif; ?>
This displays the “Older Posts” and “Newer Posts” links.
<div id="bottom-navi"> <div><?php next_posts_link( '« Older posts' ); ?></div> <div><?php previous_posts_link( 'Newer posts »' ); ?></div> </div>
So, now we have the header, menu, and content. Let’s move on to the sidebar that contains the widgets.
Register the Dynamic Sidebar
Place the following code in the functions.php file:
<?php
    register_sidebar(array(
        'name'  =>  'sidebar' ,
        'id'  =>  'sidebar_widgets' ,
        'before_widget'  =>  '<div id="%1$s">',
        'after_widget'  =>  '</div>' ,
        'before_title'  =>  '<h4>' ,
        'after_title'  => '</h4>' , )
    );
?>
Display the Widgets on the Sidebar
Add this code in the index.php file:
<div id="sidebar" >
    <?php if ( is_active_sidebar( 'sidebar_widgets'  ) ) : ?>
        <div id="sidebar-widgets-wrap">
            <?php dynamic_sidebar( 'sidebar_widgets' ); ?>
        </div>
    <?php endif; ?>
</div>
The style sheet is important because it contains vital info about the theme like theme name, theme description, theme version and the theme author; also it dictates the looks of the theme.
CSS Reset
This ensures the consistency of your website in different browsers.
/* RESET */
html,body,h1,h2,h3,h4,h5,h6,p,img,ul,ol,li,form,fieldset {
    border: 0 none;
    margin: 0;
    padding: 0;
    list-style: none:
}
Theme Design
After the CSS Reset you can now add the CSS codes to alter your theme’s appearance.
There are too many to list them all here but a good practice (in my opinion) is to start with the containers like the body and other major wrappers. In our sample theme, these are the #container, #header, #content, #sidebar and so on.
body {
    color: #333;
    font: normal 13px/20px arial, sans-serif;
}
#container {
    width:960px;
    background: #FFF;
    border: 3px solid #000;
    margin: 20px auto 30px;
}
h1{font-size:28px;}
h2{font-size:24px;}
h3{font-size:20px;}
h4{font-size:18px;}
h5{font-size:14px;}
h6{font-size:12px;}
h1, h2, h3, h4, h5, h6 {
    clear: both;
    line-height: 1;
}
Adding the Stylesheet
Now that you’ve created the style.css along with its contents, you’ll need to link it to your header template. The proper way to add your main stylesheet (style.css) is to add this code in your functions.php.
function practice_theme_enqueue_styles() {

    wp_enqueue_style( 'style-main' , get_stylesheet_uri(), array() );

}

add_action( 'wp_enqueue_scripts', 'practice_theme_enqueue_styles' );
Now, your theme is ready to use. Enjoy and if you face any difficulty please let me know through comments.
Looking for expert assistance to implement or extend this script’s functionality? Submit a Service Request
💰 Budget-friendly • 🌍 Global clients • 🚀 Production-ready solutions


nice article
Thanks S.Clarke for this valuable post .
Mam please assist me regarding wordpress customization .
Which site or blog help me learn step by step website customization in WordPress.
Thanks in advance