close
Our tutorials are designed to make web development simple. Step-by-step instructions make our tutorial more developer-friendly. Therefore web developers like our tutorial rather than the official user manual. Recently we have received many requests for publishing the tutorial on CodeIgniter file upload and instantly we have decided to publish this tutorial.
This tutorial will show how to upload file in CodeIgniter using File Uploading Class. CodeIgniter’s File Uploading Class helps to upload files to the server. You can use various preferences for configuring your file upload and restrict the type and size of the files.
For your better understand we’ll demonstrate the file upload with an example. Also, we’ll upload the user picture to the server and insert the user data to the database.
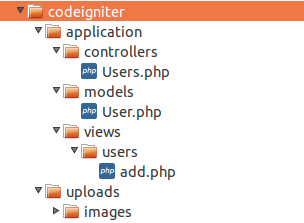
Before starting the tutorial, please take a look at the folders & files structure based on this example application.
Before start to writing the code, create a table into your application’s database. For this example you can create a users table into the database with some basic fields. The users table SQL would like the below.
CREATE TABLE `users` (
 `id` int(11) NOT NULL AUTO_INCREMENT,
 `name` varchar(100) COLLATE utf8_unicode_ci NOT NULL,
 `email` varchar(255) COLLATE utf8_unicode_ci NOT NULL,
 `picture` varchar(255) COLLATE utf8_unicode_ci NOT NULL,
 `created` datetime NOT NULL,
 `modified` datetime NOT NULL,
 `status` tinyint(1) NOT NULL DEFAULT '1' COMMENT '1=Active, 0=Inactive',
 PRIMARY KEY (`id`)
) ENGINE=InnoDB DEFAULT CHARSET=utf8 COLLATE=utf8_unicode_ci;
Create a controller called Users.php. Place the following code in it and save this file to application/controllers/ directory.
User model loaded into the __construct() function for inserting user data into the database.
Initially, add() function will load the user adding form. When the form is submitted, picture would be uploaded and data would be inserted into the database via User model.
<?php defined('BASEPATH') OR exit('No direct script access allowed');
class Users extends CI_Controller
{
    function  __construct() {
        parent::__construct();
        $this->load->model('user');
    }

    function add(){
        if($this->input->post('userSubmit')){

            //Check whether user upload picture
            if(!empty($_FILES['picture']['name'])){
                $config['upload_path'] = 'uploads/images/';
                $config['allowed_types'] = 'jpg|jpeg|png|gif';
                $config['file_name'] = $_FILES['picture']['name'];

                //Load upload library and initialize configuration
                $this->load->library('upload',$config);
                $this->upload->initialize($config);

                if($this->upload->do_upload('picture')){
                    $uploadData = $this->upload->data();
                    $picture = $uploadData['file_name'];
                }else{
                    $picture = '';
                }
            }else{
                $picture = '';
            }

            //Prepare array of user data
            $userData = array(
                'name' => $this->input->post('name'),
                'email' => $this->input->post('email'),
                'picture' => $picture
            );

            //Pass user data to model
            $insertUserData = $this->user->insert($userData);

            //Storing insertion status message.
            if($insertUserData){
                $this->session->set_flashdata('success_msg', 'User data have been added successfully.');
            }else{
                $this->session->set_flashdata('error_msg', 'Some problems occured, please try again.');
            }
        }
        //Form for adding user data
        $this->load->view('users/add');
    }
}
We’ve used some required Preferences in our file upload configuration. You can get all the available Preferences from here – https://codeigniter.com/user_guide/libraries/file_uploading.html#preferences
Create a model called User.php. Place the following code in it and save this file to application/models/ directory.
insert() function insert the provided data into the users table.
<?php if ( ! defined('BASEPATH')) exit('No direct script access allowed');
class User extends CI_Model{
    function __construct() {
        $this->tableName = 'users';
        $this->primaryKey = 'id';
    }

    public function insert($data = array()){
        if(!array_key_exists("created",$data)){
            $data['created'] = date("Y-m-d H:i:s");
        }
        if(!array_key_exists("modified",$data)){
            $data['modified'] = date("Y-m-d H:i:s");
        }
        $insert = $this->db->insert($this->tableName,$data);
        if($insert){
            return $this->db->insert_id();
        }else{
            return false;
        }
    }
}
Create a view called add.php. Place the following code in it and save this file to application/views/users/ directory.
add.php file contains form HTML, it is used to collect the user data and submit to the controller.
<?php echo $this->session->flashdata('success_msg'); ?>
<?php echo $this->session->flashdata('error_msg'); ?>
<form role="form" method="post" enctype="multipart/form-data">
    <div class="panel">
        <div class="panel-body">
            <div class="form-group">
                <label>Picture</label>
                <input class="form-control" type="file" name="picture" />
            </div>
            <div class="form-group">
                <label>Name</label>
                <input class="form-control" type="text" name="name" />
            </div>
            <div class="form-group">
                <label>Email</label>
                <input class="form-control" type="text" name="email" />
            </div>
             <div class="form-group">
                <input type="submit" class="btn btn-warning" name="userSubmit" value="Add">
            </div>
        </div>
    </div>
</form>
Create the uploads/images/ directory to storing the uploaded images.
In this tutorial, we’ve trying to show the basic example of CodeIgniter file upload. We hope you have learned how to upload a file in CodeIgniter using upload library. If you have any questions about CodeIgniter file upload, let us know by commenting here.
Looking for expert assistance to implement or extend this script’s functionality? Submit a Service Request
💰 Budget-friendly • 🌍 Global clients • 🚀 Production-ready solutions


Its working well!:-) Thank you!
Hey, it is a really cool tutorial but assume a user want to upload multiple images at once, how would that work? Would you need an images table? Why don’t you do another tutorial with that in mind. Thanks
superb coded, explain, thanks…
really thank your sir. Such as nice tutorial…..
nice tutorial..
I want to upload video only, so what i have to update in this code? Also i want to tell you i am using ionic2 for front end. So i will use codeigniter for backend and ionic2 for frontend. Please help me. Thanks.
thanks..
hi, do you know how to add multiple file upload? for example: 1 user have to upload Photo, CV, Driver license, etc separated in one time clicking submit button.
Thank you in advance 😉
How do I connect to the database?
Open the
application/config/database.phpfile and specify the hostname, username, password, and database name. CodeIgniter will connect to your specified database.I can insert the data into table but the file is not uploaded…does it need to declare in autoload?
No, the
uploadlibrary is loaded into theadd()method ofUserscontroller. So, you don’t need to load it into the autoload. In your case, you can check whether theuploads/images/directory has writable permission.Thank you, and waiting for that.
Can you show an example with form validation, I mean for this script If I add validation rule, If name and email field is not valid and File field valid then file should not upload… How to do that, without js/ajax.
I have asked the same question at StackOverlfow, here is the link for more about my question::::
http://stackoverflow.com/questions/41414281/is-there-a-better-way-of-multipart-form-data-validation
@Salih We’ll try to publish your requested tutorial soon. Please subscribe our newsletter to get notified.
thank you , your tutorial let me learn more
thank u i used this code…it works great…
great code
Thanks helpful tutorial, could you make some vote system tutorial ?
Big thanks from me.
@Gus We’ll try to publish your requested tutorial soon. Meanwhile, subscribe our newsletter to get the notification about new tutorial.
very good tutorial it is very helpful for me