close
CakePHP is an open source web application framework. It follows the Model-View-Controller (MVC) approach and written in PHP. CakePHP makes building web applications simpler, faster and require less code.
This CakePHP tutorial will drive you to the right direction for getting started with CakePHP framework and provide basic guide of CakePHP application development. Our step by step cakePHP tutorial helps beginners for install and configures the CakePHP application. You can learn CakePHP from scratch with our easy tutorial. Also we will develop a sample CakePHP project and it will help you for better understanding the whole process.
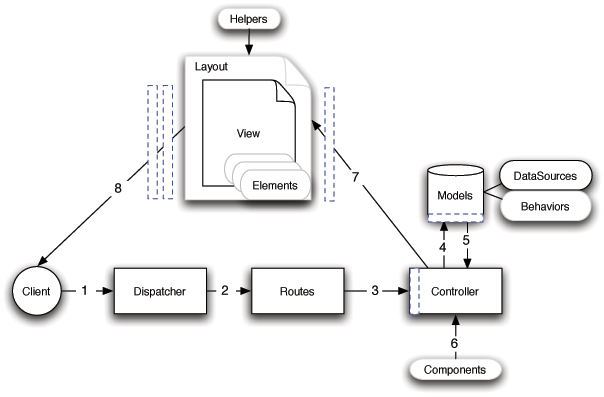
Application flow of the CakePHP are given below:
At first you need to download the stable release of CakePHP from Github – CakePHP Releases
cakephp/.cakephp/ folder to the localhost server. Your directory setup looks like the following.
.htaccessindex.phpREADMEcakephp_db.app/Config/core.php file and make the following changes.
Security.salt at Line no.225.
Configure::write('Security.salt', 'DYhG93b0qyJfIxfs2guVoUubWwvniR2G0FgaC9mi');
Configure::write('Security.salt', 'codexworld');
Security.cipherSeed at Line no.230.
Configure::write('Security.cipherSeed', '76859309657453542496749683645');
Configure::write('Security.cipherSeed', '123456');
database.php.default file to database.php at the app/Config/ directory.public $default = array(
'datasource' => 'Database/Mysql',
'persistent' => false,
'host' => 'localhost',
'login' => 'user',
'password' => 'password',
'database' => 'database_name',
'prefix' => '',
//'encoding' => 'utf8',
);
public $default = array(
    'datasource' => 'Database/Mysql',
    'persistent' => false,
    'host' => 'localhost',
    'login' => 'root',
    'password' => '',
    'database' => 'cakephp_db',
    'prefix' => '',
    //'encoding' => 'utf8',
);
http://localhost/cakephp/) at the browser.
PostsController, LatestPostsController)Post, LatestPost)posts, latest_posts)postDetails() function of PostController class will look for a view template in app/View/Post/post_details.ctp. The basic pattern is app/View/Controller/underscored_function_name.ctpIn this sample project we will create a products table at the cakephp_db database. And we will insert some data manually at this table. We will fetch and display products in our sample CakePHP project.
Table Creation & Data Insert: Following SQL is used for products table creation.
CREATE TABLE `products` (
 `id` int(11) NOT NULL AUTO_INCREMENT,
 `title` varchar(255) COLLATE utf8_unicode_ci NOT NULL,
 `description` text COLLATE utf8_unicode_ci NOT NULL,
 `price` float(10,2) NOT NULL,
 `created` datetime NOT NULL,
 `modified` datetime NOT NULL,
 `status` tinyint(1) NOT NULL DEFAULT '1',
 PRIMARY KEY (`id`)
) ENGINE=InnoDB AUTO_INCREMENT=5 DEFAULT CHARSET=utf8 COLLATE=utf8_unicode_ci
Once table creation is completed, insert some demo product data into this table.
Controller: Create a products controller with ProductsController class into the app/Controller/ directory. Controller file and class name should be ProductsController.
<?php
class ProductsController extends AppController {
    public function index() {
        //fetch products resultset from databse
        $products = $this->Product->find('all',array('fields'=>array('Product.id','Product.title','Product.description','Product.price','Product.created','Product.status'),'conditions'=>array('Product.status'=>1)));

        //set products data and pass to the view
        $this->set('products',$products);
    }
}
View: Create view for display products in app/View/ directory. The controller class name is ProductsController and method is index. For creating the index view, we need to Products/ directory and a index.ctp file. So, the complete path of the view file (index.ctp) would be app/View/Products/index.ctp.
<ul>
<?php foreach($products as $row): ?>
    <li>
        <h1><?php echo $row['Product']['title']; ?></h1>
        <h6>Price: <?php echo $row['Product']['price']; ?></h6>
        <p><?php echo $row['Product']['description']; ?></p>
    </li>
<?php endforeach; ?>
</ul>
Model: Model creation is not required until you need validation or associations.
Routes: Open the app/Config/routes.php file and set the default controller and action. Go to the line no.27 and change controller name from "pages" to "products" and action name from "display" to "index". If you want to load the different view for this action, you need to pass the view file name after the action element.
Router::connect('/', array('controller' => 'products', 'action' => 'index'));
Testing: Run the base URL at the browser, products list would displayed.

Our next post will explain about layout, database and advanced label of CakePHP. Please follow CodexWorld for notify about the next post.
Looking for expert assistance to implement or extend this script’s functionality? Submit a Service Request
💰 Budget-friendly • 🌍 Global clients • 🚀 Production-ready solutions

Thank you,it’s very usefull tutorial
Good
what is the complete path for the controller
really nice tutorial for beginers
very nice tutorial for learning basics. thanks alot
WAO great tutorial for beginners of cakephp ….Thanks a lot..
thank you ….
Very Simple and Understandable.Thank You So much…
Thanks a lot. Nice job.
Very Nyc tutorial
sir it was awesome it help me a lot…thanQ.
It is so simple and understandable description.
Thank you sooooooooooo much
really a very very helping and easy tutorial.
THANKS
really good explain
Nice post.Simple and easy to understand for the beginner
Realy very good
very nice tutorial for learning basics.
i need add ,edit and delete funationality tutorial of cake php 2.x version.please provide me soon.Please help me….
please send the code of cakephp 3.2 for login,registration page with database connection and with routing. please if possible…send on my mail mandeepkhaleriya.08@gmail.com.Please do n’t ignore. i have urgently need for that.please help me……
@Mandeep We’ve already published CakePHP 3.x Tutorial for Beginners, you can read it from here – http://www.codexworld.com/cakephp-3-x-tutorial-for-beginners/.
A1 totoural for beginner
I appreciate this.
Thanx so much …its too easy to understand cakephp now
nice tutorial …………………thanks
Excellent tutorial for beginners!
Well Done.
JCS
nice tutorial and very usefull to learn cakephp 3 can you update more on cake php3.. thanks allot
this tutorial made it easy to initialize with cakephp
nice tutorial and very usefull to learn cakephp 3 can you update more on cake php3..
@Raghul
Thanks. Of course, other tutorials will come soon. Before that, you can read this tutorial – CakePHP Tutorial Part 2: Add, Edit and Delete Operations
Thanks a lot, its very useful for beginners. when would come your next post..
@Vivek
We’ve already published CakePHP Tutorial Part 2 and next is coming soon.
Thank you,it’s very usefull tutorial
Nice Tutorial for beginners,,,Keep it up
Nice tutorial i really understood it easily…
Than You…
thank you
greatest codex world, it’s readable,considerable ,?
Great tutorial for beginners
its real awesome tutorial i understand completed, thanks for share the information, i am waiting for your next post..
very nice descriptions..really simple:)
Thank you so much to help me to understand cakephp.
Thank you so much to help me to understand Naming convention in cakephp
I need next post.
Simple and nice tutorial.