close
TinyMCE is web-based WYSIWYG editor that converts HTML elements to an editor. It provides an instant ability to add HTML editor to textarea in the web page. You can easily add TinyMCE editor to HTML element by writing minimal JavaScript Code.
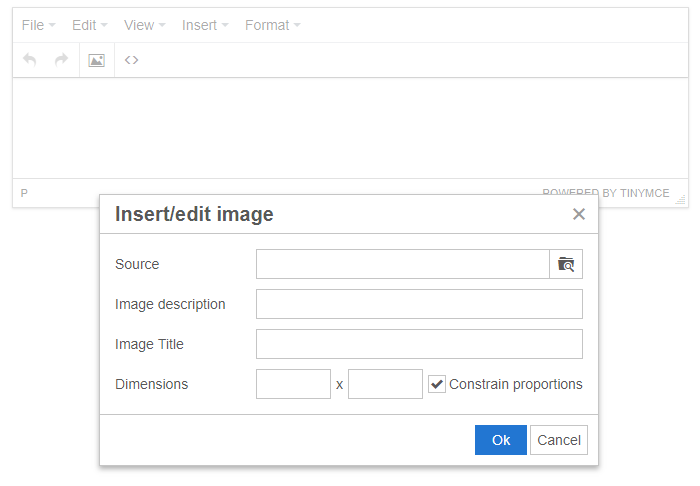
In our earlier tutorial, we have shown how you can add an editor to textarea using TinyMCE jQuery plugin. TinyMCE has many advanced features which make your WYSIWYG editor more powerful and user-friendly. Along with the text content, the image is the most useful element to insert in the editor. In this tutorial, we will show you how to add a local file picker to insert image in TinyMCE editor.
In the example code, we will integrate image uploading functionality in TinyMCE editor. This will add local file picker to the Image dialog and allow the user to upload image in TinyMCE editor.
Specify an HTML element (textarea) to add a WYSIWYG HTML Editor.
<textarea name="editor" id="editor"></textarea>
At first download the TinyMCE jQuery plugin from here and include the TinyMCE JS library in the web page.
<script type="text/javascript" src="tinymce/tinymce.min.js"></script>
Note that: All the necessary TinyMCE libraries are included in our source code. So, you don’t need to download the TinyMCE jQuery plugin separately.
JavaScript Code:
The following JavaScript code will replace textarea with TinyMCE editor instance by passing the selector #editor.
<script>
tinymce.init({
  selector: '#editor',
  plugins: 'image code',
  toolbar: 'undo redo | link image | code',
  // enable title field in the Image dialog
  image_title: true,
  // enable automatic uploads of images represented by blob or data URIs
  automatic_uploads: true,
  // add custom filepicker only to Image dialog
  file_picker_types: 'image',
  file_picker_callback: function(cb, value, meta) {
    var input = document.createElement('input');
    input.setAttribute('type', 'file');
    input.setAttribute('accept', 'image/*');

    input.onchange = function() {
      var file = this.files[0];
      var reader = new FileReader();

      reader.onload = function () {
        var id = 'blobid' + (new Date()).getTime();
        var blobCache =  tinymce.activeEditor.editorUpload.blobCache;
        var base64 = reader.result.split(',')[1];
        var blobInfo = blobCache.create(id, file, base64);
        blobCache.add(blobInfo);

        // call the callback and populate the Title field with the file name
        cb(blobInfo.blobUri(), { title: file.name });
      };
      reader.readAsDataURL(file);
    };

    input.click();
  }
});
</script>
To save the TinyMCE editor content, an HTML form needs to be submitted. Once the <form> is submitted, you can get the editor HTML content using $_POST variable in PHP.
$_POST['editor'];
How to Export TinyMCE Content to MS Word Document
Looking for expert assistance to implement or extend this script’s functionality? Submit a Service Request
💰 Budget-friendly • 🌍 Global clients • 🚀 Production-ready solutions


Wow, great code!
How can I download the tiny mCE jquery plugin ?
Please help
Thank you
Hi,
Add a Local File Picker to Image Dialog in TinyMCE, this is good but if their is more insert option is very good for use easy. suppose i want to insert back link their is no more option. please help me to insert more option in the editor. only insert->image. send me as soon as possible. really you did great job for us. great tutorial.
thank you.
I’m not interesting storing images in blob format (I guess as much as the most readers of this tutorial).
Is it possible to explain how or what should I change in this code, in order tinyMCE to upload a single local selected image file into remote server?
See this tutorial – https://www.codexworld.com/tinymce-upload-image-to-server-using-php/
This is just amazing. Thanks a ton. Worked straight off the bat for me. Even on version 5. Can you help me understand this better?
In my understanding what’s really happening here is
1. The image is sent in the context of image picker callback function
2. We use file reader to extract the blob
3. We update the source field in the dialog with the blob. (Can you please elaborate this step? It’ll be really helpful for me to better my skills)
Is there an example or pseudo code for saving to a database and reading back? Is the blob stored on the localhost or is it cached in the browser using the code as is.
Great script man….
How to add this functionality using yii2
I have tried but not working
Please guide me
Thanks
Hi there, this is great tutorial. Just a question, where is the image saved to?
The image will be inserted in the editor as BLOB format. You can save the entire content including the image in the database.