close
WordPress Widgets is used to add content and features to Sidebar. Some default widgets are come with the WordPress (Search, Categories, Tag Cloud etc.). We can also create custom widgets as per our needs.
Today we will learn how to create custom WordPress widgets. For testing purpose we will create an Author Profile Widget. Author Widget would be used to display author information (Picture, Name, Introduction, Location, and Email) at the sidebar. Follow the step by step instructions given below.
Create a folder named widgets into the current theme directory.
Create a PHP file named author-widget.php.
Provide widget details under the comment tags (It is not mandatory).
/**
 * Plugin Name: Author Widget
 * Plugin URI: create-custom-wordpress-widget-from-scratch
 * Description: Provides a widget for display blog author information
 * Version: 1.0
 * Author: CodexWorld
 * Author URI: http://www.codexworld.com
 */
Using the add_action() function we will hook codexworld_author_widget() to widgets_init action. codexworld_author_widget() function register a widget with Codexworld_Author_Widget class.
// load widget
add_action( 'widgets_init', 'codexworld_author_widget' );

// Register widget
function codexworld_author_widget() {
    register_widget( 'Codexworld_Author_Widget' );
}
Codexworld_Author_Widget class extends WP_Widget.
// Widget class
class Codexworld_Author_Widget extends WP_Widget {

}
Into the Codexworld_Author_Widget class, codexworld_author_widget() function will used to create custom widget.
function codexworld_author_widget() {

    // Widget settings
    $widget_ops = array (
        'classname' => 'codexworld_author_widget',
        'description' => __('A widget for display author information')
    );

    // Widget control settings
    $control_ops = array (
        'width' => 300,
        'height' => 350,
        'id_base' => 'codexworld_author_widget'
    );

    // Create the widget
    $this->WP_Widget( 'codexworld_author_widget', __('Author Profile'), $widget_ops, $control_ops );

}
We will use widget() function for display the widget content at the sidebar.
/**
 * Display Widget
 */
function widget( $args, $instance ) {
    extract( $args );

    // variables from the widget settings
    $title = apply_filters('widget_title', $instance['title'] );
    $name = $instance['name'];
    $picture = $instance['picture'];
    $introduction = $instance['introduction'];
    $location = $instance['location'];
    $email = $instance['email'];

    // Before widget (defined by theme functions file)
    echo $before_widget;

    // Display widget title
    if ( $title )
        echo $before_title . $title . $after_title;

    // Display author picture
    echo '<div class="profile-pic">';
    if ( $picture )
        echo '<img src="'.$picture.'" alt="'.$name.'\'s Picture" title="'.$name.'"/>';
    echo '</div>';

    echo '<div class="profile_meta">';
    // Display the author name
    if ( $name )
        echo '<span><b>'.$name.'</b></span><br/>';

    // Display author introduction
    if ( $introduction )
        echo '<span>'.$introduction.'</span><br/>';


    // Display author location
    if ( $location )
        echo '<span>'.$location.'</span><br/>';

    // Display author email
    if ( $email )
        echo '<span><a href="mailto:'.$email.'">'.str_replace("@",'[at]',$email).'</a></span><br/>';
    echo '</div>';

    // After widget (defined by theme functions file)
    echo $after_widget;
}
update() function helps to update the widget data.
/**
 * Update Widget
 */
function update( $new_instance, $old_instance ) {
    $instance = $old_instance;

    // Strip tags to remove HTML (important for text inputs)
    $instance['title'] = strip_tags($new_instance['title']);

    // No need to strip tags
    $instance['name'] = $new_instance['name'];
    $instance['picture'] = $new_instance['picture'];
    $instance['introduction'] = $new_instance['introduction'];
    $instance['location'] = $new_instance['location'];
    $instance['email'] = $new_instance['email'];

    return $instance;
}
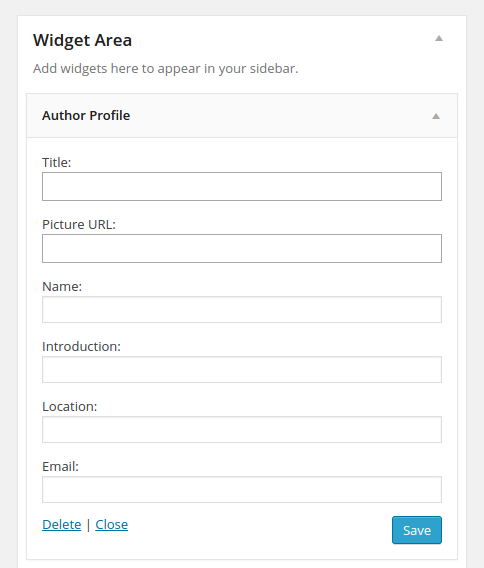
form() function is used to appearing the widget form at the wp-admin Widgets area.
/**
 * Displays the widget settings controls on the widget panel
 */
function form( $instance ) {

    // Set up some default widget settings
    $defaults = array(

        'title' => '',
        'picture' => '',
        'name' => '',
        'introduction' => '',
        'location' => '',
        'email' => '',
    );

    $instance = wp_parse_args( (array) $instance, $defaults ); ?>

    <!-- Widget Title: Text Input -->
    <p>
        <label for="<?php echo $this->get_field_id( 'title' ); ?>"><?php _e('Title:') ?></label>
        <input class="widefat" id="<?php echo $this->get_field_id( 'title' ); ?>" name="<?php echo $this->get_field_name( 'title' ); ?>" value="<?php echo $instance['title']; ?>" />
    </p>

    <!-- Picture URL: Text Input -->
    <p>
        <label for="<?php echo $this->get_field_id( 'picture' ); ?>"><?php _e('Picture URL:') ?></label>
        <input class="widefat" id="<?php echo $this->get_field_id( 'picture' ); ?>" name="<?php echo $this->get_field_name( 'picture' ); ?>" value="<?php echo $instance['picture']; ?>" />
    </p>

    <!-- Name: Text Input -->
    <p>
        <label for="<?php echo $this->get_field_id( 'name' ); ?>"><?php _e('Name:') ?></label>
        <input type="text" class="widefat" id="<?php echo $this->get_field_id( 'name' ); ?>" name="<?php echo $this->get_field_name( 'name' ); ?>" value="<?php echo $instance['name']; ?>" />
    </p>

    <!-- Introduction: Text Input -->
    <p>
        <label for="<?php echo $this->get_field_id( 'introduction' ); ?>"><?php _e('Introduction:') ?></label>
        <input type="text" class="widefat" id="<?php echo $this->get_field_id( 'introduction' ); ?>" name="<?php echo $this->get_field_name( 'introduction' ); ?>" value="<?php echo $instance['introduction']; ?>" />
    </p>

    <!-- Location: Text Input -->
    <p>
        <label for="<?php echo $this->get_field_id( 'location' ); ?>"><?php _e('Location:') ?></label>
        <input type="text" class="widefat" id="<?php echo $this->get_field_id( 'location' ); ?>" name="<?php echo $this->get_field_name( 'location' ); ?>" value="<?php echo $instance['location']; ?>" />
    </p>

    <!-- Email: Text Input -->
    <p>
        <label for="<?php echo $this->get_field_id( 'email' ); ?>"><?php _e('Email:') ?></label>
        <input type="text" class="widefat" id="<?php echo $this->get_field_id( 'email' ); ?>" name="<?php echo $this->get_field_name( 'email' ); ?>" value="<?php echo $instance['email']; ?>" />
    </p>
<?php
}
You can get the full script of the author-widget.php from the below Download Source Code link.
Now open the function.php file of current theme and include the author-widget.php file by the following code.
/**
 * Add the Custom Author Profile Widget
 */
require get_template_directory() . '/widgets/author-widget.php';
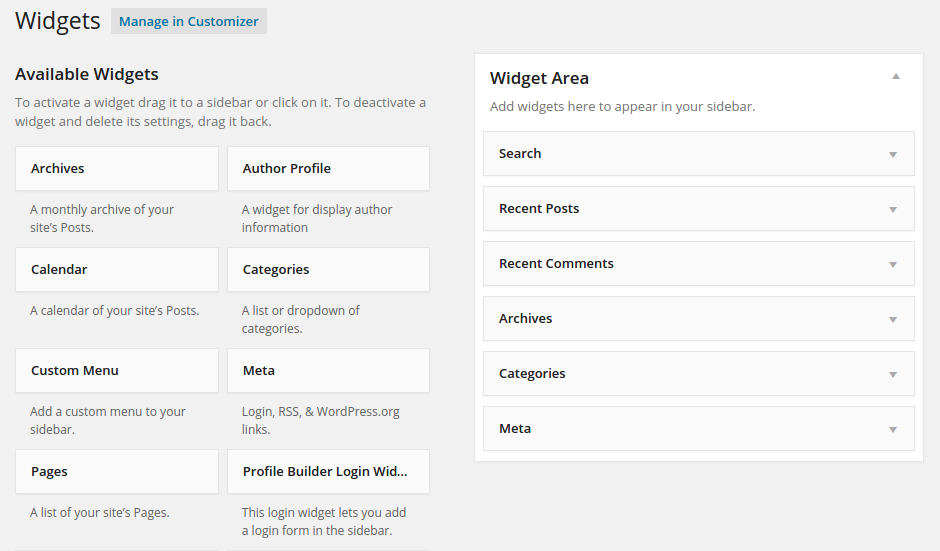
Go to the WP Admin Widgets section (http://localhost/nitya/wordpress/wp-admin/widgets.php).

Do you want to get implementation help, or enhance the functionality of this script? Click here to Submit Service Request


Thanks for the post it really helped me to create my own version of wrod[ress widget. Will be looking forward to seeing more from you in the future.