close
The full form of WYSIWYG is What You See Is What You Get, it lets users see what the end result will look like when the document is printed. Basically, the WYSIWYG editor is driven by JavaScript which lets users enter the formatted text. The WYSIWYG editor is converting the formatted text to HTML when the web form is submitted to the server.
When you need to accept formatted text content or HTML content from the users on your website, using the WYSIWYG editor to textarea is required. There are many jQuery plugins are available for adding WYSIWYG editor to textarea. In this article, we’ll provide information about the best WYSIWYG HTML editor and show how to add an HTML editor to textarea on the web page.
TinyMCE is a web-based WYSIWYG editor that enables you to convert HTML textarea fields or other HTML elements to an editor. You can easily embed a rich text editor in the web page using the TinyMCE plugin. In this tutorial, we will show you the simple steps to add a TinyMCE editor to your website by writing minimal JavaScript Code.
Before getting started to integrate the TinyMCE editor in HTML, download the latest version of the TinyMCE jQuery plugin from the official TinyMCE site. Extract it and placed it into the web application directory.
Note that: You don’t need to download the plugin file separately, all the required files exist in our source code package.
Load the tinymce.min.js file from the TinyMCE plugin directory to include the TinyMCE library in HTML page.
<script src="tinymce/tinymce.min.js"></script>
Now, we will show you how to attach the TinyMCE editor to an HTML element and convert textarea to a rich text HTML editor on the webpage.
HTML Code:
Define a Textarea input HTML where the WYSIWYG HTML Editor will be added.
<textarea id="myTextarea"></textarea>
JavaScript Code:
Initialize TinyMCE plugin: Use the tinymce.init() method to initialize the TinyMCE plugin and attach it to the HTML element on the webpage. The element needs to be specified in the selector option and passed as an object in tinymce.init().
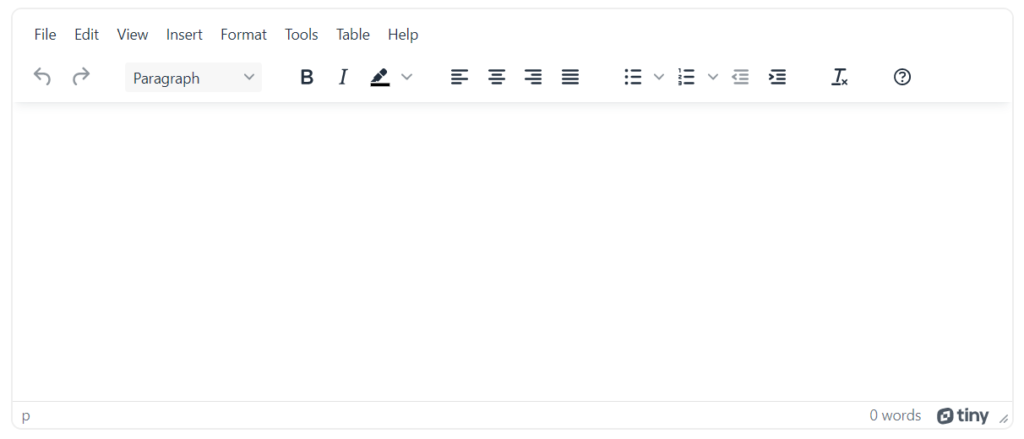
The following example code will replace the Textarea field with the TinyMCE editor instance using the selector #myTextarea. This code provides some default features of the TinyMCE editor for basic uses.
tinymce.init({
    selector: '#myTextarea'
});
Now, the textarea element will replace with an HTML editor and display like the following screen.
Some useful configuration options of the TinyMCE plugin are given below.
height:
Use the height option to set the height of the editor including the menu and toolbars.
tinymce.init({
    selector: '#myTextarea',
    height: 300
});
width:
Use the width option to set the width of the editor.
tinymce.init({
    selector: '#myTextarea',
    width: 300
});
placeholder:
If you want to set the placeholder text from JavaScript, use the placeholder option in tinymce.init() object.
tinymce.init({
    selector: '#myTextarea',
    placeholder: 'Type here...'
});
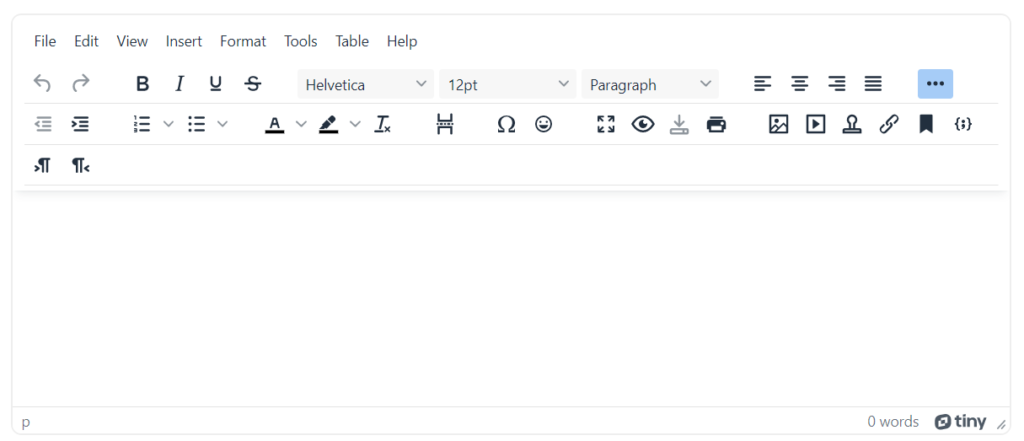
The following example code displays all features available in TinyMCE for advanced uses.
tinymce.init({
    selector: '#myTextarea',
    plugins: 'preview importcss searchreplace autolink autosave save directionality code visualblocks visualchars fullscreen image link media template codesample table charmap pagebreak nonbreaking anchor insertdatetime advlist lists wordcount help charmap quickbars emoticons',
    menubar: 'file edit view insert format tools table help',
    toolbar: 'undo redo | bold italic underline strikethrough | fontfamily fontsize blocks | alignleft aligncenter alignright alignjustify | outdent indent |  numlist bullist | forecolor backcolor removeformat | pagebreak | charmap emoticons | fullscreen  preview save print | insertfile image media template link anchor codesample | ltr rtl',
    toolbar_sticky: true,
    autosave_ask_before_unload: true,
    autosave_interval: '30s',
    autosave_prefix: '{path}{query}-{id}-',
    autosave_restore_when_empty: false,
    autosave_retention: '2m',
    image_advtab: true,
    link_list: [
      { title: 'My page 1', value: 'https://www.codexworld.com' },
      { title: 'My page 2', value: 'http://www.codexqa.com' }
    ],
    image_list: [
      { title: 'My page 1', value: 'https://www.codexworld.com' },
      { title: 'My page 2', value: 'http://www.codexqa.com' }
    ],
    image_class_list: [
      { title: 'None', value: '' },
      { title: 'Some class', value: 'class-name' }
    ],
    importcss_append: true,
    file_picker_callback: (callback, value, meta) => {
      /* Provide file and text for the link dialog */
      if (meta.filetype === 'file') {
        callback('https://www.google.com/logos/google.jpg', { text: 'My text' });
      }

      /* Provide image and alt text for the image dialog */
      if (meta.filetype === 'image') {
        callback('https://www.google.com/logos/google.jpg', { alt: 'My alt text' });
      }

      /* Provide alternative source and posted for the media dialog */
      if (meta.filetype === 'media') {
        callback('movie.mp4', { source2: 'alt.ogg', poster: 'https://www.google.com/logos/google.jpg' });
      }
    },
    templates: [
      { title: 'New Table', description: 'creates a new table', content: '<div class="mceTmpl"><table width="98%%"  border="0" cellspacing="0" cellpadding="0"><tr><th scope="col"> </th><th scope="col"> </th></tr><tr><td> </td><td> </td></tr></table></div>' },
      { title: 'Starting my story', description: 'A cure for writers block', content: 'Once upon a time...' },
      { title: 'New list with dates', description: 'New List with dates', content: '<div class="mceTmpl"><span class="cdate">cdate</span><br><span class="mdate">mdate</span><h2>My List</h2><ul><li></li><li></li></ul></div>' }
    ],
    template_cdate_format: '[Date Created (CDATE): %m/%d/%Y : %H:%M:%S]',
    template_mdate_format: '[Date Modified (MDATE): %m/%d/%Y : %H:%M:%S]',
    height: 400,
    image_caption: true,
    quickbars_selection_toolbar: 'bold italic | quicklink h2 h3 blockquote quickimage quicktable',
    noneditable_class: 'mceNonEditable',
    toolbar_mode: 'sliding',
    contextmenu: 'link image table',
    content_style: 'body { font-family:Helvetica,Arial,sans-serif; font-size:16px }'
});
Server-side Image Upload in TinyMCE Editor using PHP
Use <form> element to submit editor HTML content to the server-side script.
<form method="post" action="submit.php">
    <!-- Editor input -->
    <textarea id="myTextarea" name="editor_input"></textarea>

    <!-- Submit button -->
    <input type="submit" name="submit" value="Submit">
</form>
In the server-side script (submit.php), you can get the HTML content from TinyMCE using the $_POST method in PHP.
<?php

// If the form is submitted
if(isset($_POST['submit'])){
    // Get editor content
    $editor_content = $_POST['editor_input'];

    // Render editor HTML
    echo $editor_content;
}

?>
Save WYSIWYG Editor Content in Database using PHP and MySQL
Do you want to get implementation help, or enhance the functionality of this script? Click here to Submit Service Request


Thank you so much, outstanding, some tweaking here and there with php, but did manage to get it to fly on some very Old php scripting, I’m impressed, thank you again !!
How to disable tinymce pdf support.
You saved my day !!! I spent the whole morning trying to make a rich text field in a form, and I was about to quit. Then I found your recommendation and it worked like heaven. I tried to use Quill.js, Draft, Slate, … you name it … but nothing worked. Now, it is working very well … Thanks a lot !
how to browse image?
very helpful it is
Please help how to add this plugin in multitime in one php page
I am very pleased and grateful to have got this tutorial from you. I have seen same severally, but your showing how the data would be post and giving the actual variable to catch this is superb.
Thanks